Language


 No results found
Google Pixel eSIM: How it works and how to set it up
Learn how to activate an eSIM on your Google Pixel phone using a QR code or activation code. Plus, how to use dual SIMs on the Google Pixel.

Ever lost connection on your Google Pixel due to a lost or damaged SIM card? Or struggle with the ejector tool just to switch networks? It’s time for an upgrade.
With an eSIM, you can set up your mobile plan without the hassle of physical SIMs — just a few taps on your Pixel, and you’re all set.
In this article, we show you how to activate your eSIM on a Google Pixel in a few easy steps and discuss the best options for staying connected using one.

Connect to the fastest networks
International eSIMs, local networks. Enjoy the best of both worlds with Holafly.
What is an eSIM on Google Pixel?
An eSIM on Google Pixel is a digital version of the physical SIM card embedded into your phone. So all you need is an eSIM plan to get connected.
You can activate it through your phone’s settings, but you might need to use your carrier’s app or website to buy and download the eSIM plan.
Once you’ve got the plan, a few taps in your settings will get you connected.
It’s a simple way to manage multiple numbers, switch carriers, or travel without the hassle of swapping out SIM cards.
Which Google Pixel models support eSIM?
Is your Google Pixel eSIM compatible? Here’s a quick rundown of some eSIM-supported phones:
- Google Pixel 2 Series (only phones bought with Google Fi service in the US)
- Google Pixel 3 Series (excluding phones from Australia, Taiwan, Japan, and non-Google Fi/Sprint US or Canadian carriers)
- Google Pixel 4 series
- Google Pixel 5 series
- Google Pixel 6 series
- Google Pixel 7 series
- Google Pixel 8 series
- Google Pixel 9 series
- Google Pixel 10 Series
You can now have two eSIMs on the same Google Pixel, letting you use both your personal and work numbers or easily switch between travel plans.
Note: The Pixel 3A and 3A XL have been discontinued as of July 2020. However, with newer Pixel models, like the Pixel 7 series and later, you can use two eSIM profiles at the same time.
Note: The Pixel 3A and 3A XL have been discontinued as of July 2020. However, with newer Pixel models, like the Pixel 7 series and later, you can use two eSIM profiles at the same time.
Fun fact: Google was one of the first major smartphone manufacturers to introduce eSIM technology, starting with the Google Pixel 2 in October 2017.
Apple soon followed, incorporating eSIM in the Apple Watch Series 3 (released in September 2017) and later in the iPhone XS, XS Max, and XR in 2018.
How to activate an eSIM on Google Pixel
You have two methods to install and activate your eSIM: scanning a QR code or entering an activation code. But first, you need to run through a quick checklist:
- ✅ Check compatibility. Confirm your Google Pixel is eSIM-compatible. Most newer models do, but it’s always good to double-check.
- ✅Get your eSIM. Purchase an eSIM plan. You’ll receive a QR code or an activation code — make sure you have it handy.
- ✅Get a reliable internet connection. Check if you have a stable internet connection to complete the setup.
Got everything ready? Let’s dive into how to activate eSIM on Google Pixel.
How to add an eSIM to Google Pixel via a QR code
After purchasing an eSIM, you’ll receive a QR code in your email or on paper. Simply scan the QR code and follow these simple steps to activate it.
Time needed: Five minutes
Steps to download eSIM on a Google Pixel:
- Open the “Settings” app.
- Scroll down and tap “Network & internet”.
- Find “SIMs or Mobile Network”. If you see a + icon next to SIMs, tap on it. Otherwise, tap on SIMs and look for Add or +.
- Tap on “Download a SIM instead” or “Add eSIM”. Depending on your Pixel model, you might see “Don’t have a SIM card?” message — if so, tap on this.
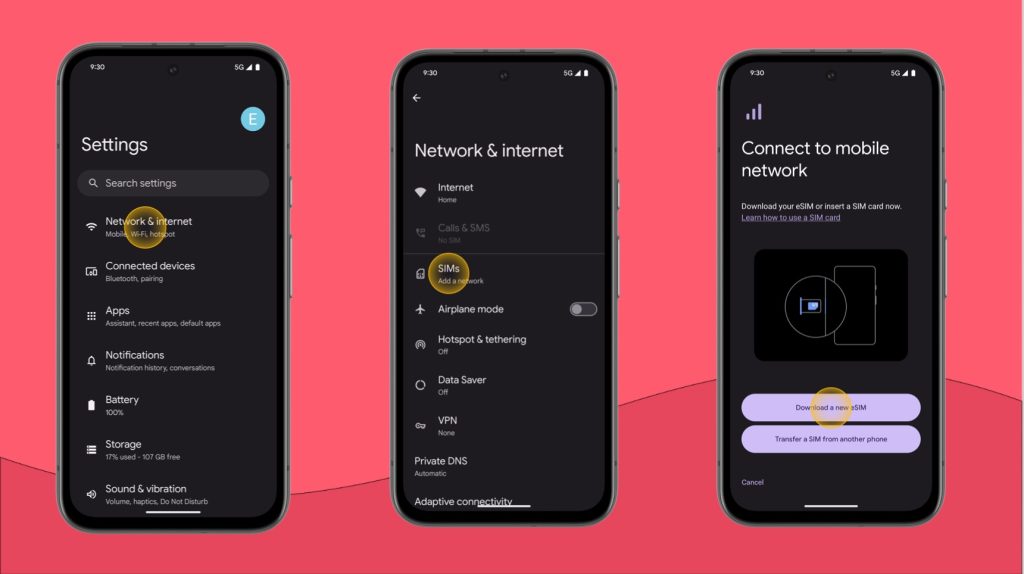
- Confirm the eSIM download. You’ll now see a screen pop-up that explains what is an eSIM. Tap “Next” to proceed.
- On the “Choose how to add SIM” screen, tap “QR code”.
- Scan the QR code. Wait for eSIM download. Once scanned, you’ll see a Downloading message. A progress bar will show the download status. This could take a few moments depending on your internet speed.
- Activate the eSIM. After your download completes, you’ll see an “Activate” or “Turn on” button. Tap this button to activate the eSIM.
- Create a custom label. To do this, head back to the SIMs menu and find your new eSIM in the list. Tap on it to open its settings. Look for an edit icon (usually a pencil ✏️) at the top right. Type a custom name in the text field (e.g., Work eSIM, Travel). If available, tap on the color option to choose a color for the label. Tap “Save or Done” to confirm your changes.
- Set eSIM preferences. You might be asked to set this eSIM as your main option for cellular data, texts, or calls. Pick your preferences, or select “Not now” to decide later.
How to add your eSIM to Google Pixel via activation code
You can also add an eSIM to your phone using an activation code from your operator.
In this case, follow the guide to step six, but instead of scanning the QR code, select “Use Activation Code”.
You’ll be asked to enter the SM-DP+ Address and the Activation Code. Your carrier typically sends these details via email or message.
- SM-DP+ Address: This is a server address that looks something like cel.prod.ondemandconnectivity.com
- Activation code: A long string of characters, e.g., 3CF00C823D4C3148D3375240367EB51DC3989759D80B7B0A2B868557A653EC43
After you enter the details, tap “Next” to begin the eSIM download and activation process.ss.

How to use dual SIMs on your Google Pixel phone
If your Google Pixel phone supports dual SIMs, you can use the Dual SIM Dual Standby (DSDS) option. This means both SIMs can receive calls and texts, but only one can be used for data at a time.
You can easily switch between SIMs — use one for calls and the other for data. This is perfect for keeping work and personal lines separate or using a local SIM while traveling.
Please note that this feature is subject to your carrier’s availability. For models like the Pixel 7 and newer, you can use two eSIMs with DSDS, but only if your carrier supports it.
Once you’ve installed both eSIMs, follow these steps to set your preferences.
- Open your Settings app.
- Tap “Network & Internet” > “SIMs” > “Your Network”.
- For each network, set your preferences.
You can set the following preferences:
- Data: Turn on Mobile data. Remember, you can only use one SIM for data at a time. If you already have one set up, you’ll get a notification.
- Calls: Tap “Call Preference”. Then, pick your main carrier, or tap “Ask me every time”.
- Texts: Tap “SMS Preference”. Then pick your main carrier, or tap “Ask me every time”.
Wrapping up your guide to an eSIM on Google Pixel
Whether you’re fed up with physical SIM cards, need to switch easily between work and personal numbers, or want to stay connected while traveling without the hassle of swapping SIMs, an eSIM has you covered.
For a reliable eSIM, choose Holafly! With Holafly, you can stay connected with ease. They offer separate eSIM plans for over 200 destinations.
Setting up takes approximately five minutes, and you can change your eSIM plans with the Holafly app — even if you’re halfway around the world.
But if you need a long-term plan for your Google Pixel eSIM, use Holafly Plans, a monthly eSIM subscription with coverage in 170+ destinations worldwide.
Choose from 25 GB to unlimited data, and get 5G speeds, and up to unlimited hotspot data with your Google Pixel eSIM-compatible phone!

Peace of mind before you fly
Set up your eSIM before travel and get unlimited data on arrival.
If you’re switching to a different brand, you might be wondering how to install and activate an eSIM. Explore our in-depth guides below to learn more.
Plans that may interest you


Based in Mumbai, Sharan Kaur Phillora has 6+ years of experience in the B2B writing industry. She has written for brands like Pocket52, Nexweave, Maze, NaNLABS, and Userpilot. When she's not working, Sharan can be found immersed in murder mystery novels or exploring Mumbai's streets on her bicycle in search of the perfect slice of pizza.