What is SM-DP+ Address? All you need to know
The SM-DP+ Address is the key code that gets your eSIM activated and ready to go. In this article, we explain what SM-DP+ Address is, why it’s important, and how to find it.
If you’re trying to activate your eSIM and things aren’t going as planned, the SM-DP+ Address might be the missing link.
This usually happens when you need to install your eSIM manually —like when the QR code doesn’t scan properly or you didn’t receive one.
The SM-DP+ Address connects your phone to your service provider’s server and finalizes your eSIM setup.
Knowing where to find it and how to use it ensures you’re not stuck halfway through the process and can connect smoothly.
In this guide, we cover everything from why the SM-DP+ Address is important and where you can find it to how to use it when things don’t go as planned.
International eSIM
>>Buy an International eSIM for travel<< Get 5% OFF. Code: MYESIMNOW5


 +1M
+1M
With Holafly, you save +30% compared to roaming fees
Plans that may interest you
What is SM-DP+ Address?
Subscription Manager Data Preparation Address (SM-DP+ Address) is a unique code your device uses to connect with your carrier’s server during an eSIM setup.
This server stores your eSIM profile, which includes your phone number, carrier information, and other settings that allow your device to connect to the mobile network.
Without this address, your eSIM won’t work, and you won’t be able to make calls, send texts, or use mobile data.
The importance of the SM-DP+ Address in the eSIM activation process
The SM-DP+ Address is the key for your eSIM to connect to the carrier’s server and retrieve the necessary profile information to function.
Without this address, your eSIM cannot be activated or managed. Here’s why it matters:
- Remote profile management. This address allows your carrier to remotely install or delete eSIM profiles on your device. Whether you’re setting up a new plan or removing an old one, this address ensures the correct profile gets sent to your phone without needing to swap SIM cards physically.
- Security and integrity. The SM-DP+ Address helps ensure that only legitimate profiles are downloaded to your device, maintaining the integrity of the eSIM. This prevents hackers or unauthorized entities from intercepting the data or tampering with the eSIM profile.
- Simplifies activation: The SM-DP+ Address automates the process of downloading and activating your eSIM profile. Instead of manual eSIM installation or additional steps, the address connects your device directly to the carrier’s server, making activation quick and seamless.
Let’s break down the step-by-step process of how the SM-DP+ Address works behind the scenes to get your device connected seamlessly.
SM-DP+ address: How does it work?
Here’s how the SM-DP+ Address works:
- When you start the eSIM activation process, your device contacts the SM-DP+ server using the SM-DP+ Address. This address identifies the specific server that manages the eSIM profile linked to your carrier.
- Once the connection is made, a secure channel is established between your device and the server. This ensures that the data exchanged is protected and cannot be intercepted by unauthorized parties.
- The SM-DP+ server then verifies your device’s identity to confirm that it is authorized to access the eSIM profile. This additional layer of authentication prevents unauthorized devices from downloading the profile.
- After successful authentication, the server sends the necessary eSIM profile to your device. This profile contains all the details needed to configure your device for the carrier’s network, including phone number and network settings.
- Your device automatically configures itself with the profile information it has just received. At this stage, the eSIM is ready, and your device can now connect to the mobile network.
Where can I find the SM-DP+ Address and activation code?
Before we dive into where to find them, let’s break down what the SM-DP+ Address and Activation Code look like.
An SM-DP+ Address is typically a string of characters that directs your device to a specific server. Here’s an SM-DP+ Address example:
LPA:1$smdp.example.com$123ABC456DEF
- LPA (Local Profile Assistant) indicates that the SM-DP+ is being used to locate the profile.
- The “smdp.example.com” part is the domain name of the server where your eSIM profile is stored.
- The final part “$123ABC456DEF” is a unique identifier or token that helps with authentication.
The eSIM Activation Code is a long alphanumeric string. It confirms that your eSIM profile can be securely downloaded to your device. For example:
1234567890ABCDEF1234567890ABCDEF
The Activation Code, used together with the SM-DP+ Address, ensures that your eSIM profile is securely downloaded and activated on your device.
Now, let’s get to the main question: where can you find these?
- Email or documentation. After purchasing your eSIM, your provider often sends an email or PDF with the SM-DP+ Address and Activation Code. Be sure to check your inbox for this important information.
- QR code. Many carriers include the SM-DP+ Address and Activation Code in a QR code, making setup as simple as scanning it with your phone. If everything works, you don’t even need to manually activate and enter the details.
- Device settings. On certain devices, you can find the SM-DP+ Address and Activation Code under the cellular plan section in your phone’s settings. This might not always be available, but it’s worth checking.
- Customer support. If you can’t locate the codes through other methods, your best bet is to contact your carrier’s customer support. They can provide the necessary details to activate your eSIM.
- Customer portal. Some providers let you access your eSIM details through an online portal, including the SM-DP+ Address and Activation Code. This is a handy backup if you prefer managing everything digitally.
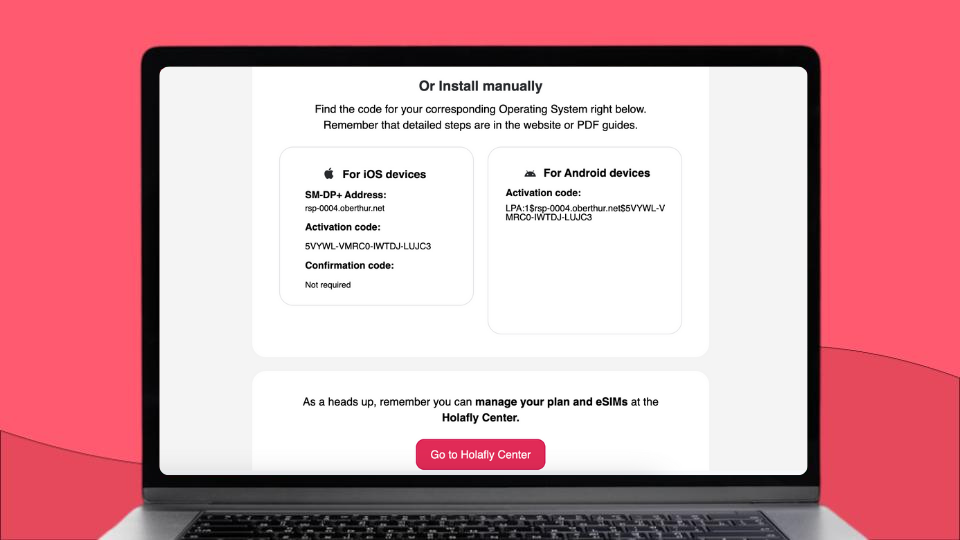
Once you’ve got these details, setting up your eSIM is just a matter of plugging in the info or scanning the QR code.
How to set up the SM-DP+ Address
When you scan the initial QR code provided by your carrier, your device will automatically connect to the SM-DP+ server and activate your eSIM. Easy, right?
But what if the QR code doesn’t work, or you need to input the details manually? Here’s how you can set up the SM-DP+ Address yourself.
Setting up the SM-DP+ Address on iPhone
If the QR code doesn’t work for setting up the SM-DP+ Address on your iPhone, follow these steps to enter the information manually:
- Locate the SM-DP+ Address and activation code in your cellphone’s instructions or request them from your operator if unavailable.
- Open the Settings app on your iPhone.
- Tap on Cellular or Mobile Data (the name may vary depending on your iPhone model and region).
- Select Add Cellular Plan or Add eSIM > Use QR Code
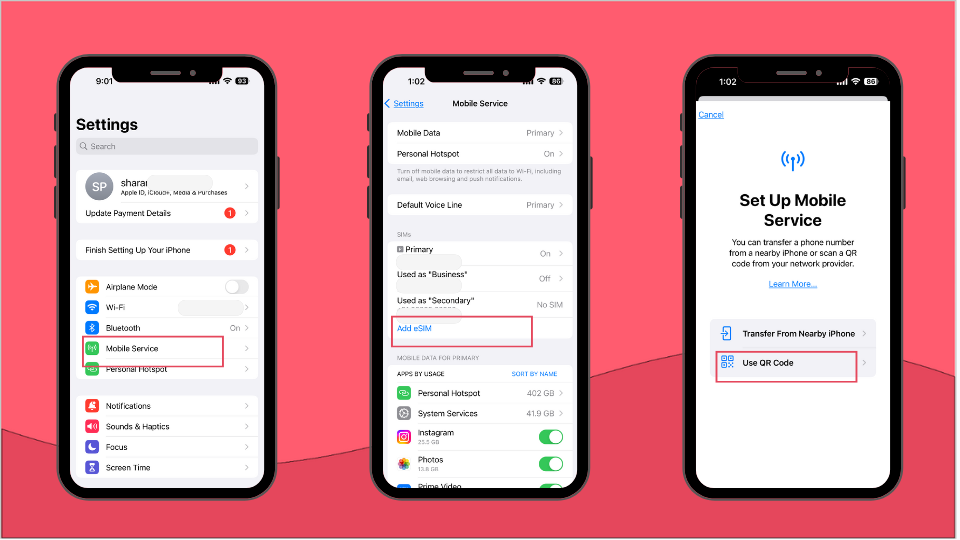
- Choose Enter Details Manually when prompted.
- You’ll see fields for the SM-DP+ Address and Activation Code. Enter these details provided by your carrier or eSIM provider.
- Tap Next or Continue to proceed with the installation.
- Your iPhone will then download and install the eSIM profile.
- Once installed, you may be asked to label the new plan (e.g., Personal or Work). Choose whether to use this new plan as your default line for calls, messages, and data.
- Confirm your settings and complete the setup process.
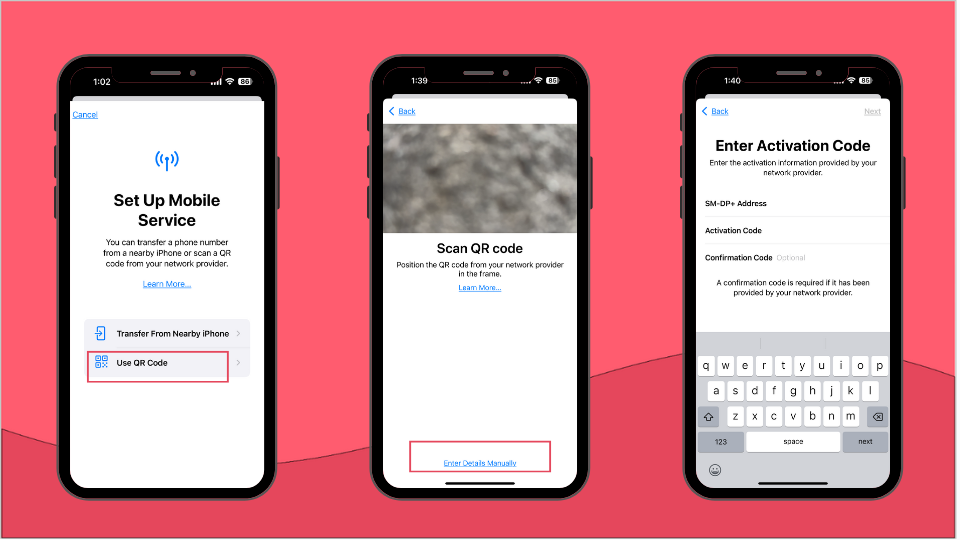
It’s important to note that the eSIM installation procedure for iPhone can be different depending on the model (the model used here is an iPhone 14 Pro Max). But, essentially, the method is the same for all versions.
Setting up the SM-DP+ Address on Android
To get your eSIM running on your Android device, simply follow these steps. You’ll be entering the SM-DP+ Address and activation code manually, and your eSIM will be ready to use in minutes.
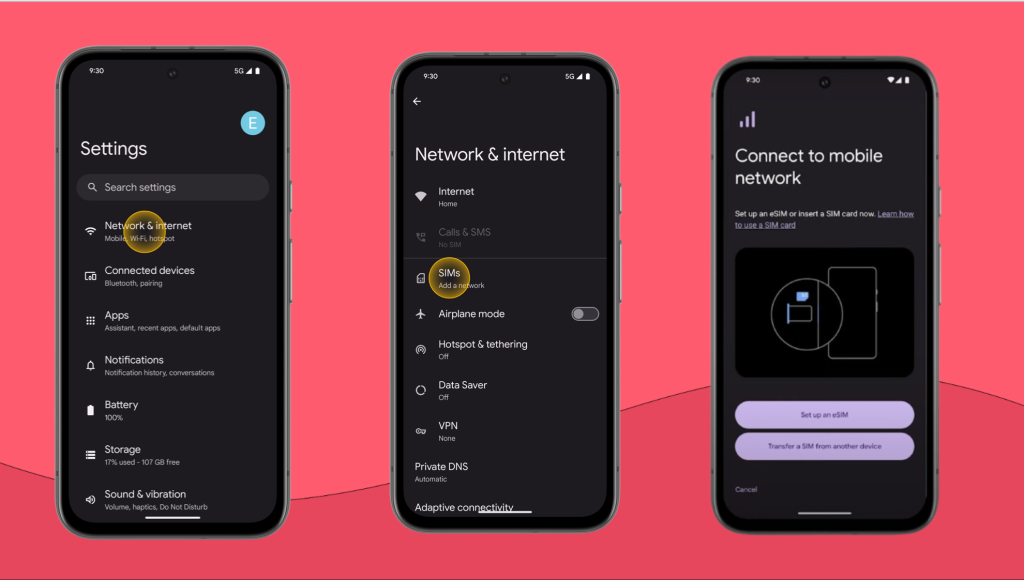
- Open the Settings app on your Android device.
- Tap on Connections, Network & Internet, or Mobile Network (the exact name may vary depending on your Android device).
- Look for Add mobile plan, Add eSIM, Set up an eSIM, or tap the plus (+) icon.
- Then tap on Scan QR code > Enter details manually.
- Now, manually enter the SM-DP+ address and activation code provided by your carrier or eSIM provider.
- Tap Next or Continue to proceed with the installation.
- Your device will download and install the eSIM profile.
- Follow any additional on-screen instructions to complete the setup, such as naming the plan or setting it as the default line.
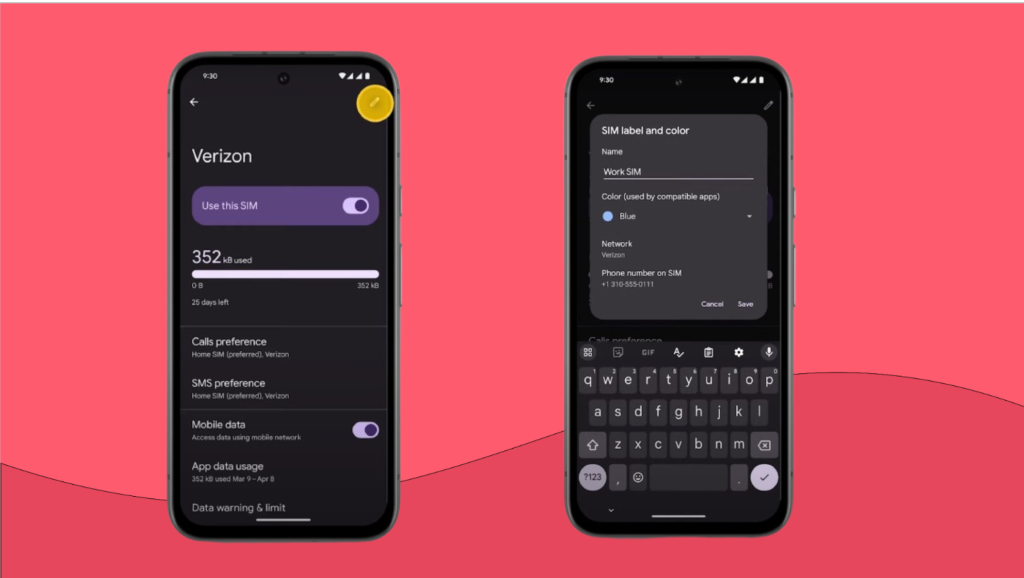
It’s important to note that the exact installation steps for Samsung and other Android devices may vary slightly depending on your device model and version.
If you face any issues during the process, contact your carrier or eSIM provider.
Is the SM-DP+ Address the same as the SIM number?
No, the SM-DP+ Address is not the same as the SIM number, even though both are important in setting up and managing mobile connections. Let’s break down the key differences.
| SM-DP+ Address | SIM number, or Integrated Circuit Card Identification (ICCID) | |
| What is it? | A code that connects your phone to your carrier’s server to activate and manage your eSIM. | A unique number that identifies your SIM card or eSIM on the network. |
| What it’s used for | Used during the eSIM setup to securely download and activate your eSIM profile. | Used by the network to recognize and register your SIM or eSIM. |
| Looks like | A string of characters (e.g., LPA:1$smdp.example.com$123ABC456DEF). | A long number, usually 19-20 digits (e.g., 89148000005123456789). |
| Where to find it | Provided by your eSIM provider | Printed on the physical SIM card or found in your phone settings for eSIM. |
| Changeability | Can change if switching eSIM providers or plans | Remains constant for given physical SIM cards. |
| Security role | Ensures secure communication between device and back-end servers | Part of the authentication process for network access |
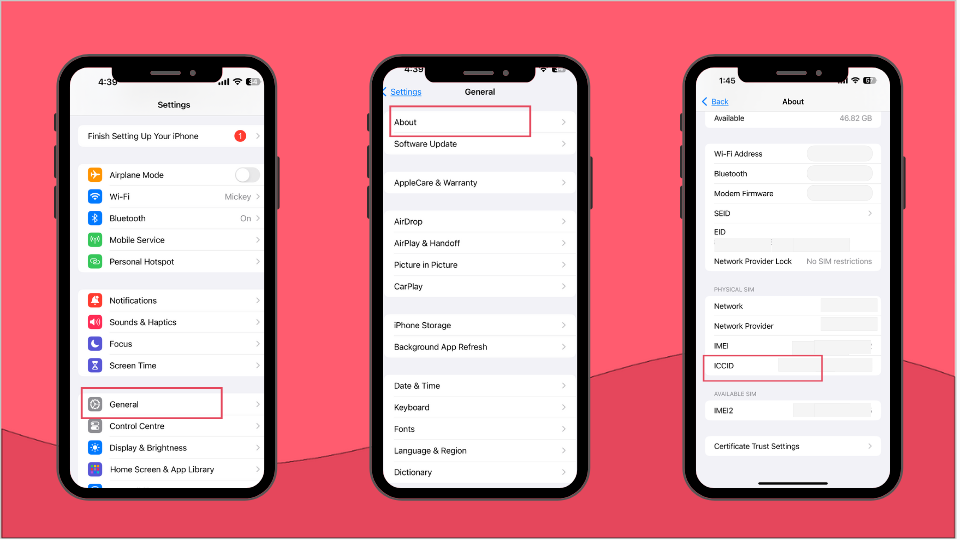
Here’s how you can find your SIM number or ICCID:
- For Android: Settings > About Phone/About Device > Status/SIM Card Status > Scroll down to find ICCID
- For iPhone: Settings > General > About > Scroll down to find ICCID
Wrapping up everything you need to know about SM-DP+ Address
Now that you know how to manage the SM-DP+ Address and your eSIM setup, you have everything you need to stay connected easily.
Whether it’s switching networks, updating your profile, or handling setup issues, you’re ready to manage your eSIM without needing extra help.
And if you’re looking for a hassle-free way to stay connected while traveling, try Holafly!
With Holafly, you don’t need to worry about technical details like the SM-DP+ Address—just scan the QR code, and you’re good to go.
If you run into any trouble, Holafly’s 24/7 customer support can guide you through the process.
You also get unlimited data plans across 200+ destinations, with individual destination plans as well as separate regional plans covering entire areas, like Europe or Asia.
Holafly ensures you stay connected easily and stress-free, no matter where you go.
Stay plugged in while you unplug!
Get an Holafly eSIM today!




 Pay
Pay  Language
  Currency


 No results found


