eSIM on iPhone: How to Set It Up
We tell you step by step how to configure and activate an eSIM on iPhone.


 +1M
+1M
Holafly saves you +30% compared to other roaming fees
Plans that may interest you
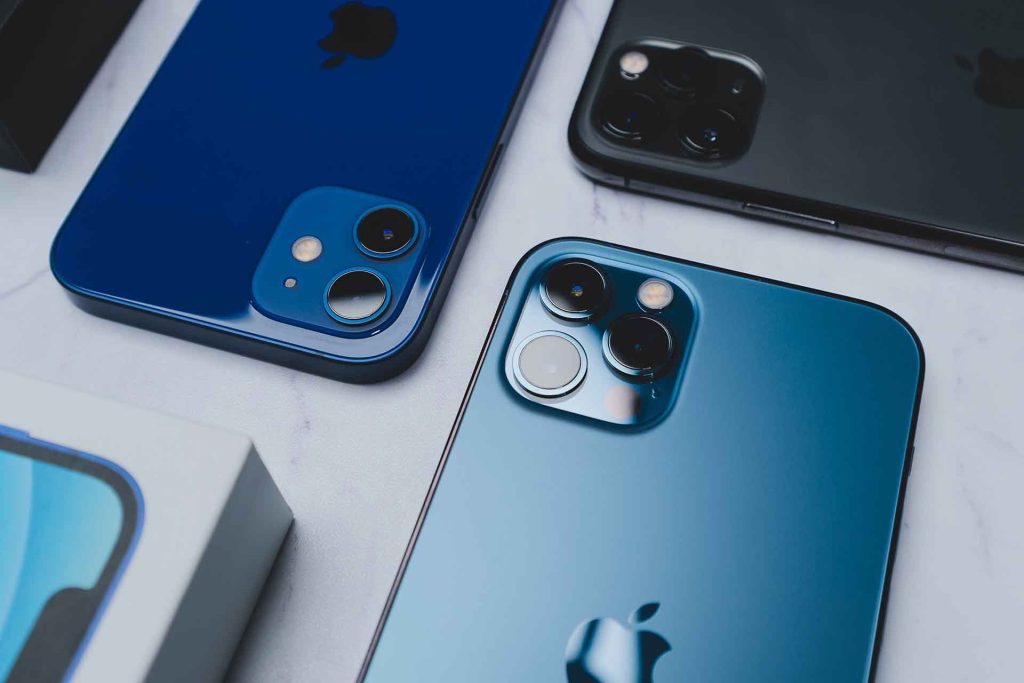
Do you have an eSIM iPhone? If your device is an iPhone XS, iPhone XS Max, iPhone XR, or one of the later iPhone models, the chances are—you do! This is excellent news because it means you have one of the devices that supports eSIM, and you can forget about buying a physical SIM card when traveling.
Moreover, if you have an iPhone 14 or newer, eSIM is your only option, as these smartphones no longer use physical SIM cards.
So, let’s discover how to set up your eSIM fastest and easiest way.
How Does eSIM Work on the iPhone?
Each Apple iPhone that supports eSIM technology has an embedded chip to which you download and install your digital SIM card.
eSIM works on iPhone in different ways:
- You have a new iPhone, and you want to set up eSIM from your carrier
- You want to transfer your SIM card from your previous device to your new one.
- You want to add a new eSIM when traveling abroad
Here’s how to install and activate your eSIM on iPhone. For this setup to happen, your device needs to be unlocked.
>Get to know how to transfer your eSIM from an iPhone to an Android device<
How to Set up an eSIM on iPhone
There are several ways to activate an eSIM on iPhone and stay connected:
- eSIM Carrier Activation
- eSIM Quick Transfer
- QR code activation
- Manual activation
- Activation through an app
Here’s what you need to start:
- An iPhone that can support eSIM
- A QR code or app from an eSIM carrier.
- A Wi Fi connection to set up your eSIM
That being said, there are some exceptions to this:
- If you have iOS 17.4 or more, you can use the automatic installation without scanning QR codes.
- You cannot use eSIM on iPhone in China mainland. However, some models can support it in Hong Kong and Macao.
- You don’t need Wi Fi for setup if you’re using iPhone 14 or later.
Here’s an easy step-by-step instructions on how to set up your digital SIM.
How to Activate eSIM on iPhone
Let’s look at how you can set up your eSIM more closely. Remember, this can vary depending on your iPhone model and current iOS version.
1. eSIM Carrier Activation
This is one of the methods used when using the eSIM provided by your carrier. Some carriers can assign you an eSIM with your new iPhone. In that case, you just need to follow the instructions on your screen as soon as you turn on your new device and tap relevant notifications.
Otherwise, you may need to contact your carrier and ask them to give you an eSIM. They will set up eSIM Carrier Activation, which usually means you just need to tap the notification that says Carrier Cellular Plan Ready or find that option in the Settings menu.
2. eSIM Quick Transfer
This method is used when switching your SIM from your previous Apple iPhone to a new one. It also works when you want to convert your SIM to an eSIM. Again, not all carriers support this option, so check if your carrier can do Quick Transfer.
- If transferring from your old to your new Apple iPhone, find Add Cellular Plan in your Settings and choose the cellular plan you want to switch. If it’s not there, tap Transfer From Nearby iPhone and follow the instructions. You’ll need to verify this on your old phone. Once you do that, your plan will no longer be active on your old phone.
- If you’re converting a physical SIM to eSIM, you’ll find Convert to eSIM in your Cellular section of the settings. Tap and follow the instructions.
3. Scan a QR Code (provided by the network operator)
This is mainly used when you’re setting up your new eSIM or adding another one when you travel. It’s very easy to set this up.
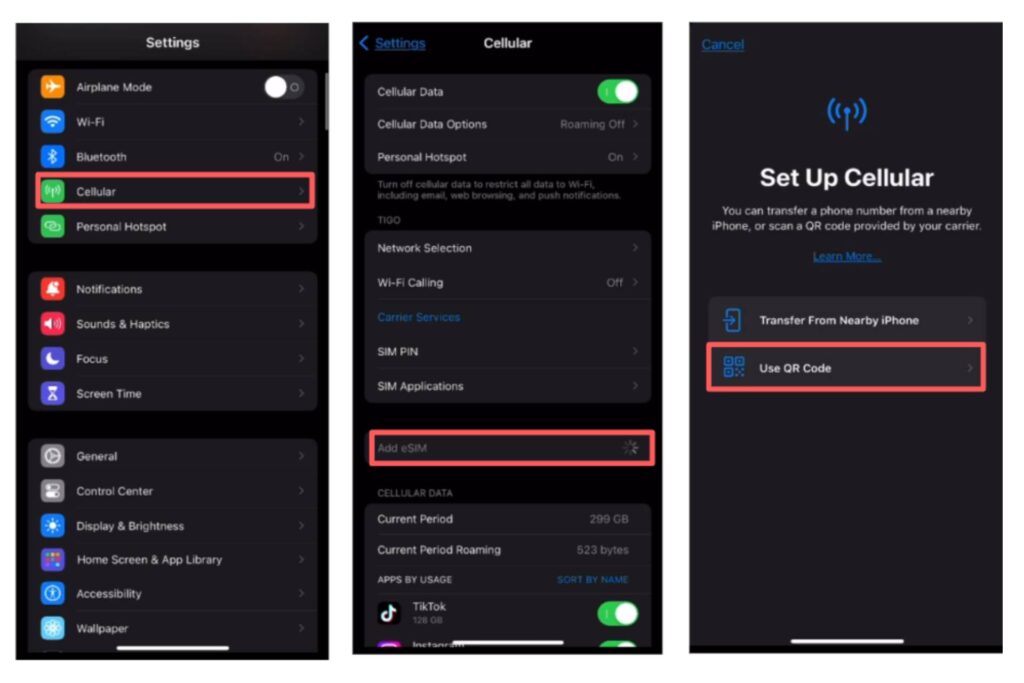
- Tap Settings, then to Mobile/Cellular
- Add eSIM, and pick Use QR code
- Scan QR code with your camera, tap Continue, and follow the instructions
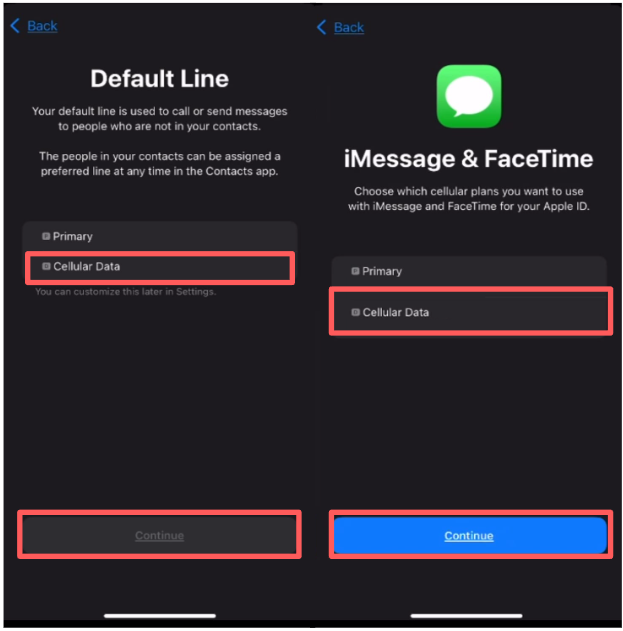
Once you set up your eSIM, you must select which line you want to use as the default line, which line you want to use as the primary line for iMessage, and which line you will use for data.
4. Manual Activation
- Go to settings, then to Mobile/Cellular data, Add eSIM, Use QR code, and Enter Details Manually:
- For this step, you will need the SM-DP+ Address and the activation code for the eSIM.
- Write the SM-DP+ Address and the activation code.
- Tap Next
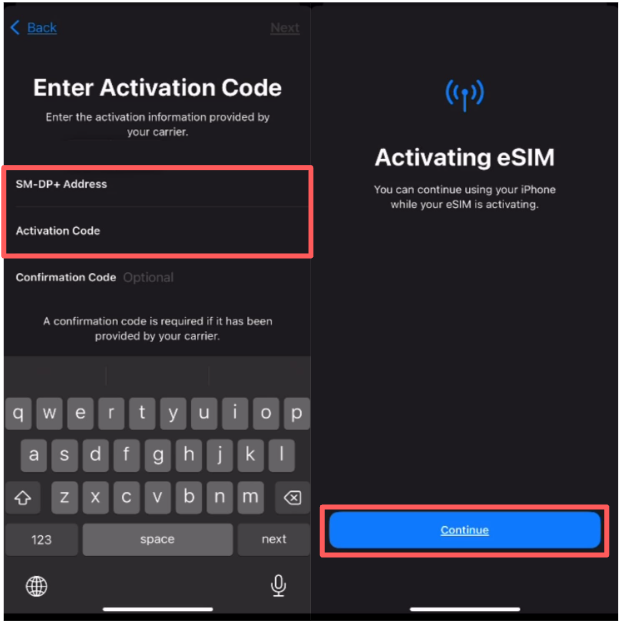
- When the Cellular Plan Detected notification appears, tap Continue and follow the instructions.
When this is done, you’ll need to pick the default lines for data, iMessage and FaceTime.
5. Mobile App Activation
Some operators, like Holafly, include the automatic installation function in their mobile app. You just download the Holafly app to your Apple iPhone, and you can use it to purchase and manage your eSIMs. This is usually what people do when they travel and want to stay connected even if they don’t have constant access to Wi Fi and don’t want to ramp up their bill with roaming.
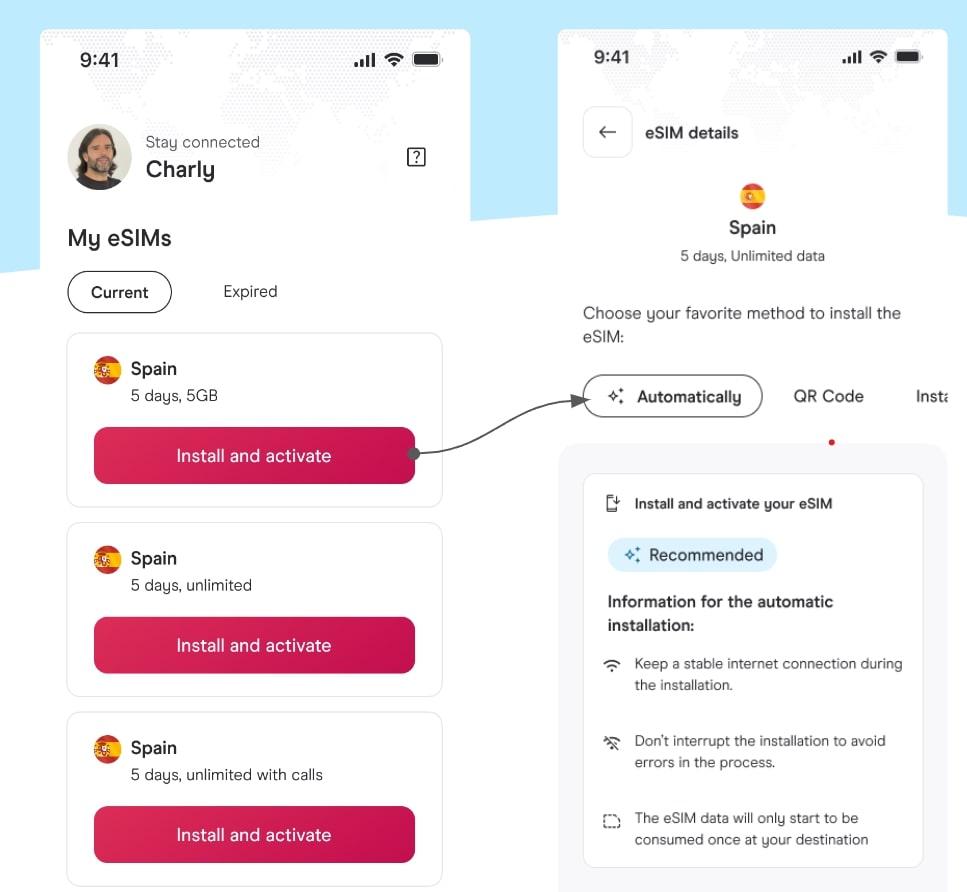
To use this function, we must have access to our user in the Holafly App and then follow the steps
- The user must be logged in
- Select the eSIM and the destination you want to install
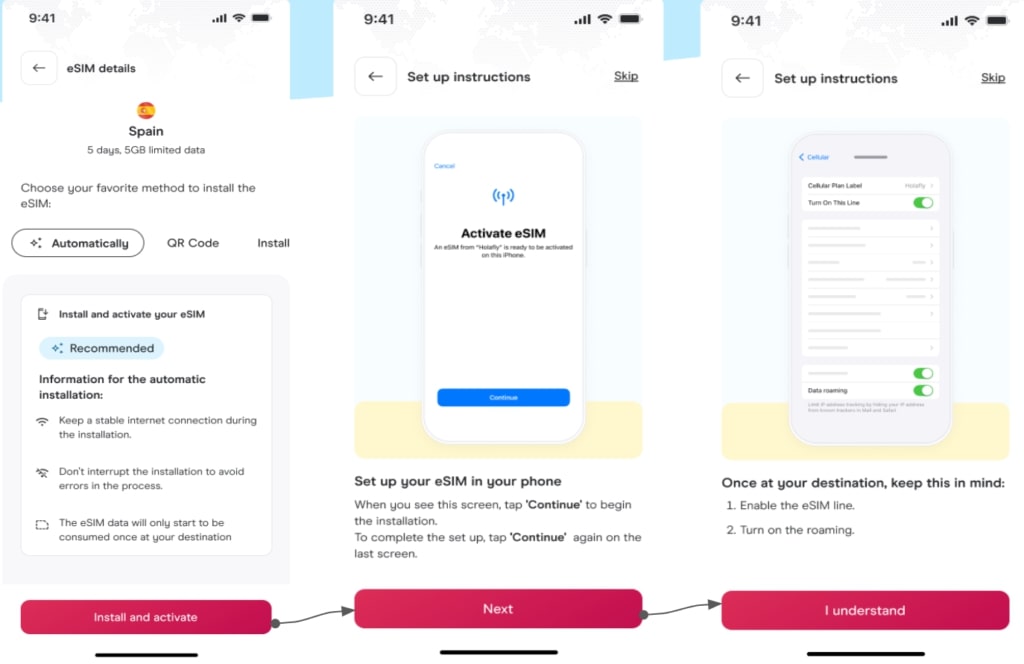
- Select automatic installation
- Finally, you just have to click on the Install and Activate button
- You can go to the cellular network menu to see your installed eSIM
Which iPhones Use eSIM
From the iPhone XR to the newest versions, all iPhones devices include eSIM support. Moreover, Apple made some models, such as the iPhone 14 and iPhone 15 from the USA, are eSIM-only.
But if you want to know more about eSIM-compatible iPhone devices, we recommend you look at our post: Cellphones compatible with eSIM.
How Many eSIMs iPhones Can Have
In most iPhone cellphones that support virtual SIM cards, you can have up to 20 eSIMs, but you can use just one eSIM or two Digital SIMs simultaneously. It depends on your iPhone model, but in a large percentage of iPhones, you can use your traditional SIM card and a virtual SIM simultaneously; this is called Dual SIM.
What Is a Dual SIM Card?
Dual SIM means you can use a nano-SIM (the classic) and an eSIM (virtual card) simultaneously; it means you can use data, receive and make calls with both SIMs. This is how the dual SIM works in many iPhones, but with the launch of the iPhone 14, which does not have a physical SIM slot, you can now use two eSIMs simultaneously.
You can find more information about Using Dual SIM with an eSIM on Apple’s support page.
How Do I Get eSIM on My iPhone?
You can buy an eSIM from either local carriers or international operators. Depending on your needs, both options will give you access to different data plans. Availability may vary based on your location.
USA – Carriers like Verizon, T-Mobile, or AT&T are great alternatives to buying a prepaid eSIM USA.
UK – Carriers like Three, Giffgaff, and Vodafone will work when purchasing an eSIM.
The downside of these carriers is that you need to sign a contract with them sometimes, or it’s difficult to buy their eSIM in advance if you’re traveling.
On the other hand, international mobile carriers like Holafly also offer travelers great options. You can buy their plans directly from the website or Android or iOS app. You will even find options with coverage in entire regions as with the eSIM card Europe or eSIM for UK travel.
FAQ About the eSIM on iPhone
You can see your eSIMs by going to Settings and taping in Cellular.
If your iPhone is locked to use with different operators, you will be able to use an eSIM, but only with your current carrier. You can learn more about locked iPhones here.
Yes, if you have an iPhone that supports eSIM, you can use a virtual SIM as the primary line. So you will not need a physical SIM.
With iOS 16, you can transfer your eSIM from an old iPhone to your new iPhone with Quick Transfer: Go to Settings > Mobile/Cellular Data > Add eSIM > Transfer from Nearby iPhone. Keep in mind, both devices must be updated with iOS 16. If you would like to know more about how to transfer an eSIM on an iPhone, read our article: How to transfer an eSIM from an iPhone to another
There aren’t many disadvantages when using this service. Two main ones are: eSIMs won’t work unless your iPhone is unlocked, and they can only be used with eSIM-compatible devices.


 No results found


