Language


 No results found
Google Pixel eSIM guide: Devices, setup, and benefits
Learn more about using an eSIM on your Google Pixel phone. We cover device compatibility, how to use dual SIMs, and eSIM benefits.

Wondering if you can use an eSIM with a Google Pixel? The good news is you don’t need the latest Pixel for eSIM-compatibility. eSIMs are digitally embedded in new Pixel phones, allowing you to access mobile plans for home or travel without the need for physical SIM cards.
All Google Pixel models released from the Pixel 2 series onward are eSIM-compatible. Some Pixel devices even offer dual SIM compatibility, where you can use two eSIMs, like with the Google Pixel 7.
In this Google Pixel eSIM guide, you can learn exactly which Pixel series are eSIM-compatible, how to set up your eSIM on your Pixel, the benefits of using an eSIM, and which eSIM plan to choose.

Peace of mind before you fly
Set up your eSIM before travel and get unlimited data on arrival.
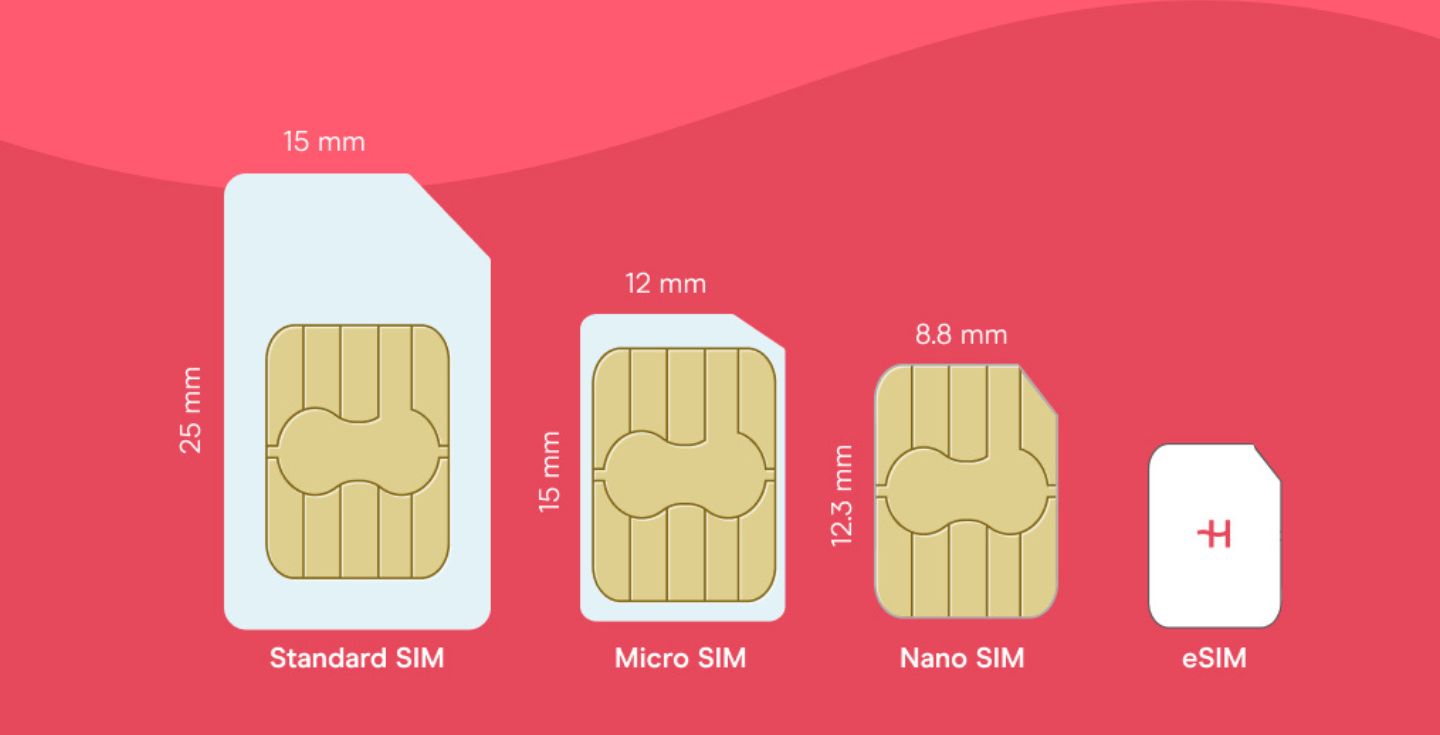
What is an eSIM on Google Pixel?
An eSIM on a Google Pixel is a digital version of the physical SIM card embedded into your phone. So all you need is an eSIM plan to get connected.
You can activate it through your phone’s settings, but you’ll need to use your carrier’s app or website to buy and download the eSIM plan.
Once you’ve got the plan, a few taps in your settings will get you connected.
It’s a simple way to manage multiple numbers, switch carriers, or travel without the hassle of swapping out SIM cards.
Google Pixel eSIM supported devices
Does Google Pixel support eSIM? Here’s a quick rundown of Google’s eSIM-supported phones:
- Google Pixel 2 and 2 XL (only phones bought with the Google Fi service in the US)
- Google Pixel 3 and 3 XL (excluding phones from Australia, Taiwan, Japan, and non-Google Fi/Sprint US or Canadian carriers)
- Google Pixel 3a and 3a XL
- Google Pixel 4 and 4 XL
- Google Pixel 4a and 4a 5G
- Google Pixel 5, 5a and 5a 5G
- Google Pixel 6, 6 Pro, and 6a
- Google Pixel 7, 7 Pro, and 7a
- Google Pixel 8, 8 Pro, and 8a
- Google Pixel 9, 9 Pro, 9 Pro XL, 9a and 9 Pro Fold
- Google Pixel 10, 10 Pro, 10 Pro XL, and 10 Pro Fold
Google Pixel also offers dual SIM compatibility, letting you use both personal and work numbers or easily switch between your home and travel plans.
If you have a Pixel 3a or later device, you can use two SIM cards: one physical SIM card and one eSIM. The Pixel 3a and 3a XL devices have been discontinued as of July 2020.
For Pixel 7, 7 Pro, and newer models, you can use two eSIMs simultaneously if your carrier allows.
Fun fact: Google was one of the first major smartphone manufacturers to introduce eSIM technology, starting with the Google Pixel 2 in October 2017. Apple soon followed, incorporating eSIM in the Apple Watch Series 3 (released in September 2017) and later in the iPhone XS, XS Max, and XR in 2018.
Set up an eSIM on a Google Pixel
Setting up an eSIM on a Google Pixel (or any smartphone) is a quick and easy process. First, you’ll need to install the eSIM. Only activate once you are ready to use it!
Here’s a checklist to make sure your eSIM setup on your Google Pixel device goes smoothly:
✅ Check compatibility: Confirm your Google Pixel is eSIM-compatible. Most modern smartphones are, but it’s always good to double-check.
✅ Get your eSIM: Purchase an eSIM plan, and keep your QR code/manual code handy.
✅ Install and activate your eSIM: Use a QR code or manual code, and follow the steps in your settings.
You’ll need a reliable internet connection for the process, which should take anywhere between five and ten minutes. Visit our detailed guide on how to activate an eSIM on the Google Pixel for a full walkthrough.
How to use dual SIMs on your Google Pixel phone
If your Google Pixel phone supports dual SIMs, you can use the Dual SIM Dual Standby (DSDS) option. This means both SIMs can receive calls and texts, but only one can be used for data at a time.
You can easily switch between SIMs — use one for calls and the other for data. This is perfect for keeping work and personal lines separate or using a local SIM while traveling.
Please note that this feature is subject to your carrier’s availability. For models like the Pixel 7 and newer, you can use two eSIMs with DSDS, but only if your carrier supports it.
Once you’ve installed both eSIMs, follow these steps to set your preferences.
- Open your Settings app.
- Tap “Network & Internet” > “SIMs” > “Your Network”.
- For each network, set your preferences.
You can set the following preferences:
- Data: Turn on Mobile data. Remember, you can only use one SIM for data at a time. If you already have one set up, you’ll get a notification.
- Calls: Tap “Call Preference”. Then, pick your main carrier, or tap “Ask me every time”.
- Texts: Tap “SMS Preference”. Then pick your main carrier, or tap “Ask me every time”.
Benefits of an eSIM on a Google Pixel
Using an eSIM on a Google Pixel (or any eSIM-compatible device) comes with advantages. By choosing an eSIM, you:
- Won’t have to waste time hunting for local SIM cards on your trip abroad
- Can easily switch between your home plan and travel plan
- Remain reachable at your home number
- Don’t have to worry about losing your physical SIM card
- Can access dedicated and affordable travel plans and reduce roaming charges
- Get an easy, online purchase process
- Get online anywhere in the world with 1 GB of free Holafly data
This is a part of Holafly Plans’ “Always On” feature. If you’ve previously had a Holafly Plans package, instead of losing connectivity when your subscription expires, your eSIM gives you 1 GB of free data every month.
Holafly also offers single-destination, regional, and global travel eSIMs with unlimited data, flexible eSIM plans, daily hotspot allowances, and 24/7 customer support in case of any issues.
Get an unlimited data eSIM for your Google Pixel
Need an eSIM plan for your Google Pixel?
Holafly gives you unlimited data in 200+ global destinations. Choose your days and enjoy daily hotspot sharing and 24/7 customer support for eSIMs on Google Pixel phones. Setting up takes approximately five minutes, and you can change your eSIM plans with the Holafly app — even if you’re halfway around the world.
If you’re looking for a long-term plan for your Pixel, Holafly Plans is better suited. This is a monthly eSIM subscription with coverage in 170+ destinations worldwide.
Choose from 25 GB to unlimited data plans, get 5G speeds, and up to unlimited hotspot data. With Always On, you’ll have 1 GB of free data loaded on your Google Pixel and ready to use whenever and wherever you need it.
Peace of mind before you fly
Set up your eSIM before travel and get unlimited data on arrival.
If you’re switching to a different brand, explore our eSIM guides below to learn more.
Plans that may interest you


Born and raised in Queens, New York, I'm a Psychology graduate with a passion for writing that I've been nurturing since 2019. Over the years, I've enjoyed creating meaningful content across various niches, including sports, hospitality, and career development. At Holafly, I focus on crafting useful and inspiring pieces to make your adventures more effortless. One of the best perks of this role? Creating travel content always seems to inspire my next vacation destination!