Language


 No results found
How to transfer eSIM to new phone: Android guide
Learn how to transfer your eSIM from Android to Android easily, whether you're upgrading, replacing, or switching devices.

Switching phones doesn’t mean losing your mobile connection. Whether you’re upgrading to the latest Samsung Galaxy or Pixel, knowing how to transfer your eSIM to a new Android phone will save you time and avoid downtime.
In this guide, we’ll take you through each step of the Android eSIM transfer process, including how to scan QR codes, and provide device-specific tips for popular models like Google Pixel and Samsung phones.
An app that gives back


What do I need to transfer my eSIM?
Before you transfer your eSIM to a new Android phone, make sure you have the following ready.
- Check device compatibility: Go to Settings > SIM Manager or Connections to see if you can add an eSIM. Most newer models, like Google Pixel 3+ and Samsung Galaxy S20+, support eSIM.
- Back up your data: Save important data from your Android, including contacts, messages, and files, before switching phones — especially when traveling or using cellular data abroad.
- Confirm carrier support: Not all providers allow eSIM transfers. Check with your carrier or mobile data provider (e.g., AT&T, T-Mobile) and ask if you’ll need a QR code or reactivation.
- Have eSIM details ready: Keep your activation code, ICCID, and PIN/PUK handy for quick setup on your unlocked phone.
- Ensure internet access: Both devices need a stable WiFi or high-speed data connection to complete the transfer. If you’re on a limited plan, switch to WiFi when possible to use less data on Android during the eSIM setup.
| 💡Tip: Not all carriers support eSIM transfers—check our list of compatible eSIM carriers to ensure yours is covered. |
How to transfer an eSIM to a new Android phone
Once you’ve prepared your devices, the actual eSIM transfer to new Android phone is quick. The process may vary slightly depending on your carrier and phone model, but the general steps are similar.
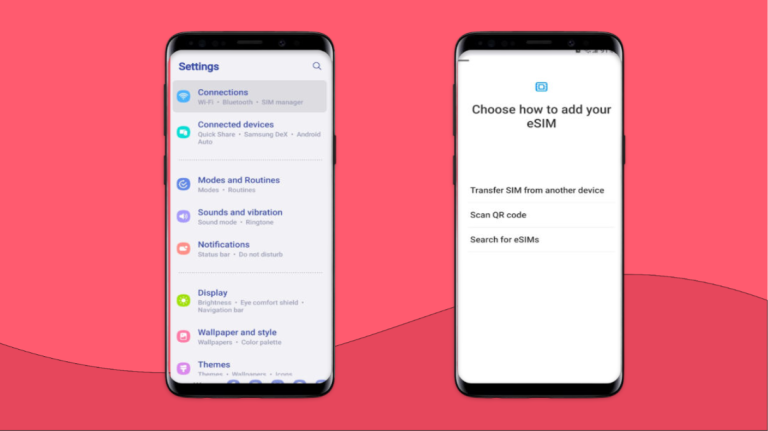
- Open your phone settings: On your old device, go to Connections or SIM Manager and select Transfer eSIM (wording may vary).
- Follow the prompts: Your phone will guide you through the transfer. Some carriers send a QR code or activation code to scan on your new device and transfer eSIM, Android to Android
- Activate on the new phone: On your new phone, open Connections or SIM Manager, choose Add eSIM, and complete the setup.
- Check mobile data and calls: Test mobile data, phone calls, and messaging to ensure everything works before resetting your old phone.
Other ways to transfer your eSIM card
If the steps above don’t work, there are still other ways to transfer eSIM from an old phone to a new Android . Depending on your carrier or phone model, you might need to explore manual setups or alternative transfer methods.
1. Transfer through your carrier
Contact your carrier and let them know you want to transfer eSIM to a new Android phone. They may do it online, via their app, over the phone, or in-store.
- Provide your account number, phone number, and IMEI (find it in Settings > About phone).
- Some carriers require their mobile app to download and activate the eSIM plan.
- Follow their instructions to complete the process.
2. Transfer using a QR code
Many carriers send a QR code for eSIM activation when you buy a new data plan or move eSIM to new phone, Android or not.
- On your new phone, go to Settings > Connections > SIM manager > Add eSIM.
- Select Scan QR code from the service provider and scan the code.
- Confirm setup, wait for activation, then set the eSIM as your primary service.
3. Transfer an eSIM card manually
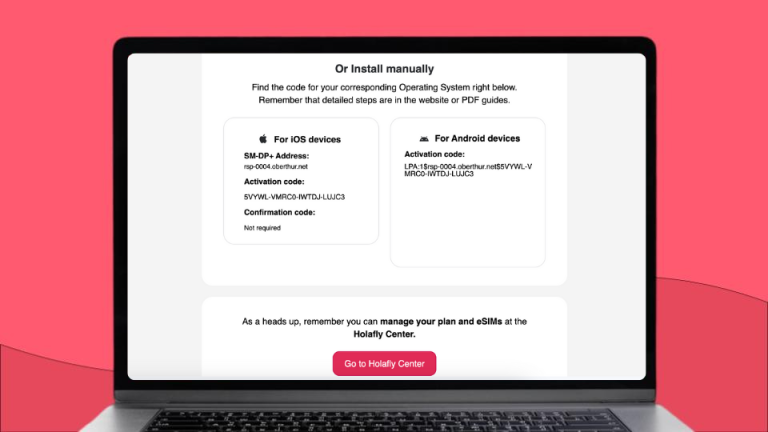
If your carrier provides only activation details instead of a QR code, you can manually transfer an eSIM to a new Android phone. Here’s how to transfer an eSIM to a new Android phone by entering an SM-DP+ address and activation code
- On your phone, go to Settings > Connections > SIM card manager > Add eSIM.
- Select Enter activation code or Enter details manually.
- Enter the SMDP+ address (links your phone to the eSIM server) and activation code provided by your carrier.
- Follow the prompts to complete activation, then set the eSIM as your main mobile service.
Can I transfer a travel eSIM?
An international eSIM is the easiest way to stay connected when traveling abroad. It lets you access local networks in your destination country, helping you avoid expensive roaming fees and enjoy better coverage.
However, most travel eSIMs — including those from Holafly — are one-time use. Once you activate them on a device, they can’t be transferred to another phone. If you switch devices, you’ll need to buy a new eSIM for that destination. Always check your eSIM’s compatibility before traveling to avoid last-minute issues.
Wrapping up everything you need to know on how to transfer eSIM on Android
And just like that, your eSIM is up and running! Now you can focus on what really matters — scrolling, streaming, and sharing those photos without a hitch.
And if you’re a frequent traveler — whether it’s for work, play, or a bit of both — Holafly offers flexible, instant global connectivity in 200+ destinations with unlimited eSIM data plans. Moreover, you can choose from postpaid Holafly Plans and get internet access across the world.
Whether you’re checking out street food in Tokyo or taking a Zoom call from the beach, Holafly keeps you in the loop.
An app that gives back
Plans that may interest you


Based in Mumbai, Sharan Kaur Phillora has 6+ years of experience in the B2B writing industry. She has written for brands like Pocket52, Nexweave, Maze, NaNLABS, and Userpilot. When she's not working, Sharan can be found immersed in murder mystery novels or exploring Mumbai's streets on her bicycle in search of the perfect slice of pizza.