


 Language


 No results found
Optus eSIM not working? Reasons and how to fix it
Struggling with your Optus eSIM not working? Here are the key causes and fixes to get you connected again.

An Optus eSIM can stop connecting at home or overseas.
Most issues, however, are caused by minor configuration errors. The good news is that these problems are usually easy to resolve once you know where to look.
Still, if the fixes from this guide don’t restore your connection, consider Holafly as a practical fallback. It installs in minutes through a QR code or the app, offers unlimited data in many destinations, and provides a reliable way to stay online.

Get connected from anywhere
Buy your eSIM no matter where you are. All you need is an internet connection.
Why is my Optus eSIM not working?
An Optus eSIM can fail to connect for a few common reasons, regardless of whether you’re an iPhone or Android user.
The table below outlines the most common technical causes behind an eSIM that won’t connect or activate.
| Issue | Description |
|---|---|
| Device not eSIM-ready or locked | The phone doesn’t support eSIM or is locked to another carrier. |
| Data or roaming turned off | Mobile data or data roaming is disabled, which stops the eSIM from connecting to networks abroad. |
| Network not connecting automatically | Automatic network selection isn’t working, and the device is unable to connect to a local Optus partner network. |
| Incorrect or outdated APN settings | An APN mismatch can stop the eSIM from connecting to the data network. |
| Activation delays or interruptions | Activation can take between 15 minutes and four hours, particularly if you’re transferring a number. If your WiFi is weak or if the setup isn’t complete, it might also prevent activation from going through. |
For more background on how Optus eSIM works for tourists, including activation requirements and coverage maps, visit our complete Optus travel eSIM guide.
Next, I’ll walk through the steps to fix each issue.
How to fix an Optus eSIM
The steps below will guide you through the most common methods for resolving an eSIM that won’t work.
Ensure your connection is stable
A weak or unstable WiFi connection can interrupt eSIM activation. So, connect to a strong, private WiFi network (avoid public hotspots) and ensure the signal strength is high.
Restart your phone after eSIM installation
A restart can help the device register the new eSIM profile.
iPhone:
- Press and hold the power button.
- Slide to power off.
- Turn the device back on after about ten seconds.
Android:
- Press and hold the power button.
- Tap Restart.
- Turn the device back on after about ten seconds.
Give activation time to complete
Optus eSIM activation can take some time, especially if you’re porting a number.
iPhone and Android:
- After installing the eSIM, keep your phone on and connected to WiFi.
- Wait at least 15 minutes for initial activation.
- If you’ve ported a number from another provider, allow up to four hours.
- Avoid deleting or reinstalling the eSIM during this period unless Optus support advises you to do so.
If several hours pass and the eSIM still shows as inactive or has no signal, move on to the steps below.
Check the My Optus app
Use the My Optus app to confirm the eSIM status and complete any pending steps.
iPhone and Android:
- Open the My Optus app.
- Sign in with your Optus account details.
- Account > SIM management > Activate eSIM.
- Verify that the eSIM is active.
- If there’s an outstanding step, follow the prompts in the app to complete activation.
Turn airplane mode on and off
Toggling airplane mode forces the device to reconnect to the network.
iPhone and Android:
- Turn on Airplane Mode for 5–10 seconds.
- Turn it off and allow the smartphone to reconnect.
Check your line status
Ensure the Optus eSIM line is enabled in your phone’s settings.
iPhone:
- Settings > Mobile Data.
- Under SIMs or Mobile plans, tap ‘Optus eSIM’.
- Verify that the line is active.
Android:
- Go to Settings > Network & Internet.
- Tap SIM manager (or SIMs).
- Confirm that the Optus eSIM is active.
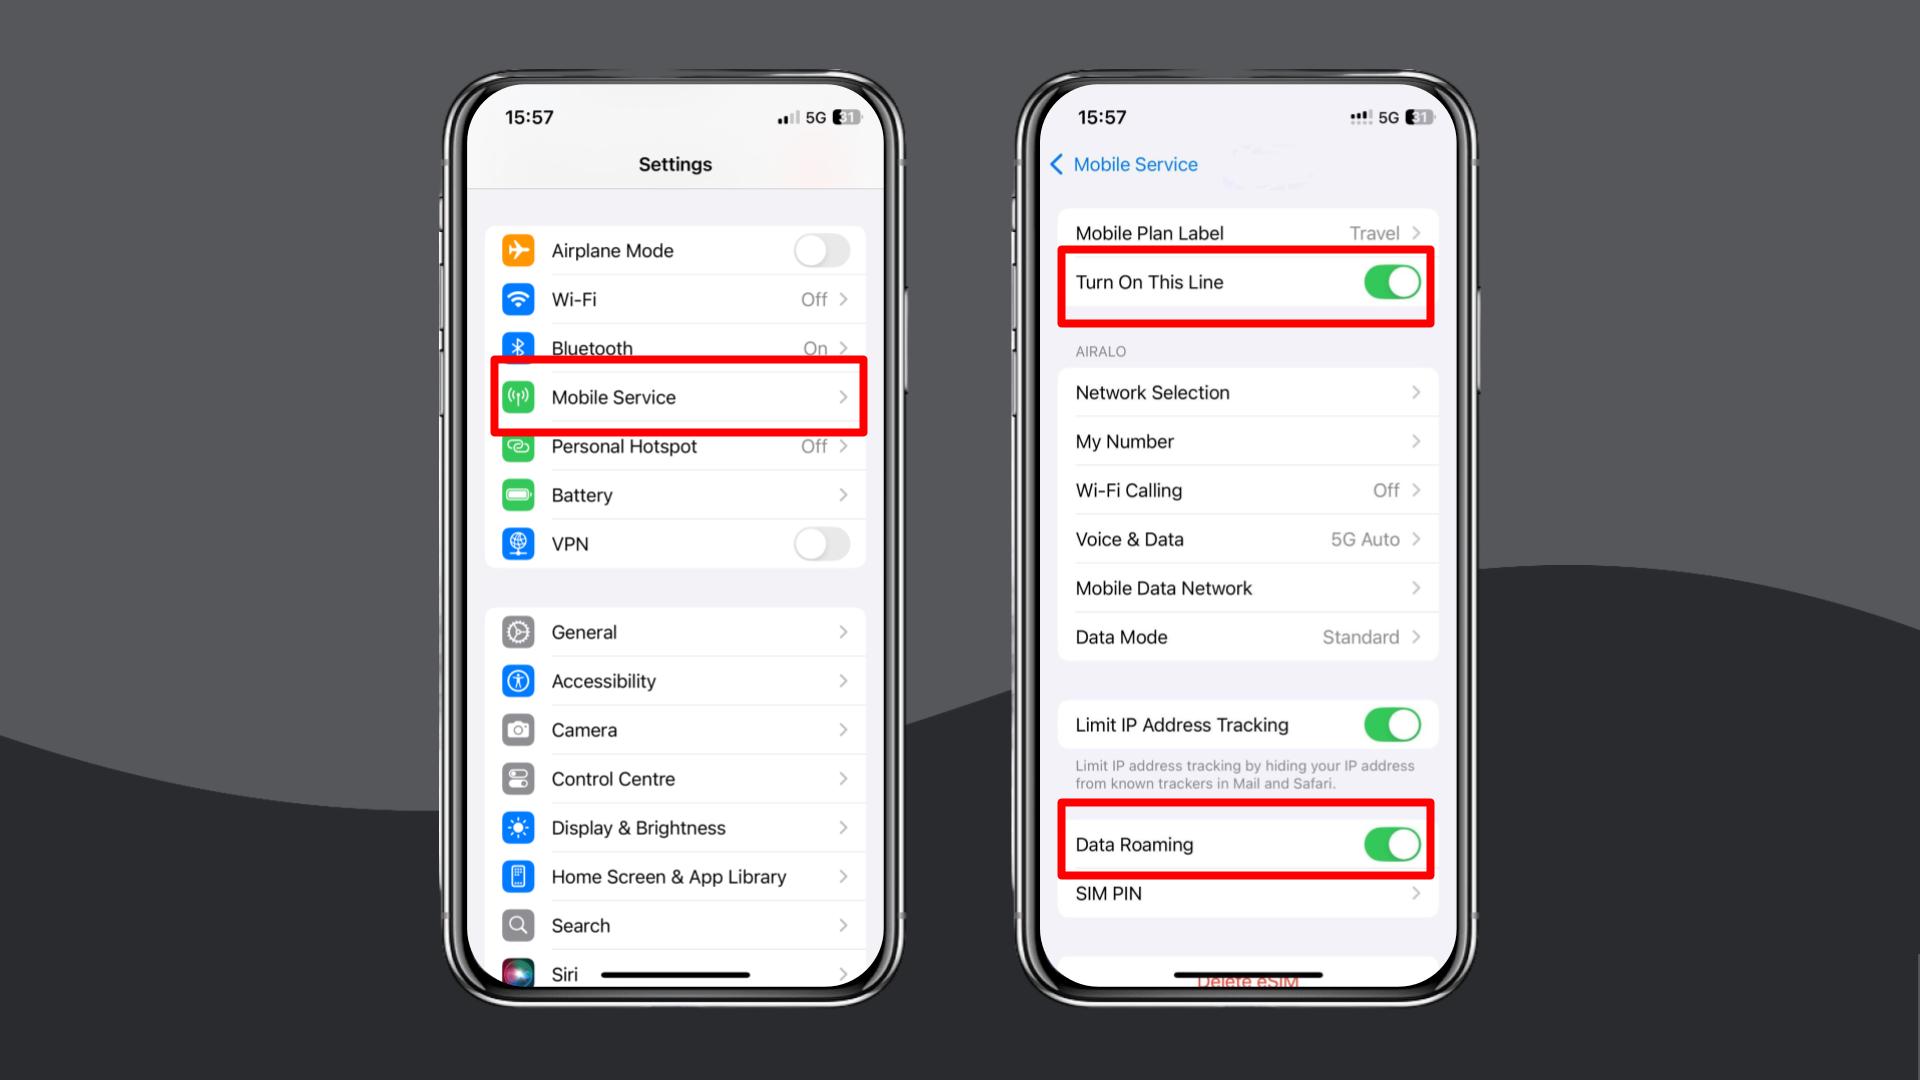
Turn on data roaming
If you’re overseas using Optus eSIM international, data roaming must be enabled for the Optus eSIM to connect.
- iPhone: Settings > Mobile Data > Your Optus eSIM > Turn on Data Roaming.
- Android: Settings > Network & Internet > Your Optus eSIM > Data Roaming > Turn on Data Roaming.
Related:
- Optus international roaming
- Optus roaming in Japan
- Optus roaming in the USA
- Optus roaming in Europe
- Optus roaming in New Zealand
Update your phone software
Outdated software can cause compatibility or network issues.
iPhone:
- Connect to WiFi and plug your phone into a power source.
- Settings > General > Software Update.
- If an update is available, download and install it.
Android:
- Connect to WiFi and plug your device into a power source.
- Settings > System
- If an update is available, download and install it.
Check if your device supports eSIM and is not carrier-locked
If your phone doesn’t support eSIM or is locked to another carrier, the Optus eSIM won’t work.
Check eSIM support
- iPhone XS, iPhone XR, and later models support eSIM.
- For Android devices, eSIM support varies by model. Still, you can consult our list of eSIM-compatible devices and see if your device is included.
Check carrier lock status
- iPhone: Settings > General > About. Under ‘Carrier Lock’, it should say, ‘No SIM restrictions.’
- Android: Settings > Connections > Mobile Networks. The device is likely unlocked if you can add new eSIMs.
Manually select a local network
If the automatic network selection doesn’t work, you may have to adjust this setting manually.
- iPhone: Settings > Mobile Service > Network Selection > Turn off ‘Automatic’ and choose an available network.
- Android: Settings > Connections > Mobile Networks > Network Operators > Turn off ‘Automatic’ and choose an available network.
Update or reset your APN settings
If APN settings are incorrect, your eSIM may show a signal but no data.
iPhone:
- Settings > Mobile Service > Mobile Data Network.
- Enter the APN details below.
Android:
- Settings > Connections > Mobile Networks > Access Point Names.
- Enter the APN details below.
After updating the APN, restart your phone and test your eSIM.
Optus internet settings
| Field | Setting |
|---|---|
| Name | Optus Yes Internet |
| APN | yesinternet |
| Proxy | Leave blank |
| Port | Leave blank |
| Username | Leave blank |
| Password | Leave blank |
| Server | Leave blank |
| MCC | 505 |
| MNC | 02 |
| Authentication type | PAP |
| APN type | default or internet |
Reinstall the Optus eSIM
If the configuration looks correct but the eSIM still doesn’t work, reinstalling may help.
iPhone:
- Settings > Mobile Data
- Tap the Optus eSIM.
- Remove mobile data plan (or Remove eSIM) and confirm.
- Restart the phone.
Android:
- Settings > Network & Internet > SIM manager (or SIMs).
- Tap the Optus eSIM.
- Remove mobile data plan (or Remove eSIM) and confirm.
- Restart the phone.
To re-add your eSIM, simply use the My Optus app or scan a new QR code provided by Optus.
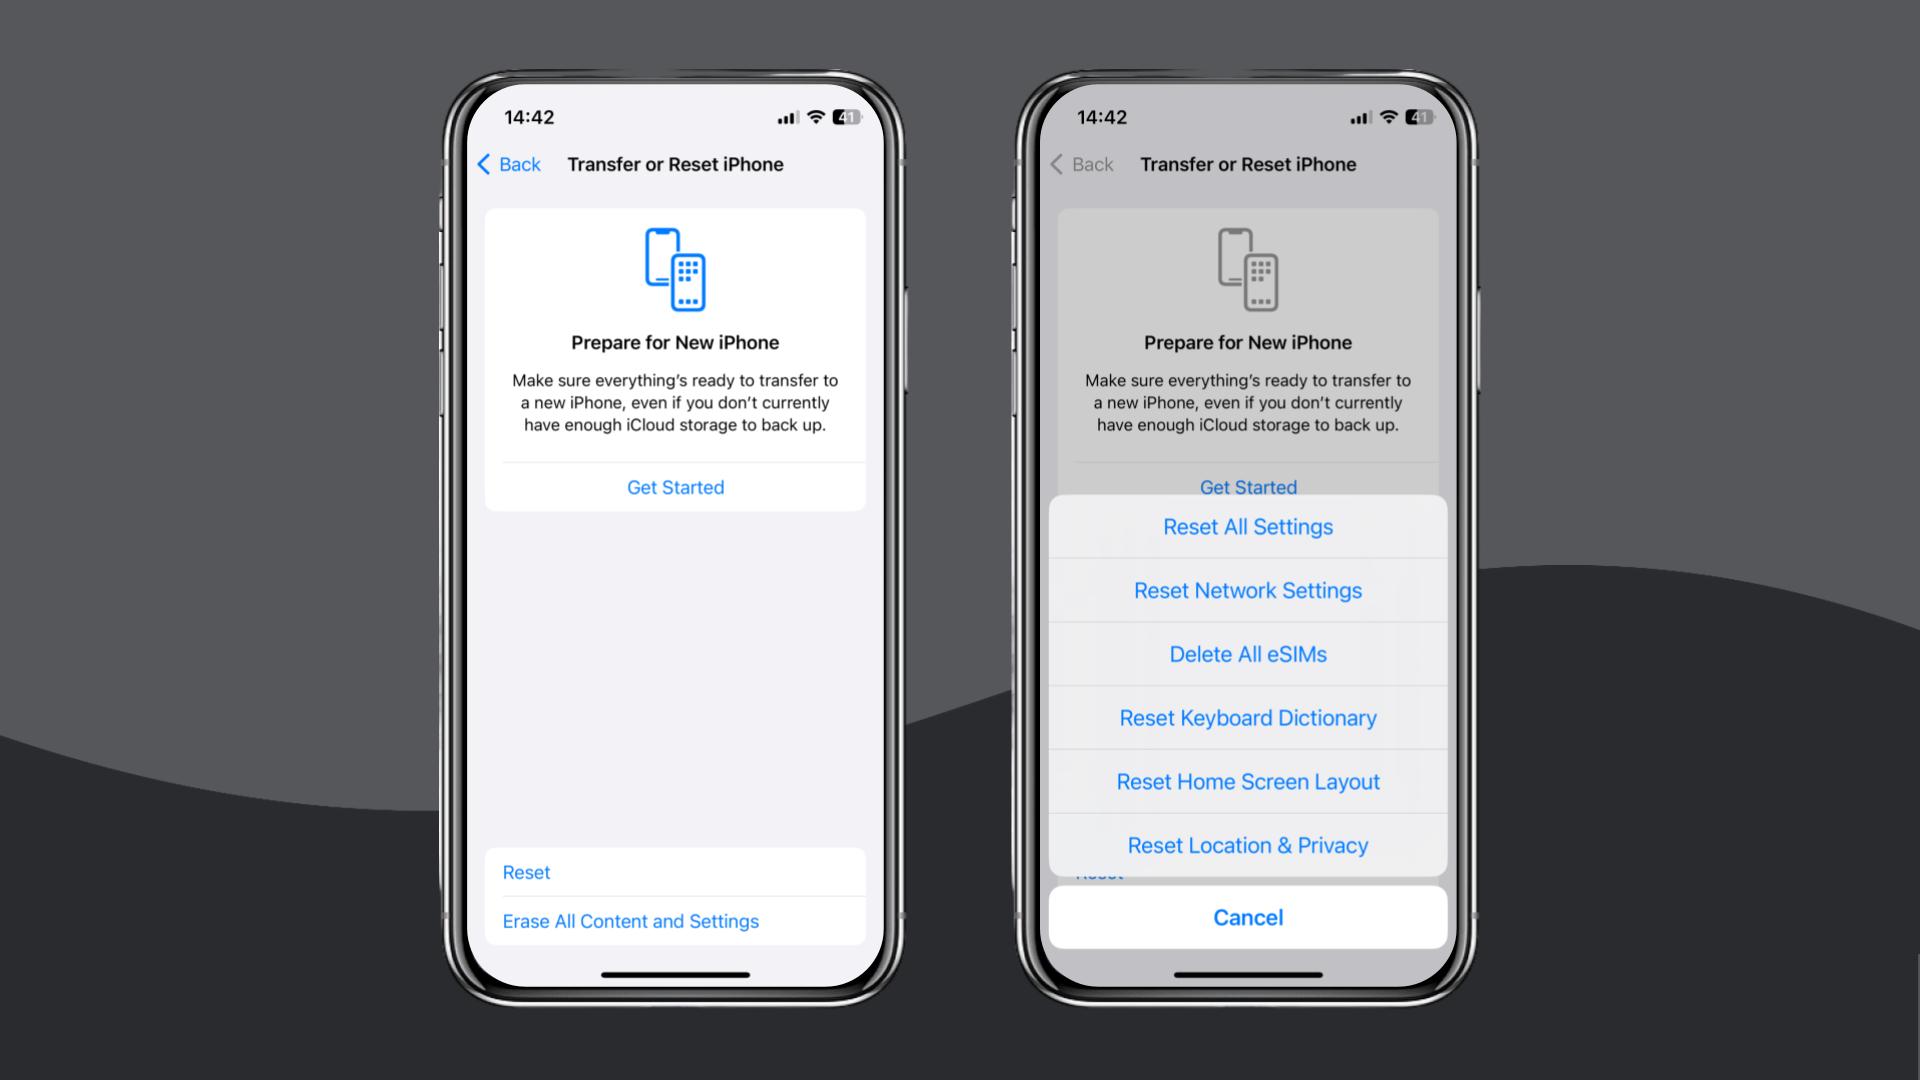
Reset your network settings
Resetting your network will erase all saved networks, APNs, and related settings, which can help fix more complex issues. Just note: this action will impact all network settings on your device, so proceed with care!
- iPhone: Settings > General > Transfer or Reset iPhone > Reset > Reset Network Settings.
- Android: Settings > General Management > Reset > Reset Network Settings.
If you have followed the steps above and your Optus eSIM is still not working, contact Optus support through the My Optus app, live chat, or phone to request further troubleshooting or inquire about a refund.
If you need a dependable way to stay online at home or overseas, consider switching to Holafly (available on iOS and Android).
Choose Holafly for peace of mind as you travel
To avoid repeated troubleshooting and stay connected without interruption, visit the Holafly eSIM store. We offer a strong fallback, whether you’re at home resolving issues with Optus or overseas. Setup takes only a minute using a QR code, and iPhone users can install their eSIM through the Holafly app.

eSIMs for every destination
Get eSIMs for 200+ destinations with Holafly, keeping you connected wherever you go.
Our Holafly Plans cover a wide range of travel needs designed for those looking for something long-term. The Unlimited Plan is ideal if you want to use data freely without tracking usage. At the same time, the Always On plan works well for lighter, everyday browsing. The Light Plan includes 25 GB of data and sits in between the two.
All options include 24/7 customer support to ensure you’re never stuck without help when you need it.
Disclaimer: The data in this article is accurate as of December 02, 2025, and is subject to change.
Plans that may interest you


I am a Liverpool-based SEO content specialist with years of experience crafting content that connects. I combine my love for clear communication with a passion for travel and languages (currently diving into Japanese!). At Holafly, I'm here to help you understand everything about staying connected abroad, turning technical jargon into straightforward advice you can actually use.

