Language


 No results found
O2 eSIM not working? Reasons and how to fix it
O2 eSIM not working? Learn the key causes and quick fixes.

An O2 eSIM may sometimes fail to connect, whether you’re setting it up at home or abroad. In most cases, the problem is due to simple configuration errors.
This guide walks you through the most reliable fixes to get your O2 eSIM up and running.
Still, if the connection cannot be established after troubleshooting, Holafly offers a straightforward fallback. With us, installation takes minutes, and data plans include unlimited usage.

Holafly is highly rated
With a Trustpilot rating of 4.6/5 from 50,000+ reviews, our eSIMs come with a seal of approval.
Why is my O2 eSIM not working?
If you encounter an issue with your eSIM O2 not working on an iPhone or Android, refer to the table below, which outlines the most common reasons.
| Issue | What typically goes wrong |
|---|---|
| Installation failure (QR code issues) | QR code already used, expired, scanned on the wrong device, or interrupted during installation. |
| O2 eSIM transfer not working | eSIM is still active on the old phone, device-to-device transfer fails, or O2 doesn’t recognise the new phone. |
| Device incompatibility or carrier lock | Phone doesn’t support eSIM or is locked to another UK network. |
| Settings errors | Data roaming is turned off, leading to no connection. |
| Network connectivity issues | Automatic network selection fails, causing ‘No service.’ |
| Incorrect APN configuration | APN missing or outdated, resulting in O2 eSIM data not working despite successful activation. |
The following section will guide you through each fix step by step, whether you’re dealing with an O2 eSIM not working iPhone or Android.
How to fix an O2 eSIM
The steps below address the most common causes of an O2 tourism eSIM not working.
Reinstall the QR code
If your O2 eSIM fails during installation, the QR code can be the cause.
| Issue | Cause | Solution | How to implement (when applicable) |
|---|---|---|---|
| ‘This code is no longer valid’ | The QR code has a single-use limit and has already been scanned. | Request a new QR code to resolve the issue of the O2 eSIM QR code not working. | – |
| Installation interrupted | The installation was closed early, or the WiFi dropped, leaving a partially registered eSIM. | Restart installation. If the QR code now shows as invalid, obtain a fresh one from O2. | – |
| Poor scan quality | The code is damaged, printed poorly, or scanned in low light. | Improve lighting. | – |
| Device not scanning | Camera permissions are off | Enable camera permissions | iPhone: Settings > Camera > Ensure the toggle switch next to ‘Scan QR Codes’ is on Android: Settings > Security & Privacy > Permissions > Camera. Ensure the app you’re using for the eSIM setup has permission set to ‘Allow.’ |
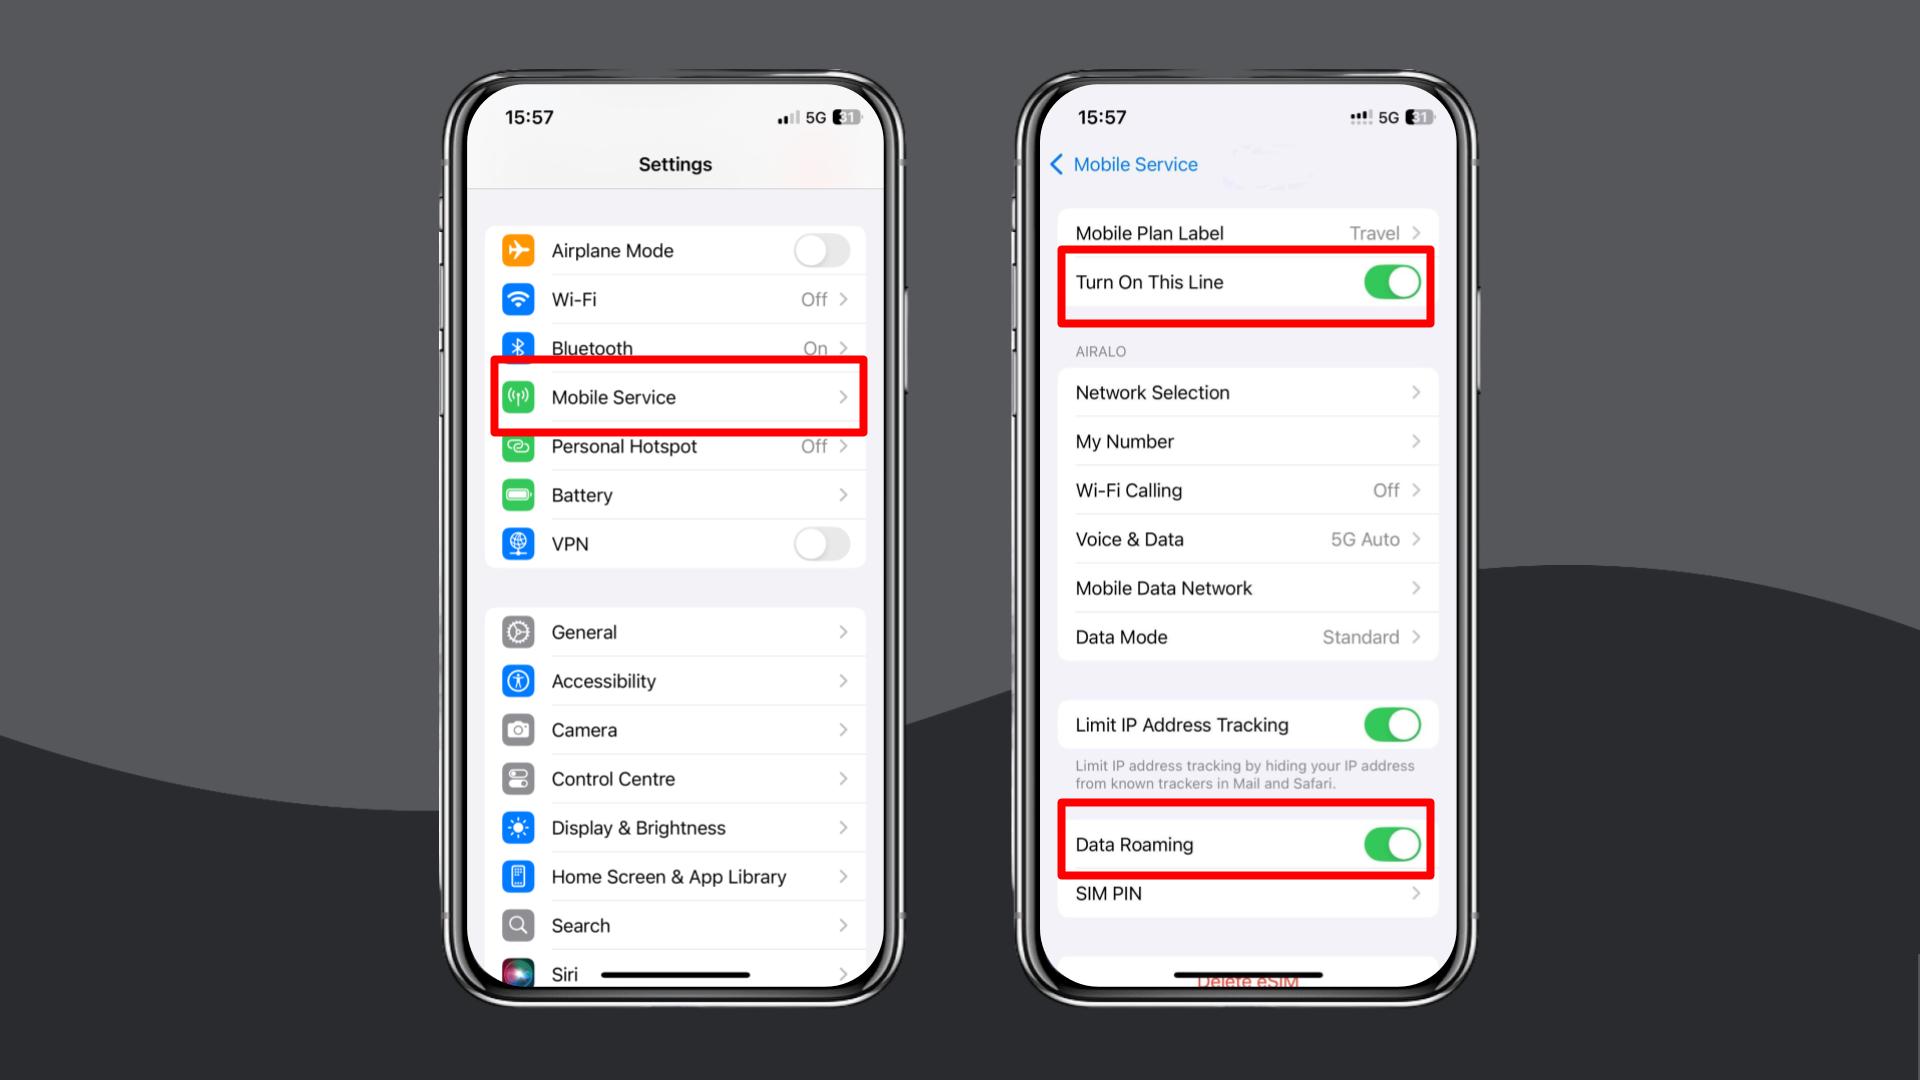
| eSIM already installed | The eSIM may have been installed without your notice. | Check mobile settings for an existing O2 profile and enable it as the data line. | iPhone: Settings > Mobile Data and locate the O2 eSIM listed under your plans. Tap it and enable ‘Turn On This Line.’ Android: Settings > Network & Internet > SIMs. In the SIM list, locate the O2 eSIM and switch it on if it appears disabled. |
Transfer the eSIM again
Suppose your O2 eSIM transfer is not working. In that case, the issue usually comes from the old device still holding the active profile, a device lock, or a limitation in O2’s transfer process.
The table below summarises the most common problems and presents solutions.
| Problem | Cause | Solution | How to implement (when applicable) |
|---|---|---|---|
| Transfer option not available | The old device is not updated, or the devices are too far apart/lack Bluetooth. | Update both devices to the latest OS, enable Bluetooth, and keep them close together during transfer. | – |
| ‘Activation failed’ or ‘Already transferred’ | The eSIM remains active on the old device, blocking activation on the new one. | Remove or deactivate the O2 eSIM on the old device. | iPhone: Settings > Mobile Data and select the O2 eSIM. Scroll to the bottom of the screen and tap ‘Remove Mobile Data Plan.’ Android: Settings > Network & Internet > SIMs. Tap the O2 eSIM and select ‘Delete SIM.’ |
| No service after transfer | The transfer was interrupted or is still processing on O2’s system. | Allow up to 24 hours for activation to complete. In the meantime, keep the new device connected to a stable WiFi connection during and after setup until the activation is complete. | – |
Check if your device supports eSIMs and isn’t carrier-locked
It’s a good idea to verify that your phone supports eSIM and isn’t carrier-locked.
Confirm eSIM compatibility
Most iPhones starting from the XS/XR range support eSIM. Android compatibility varies by model, so it’s best to consult our list of devices that support eSIM.
Check if the phone is unlocked
- iPhone: Settings > General > About and look for ‘Carrier Lock.’ If it shows ‘No SIM restrictions’, the device is unlocked.
- Android: Settings > Connections > Mobile Networks. If the phone allows the addition of new SIMs, it’s likely unlocked.
Restart your phone after installation
A restart forces the device to load the new O2 profile correctly.
- iPhone: Press and hold the volume button and the side button. Then, drag the slider to power on.
- Android: Hold the power button and tap ‘Restart.’
Turn on data roaming
O2’s international data roaming must be enabled for any O2 eSIM used abroad.
- iPhone: Settings > Mobile Data > Your O2 eSIM > Turn on Data Roaming.
- Android: Settings > Network & Internet > Your O2 eSIM > Data Roaming > Turn on Data Roaming.
Enable and disable Airplane Mode
Toggling Airplane Mode forces the device to re-establish the network connection.
On iPhone and Android:
- Turn Airplane Mode on.
- Wait 5–10 seconds.
- Turn it off and allow the device to search for a network.
Manually select a local network
If automatic registration fails, choose a supported O2 roaming partner manually.
- iPhone: Settings > Mobile Service > Network Selection > Turn off ‘Automatic’ and choose an available network.
- Android: Settings > Connections > Mobile Networks > Network Operators > Toggle off ‘Automatic’ and choose an available network.
Update or reset your APN settings
If O2 eSIM data is not working, the APN settings may be incorrect.
The correct APN settings depend on whether you’re a Pay Monthly or Pay As You Go (PAYG) customer.
| O2 APN Settings | Pay Monthly | Pay As You Go (PAYG) |
|---|---|---|
| Name | O2 Internet | O2 PAYG Internet |
| APN | mobile.o2.co.uk (or idata.o2.co.uk on some iPhones) | payandgo.o2.co.uk |
| Username | o2web (or vertigo on certain iPhones) | payandgo |
| Password | password | password |
| MMSC | http://mmsc.mms.o2.co.uk:8002 | http://mmsc.mms.o2.co.uk:8002 |
| MMS Proxy | 82.132.254.1 | 82.132.254.1 |
| MMS Port | 8080 | 8080 |
| MCC | 234 | 234 |
| MNC | 10 | 10 |
| Authentication Type | PAP | PAP |
| APN Type | default,supl,mms (or internet+mms) | default,supl,mms |
iPhone:
- Settings > Mobile Service > Mobile Data Network.
- Enter the APN details above.
Android:
- Settings > Connections > Mobile Networks > Access Point Names.
- Enter the APN details above.
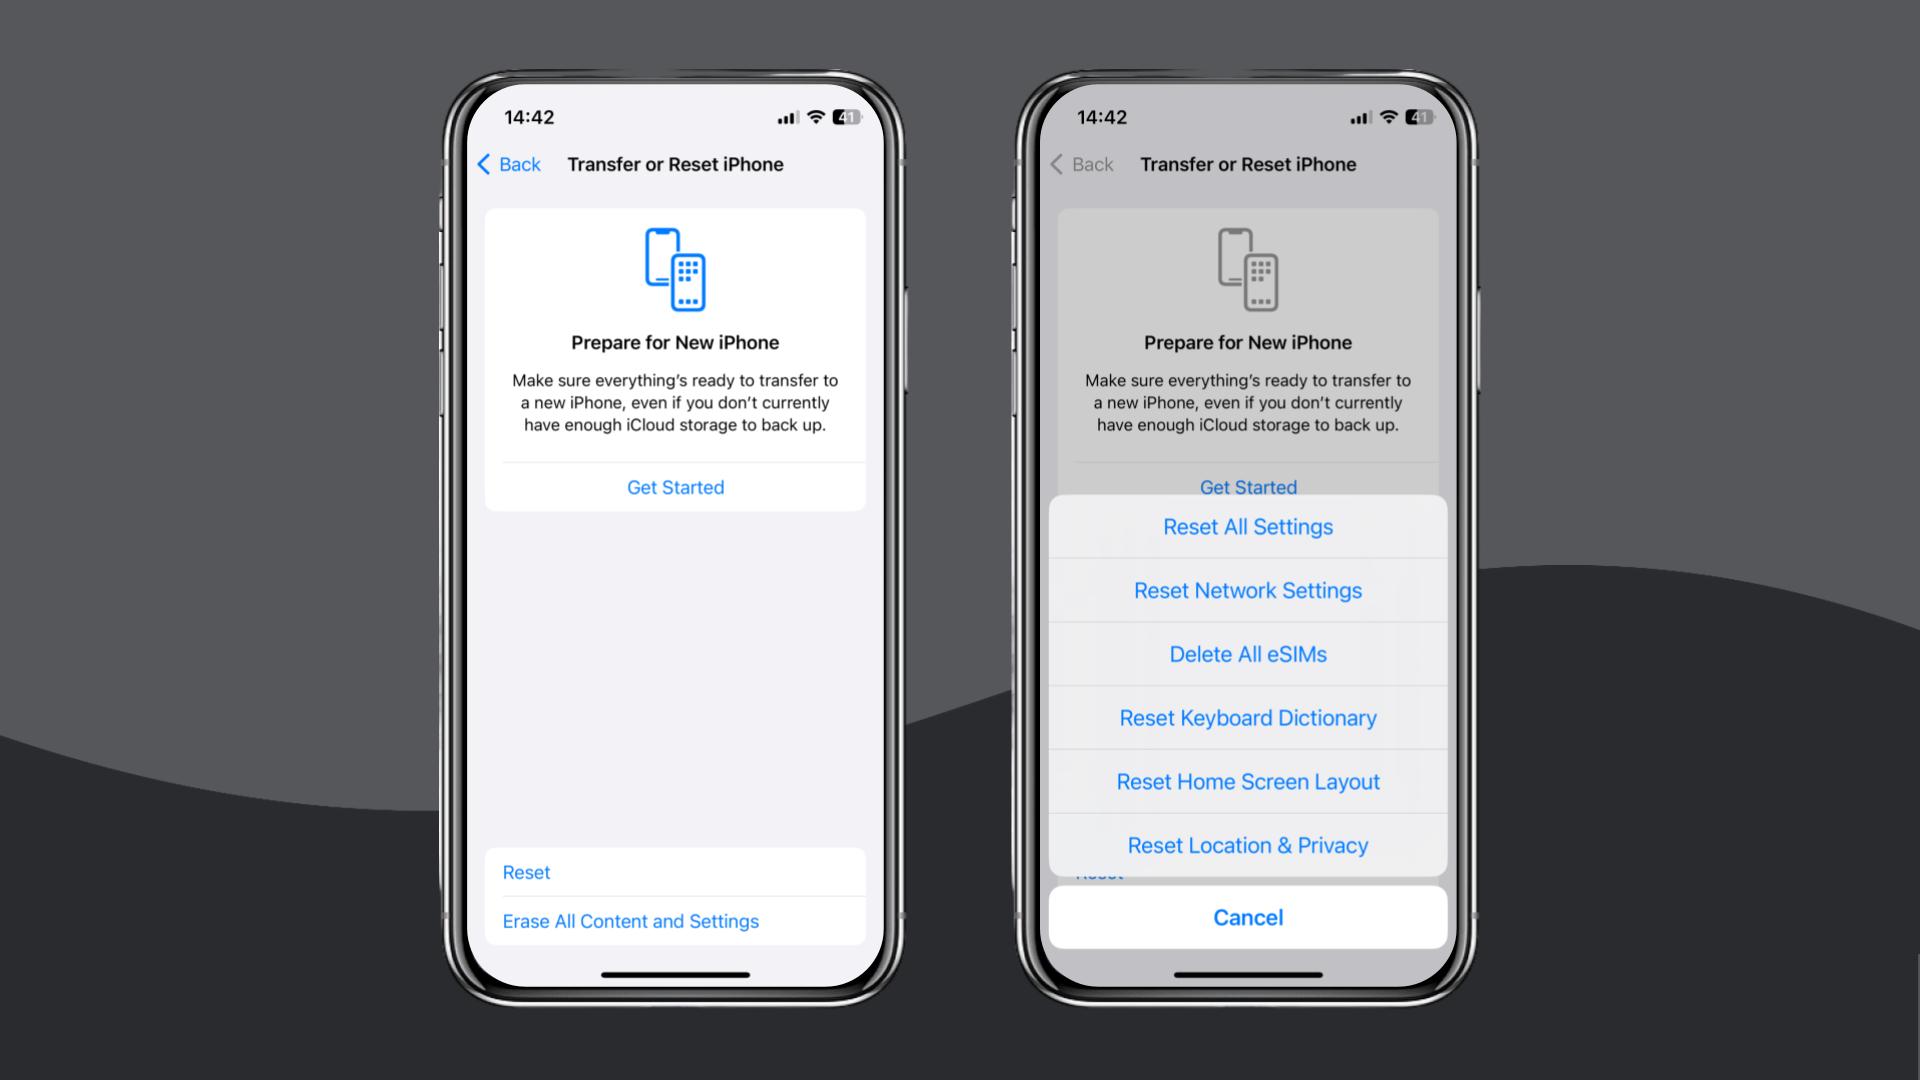
Reset your network settings
If all settings appear correct but the O2 eSIM still doesn’t connect, a complete network reset can clear conflicting configurations.
However, resetting your network settings will remove all saved network information, including WiFi passwords, Bluetooth pairings, VPN profiles, and mobile data configurations. Thus, proceed with caution.
- iPhone: Settings > General > Transfer or Reset iPhone > Reset > Reset Network Settings.
- Android: Settings > General Management > Reset > Reset Network Settings.
If the O2 eSIM data is still not working after these steps, contact O2 support via live chat, the My O2 app, or email. They can issue a new QR code, check your account, or process a refund.
If you need an immediate solution, check out our Holafly eSIM store.
More on that next.
Choose Holafly for peace of mind
If you’ve tried every fix and your O2 eSIM is still not working, it may be worth considering an alternative.
With Holafly, installation takes a few minutes using a QR code, and iPhone users can complete the entire setup directly through the Holafly app. Once installed, the eSIM activates automatically, eliminating the need to adjust network settings.
If you’re travelling, Holafly eSIMs offer reliable data in many countries. If you’re in the UK and need a temporary backup while resolving issues with O2, we can help too.
An eSIM you can rely on
Join over 10 million Holafly customers and get connected with our trusted, global services.
We offer three main Holafly Plans: the Always On plan for occasional use, the Light Plan for moderate everyday data needs, and the Unlimited Plan, ideal for those who need to use a high volume of data.
Support is available 24/7 through live chat, so if an issue arises, you can receive assistance immediately.
Disclaimer: The data in this article is accurate as of November 28, 2025, and is subject to change.
Plans that may interest you


I am a Liverpool-based SEO content specialist with years of experience crafting content that connects. I combine my love for clear communication with a passion for travel and languages (currently diving into Japanese!). At Holafly, I'm here to help you understand everything about staying connected abroad, turning technical jargon into straightforward advice you can actually use.