




 Language

Huawei eSIM: how to install and activate it on your phone
Setting up a Huawei eSIM requires two steps directly from your phone settings: installation, which involves downloading and saving the eSIM to your device, and activation, which is the final step to turn on the line and start browsing.
This technology is compatible with popular models like the Huawei P40, P40 Pro, Mate 40 Pro, and Pura 70 Pro (though compatibility may vary by region or carrier). Below, we’ll show you how to complete this process using different setup options, and answer the most common questions to ensure you a guaranteed connection.
Before you install your Huawei eSIM
- Confirm that your device is eSIM-compatible and unlocked (meaning it isn’t locked to the carrier you bought it from).
- Make sure you are connected to a stable Wi-Fi network.
Important: For Global or Regional (Europe, South America, Africa, etc.) plans, install it no earlier than 1 day before your trip to ensure your data starts when you need it. For single-country plans, install it at any time.

How to install eSIM on Huawei
There are three options to install your Huawei eSIM. If available, the app that comes with your eSIM is usually the quickest option, as most of the setup is done automatically.
You can also install your eSIM using the universal methods, such as the QR code or manual activation details commonly sent to your email. Review the options below and choose the one that works best for you.
1. Automated eSIM installation via App
If your eSIM provider has its own app (like Holafly), just download it for a more direct setup and follow these steps:
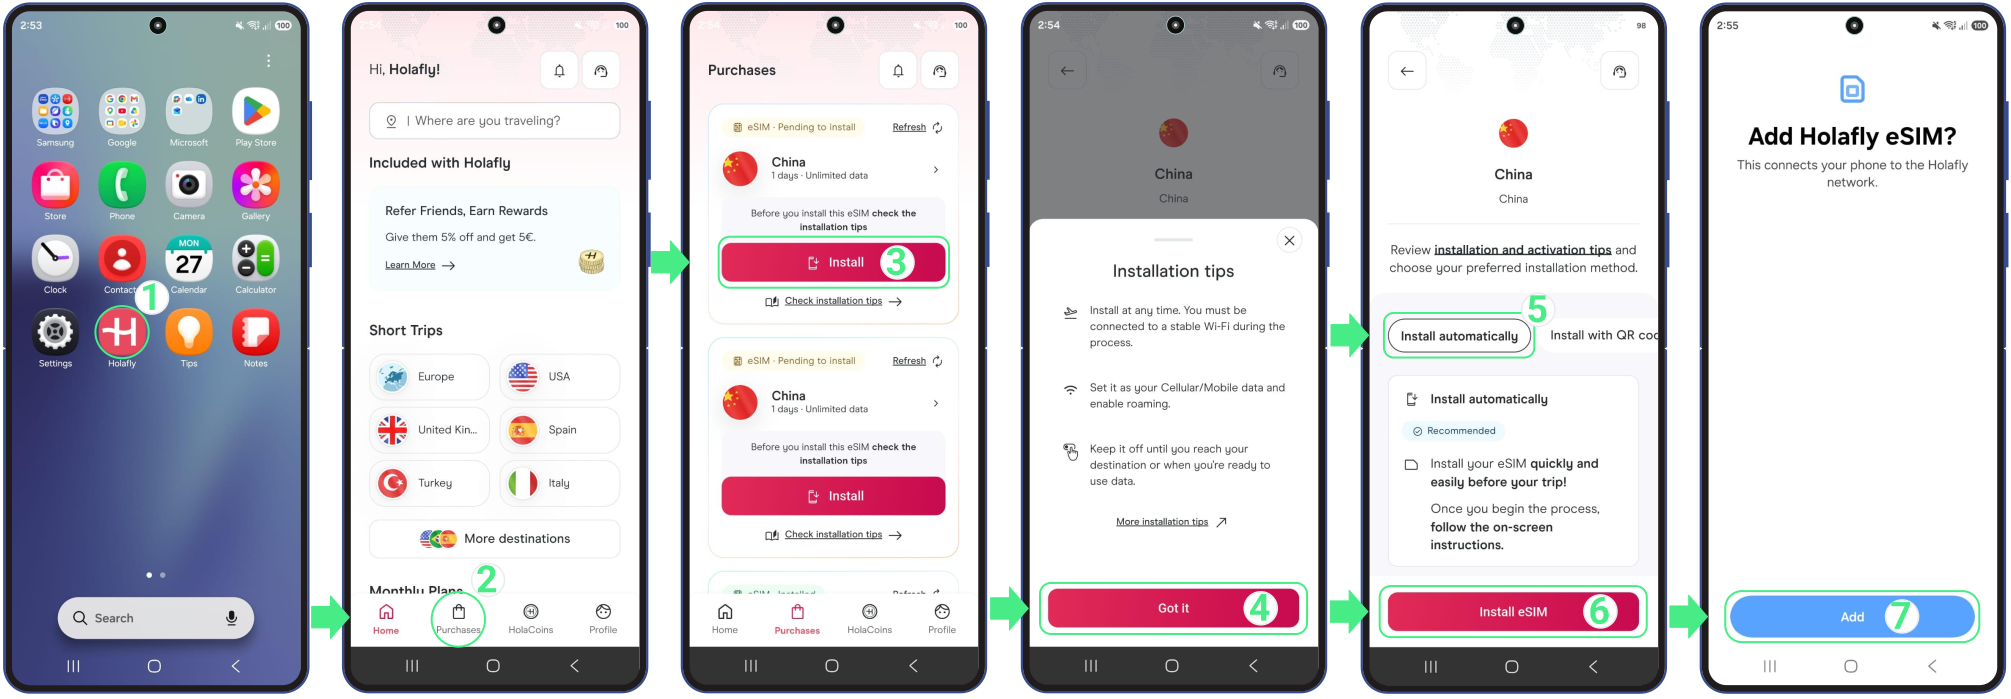
- Open the app on your phone → Log in with the email associated with your purchase → Go to Purchases → Tap Install on the eSIM you want to add → Read the Installation tips and tap Got it to continue → Choose Install Automatically → Tap Install eSIM → Then, tap Continue and Add to save your new line inside your Huawei’s SIM management menu (Keep this window open until it finishes).
2. Installation via QR code
The QR code method is another easy way to install an eSIM on Huawei. You can scan the QR code from another screen or save it to your gallery and select it during setup. Follow the steps below through your phone’s settings (don’t use your camera app).
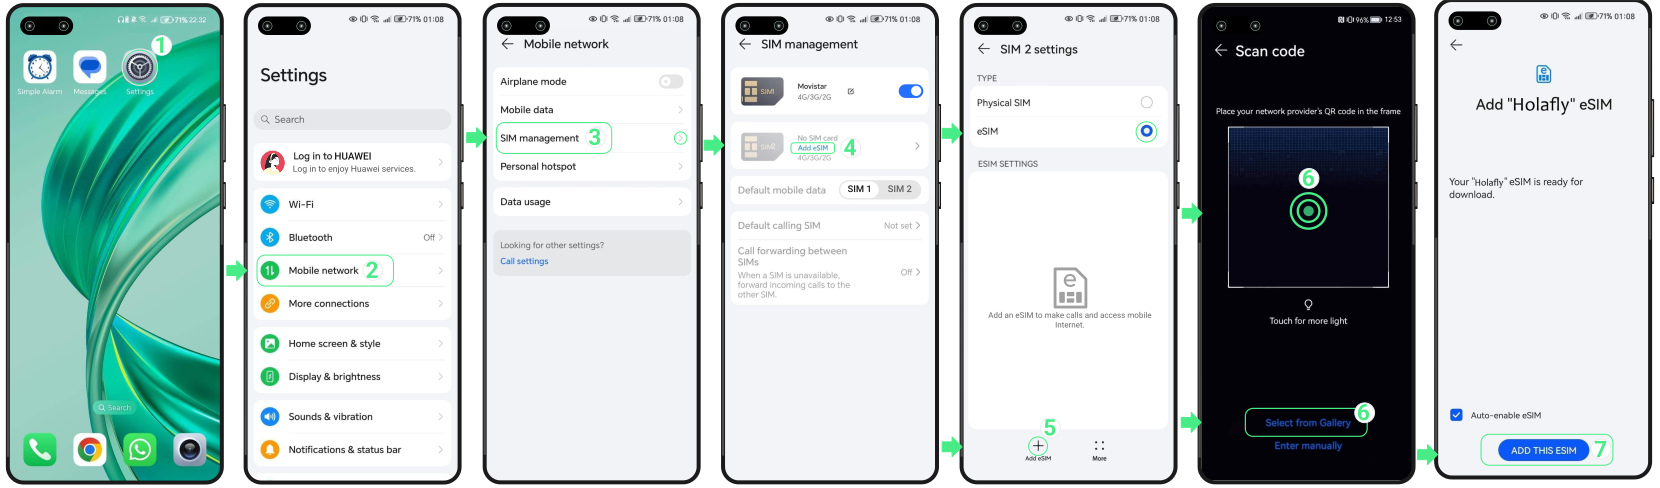
- Go to Settings → Select Mobile network → Tap on SIM management → Select Add eSIM → Enable the eSIM option → Press the Add eSIM button in the bottom left corner of the screen → Scan the QR code, or tap the “Select from gallery” text link below to choose it from your photos → Tap on Add this eSIM (Don’t close this window, or the installation will stop).
3. Manual eSIM Installation on Huawei
If the other installation methods didn’t work as expected, you can also install your eSIM using the manual activation details received. Just follow the steps below:
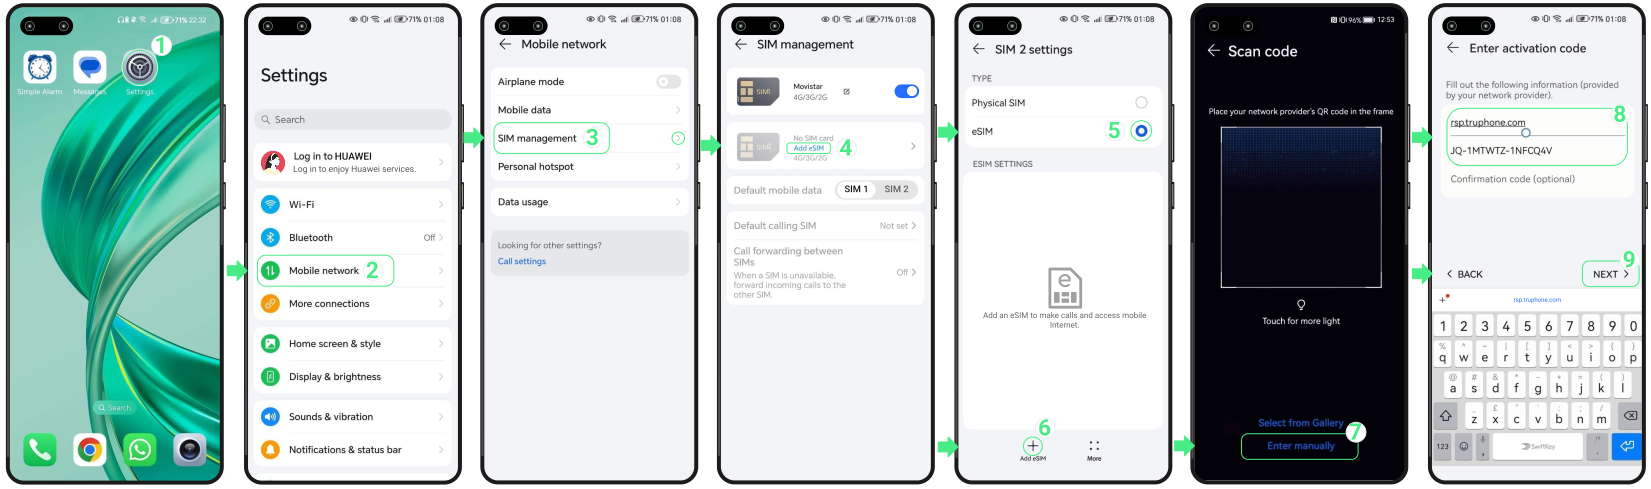
- Go to Settings → Select Mobile network → Tap on SIM management → Select Add eSIM → Enable the eSIM option → Press the Add eSIM button in the bottom left corner of the screen → Tap on Enter manually → Copy the two manual codes from the iOS section in your eSIM confirmation email (Huawei uses the same two-field format as iOS, not Android) and paste the SM-DP+ Address and the Activation code into their respective fields → Tap Next → Tap Add eSIM (Keep this window open until it finishes).
Note: Please keep in mind that these are manual text codes, not clickable links.
How to activate Huawei eSIM
After installing your eSIM, activation happens from your phone settings. For travel eSIMs, your plan starts whOnce your eSIM is installed on your Huawei, you’re ready to activate it by turning on the line and setting it as your main data source.
If you are using a travel eSIM, remember that your plan will only start working once you arrive at your destination and turn on data roaming.
Follow these steps to activate it:
- Go to Settings → Select Mobile network → Tap on SIM management → Set your new eSIM as Default mobile data → Deactivate your Personal SIM/eSIM (this prevents unexpected charges from your home carrier) → Tap on the recently installed eSIM → Check that the eSIM option is selected → Then, tap on your New eSIM line again.
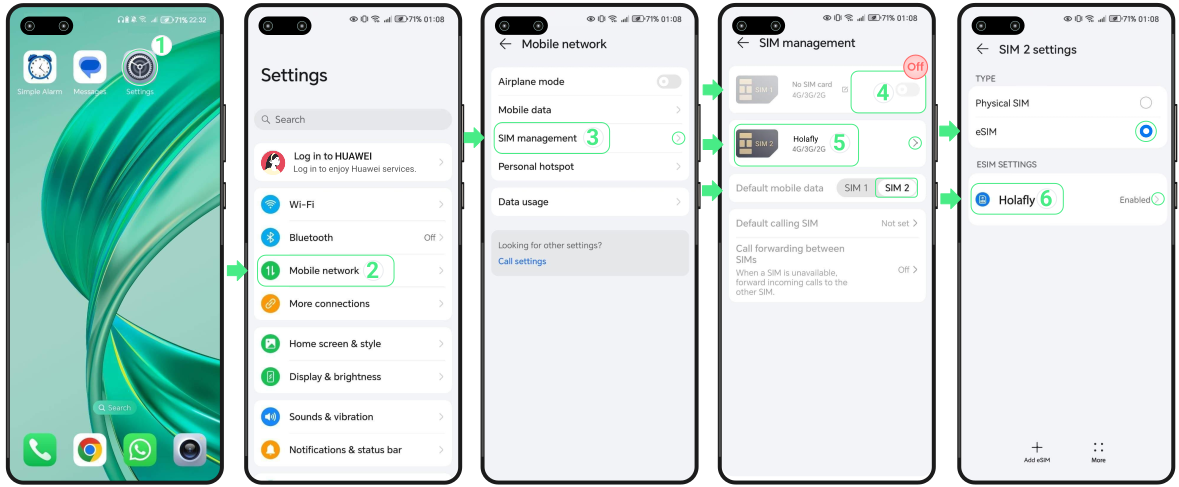
- Turn on the Enable switch → Go back three times until you reach the Mobile network menu → Then, choose Mobile data → Turn on Mobile data and also Data roaming if you are using a travel eSIM.
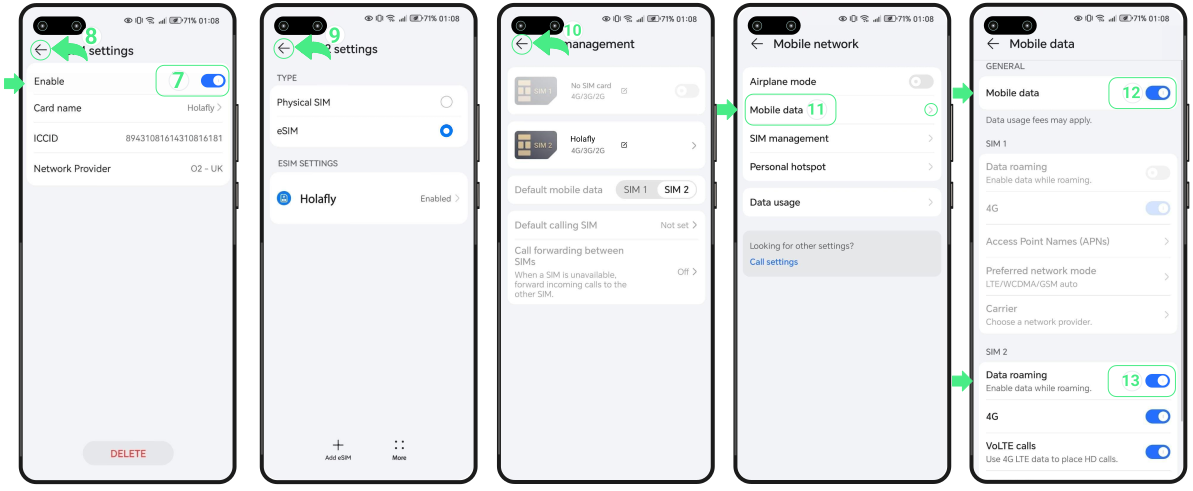
And that’s it! Now you’ll have your data plan active and can enjoy reliable data service on your trip.
Troubleshooting tips
During Installation
If Huawei shows a message while adding your eSIM, there’s no need to start the installation again right away. In many cases, the eSIM has already been saved on your device. Before trying again, check the following:
- On your phone: Go to Settings → Mobile network → SIM management. Your eSIM should appear in the SIM list, either with the provider name or the name you selected during setup.
- In the App: Check your eSIM status. If it says “eSIM Installed – Ready to use,” your eSIM is installed and ready for activation.

Using your mobile data
Once you switch on your eSIM following the activation steps above, your Huawei device will automatically search for the network. Give it a few moments to establish a stable connection.
If you still don’t see any signal bars at the top of your screen after a few moments, go to your mobile network settings and select another local operator manually.
⚠️ Important: Keep your eSIM installed on your device. Don’t delete it to fix connection issues.