




 Language

Oppo eSIM: how to install and activate it
Setting up an Oppo eSIM is a quick and simple process you can complete in just a few minutes. If your device supports eSIM, you’ll be connected in just a few steps.
To get started, you’ll go through two quick stages: first, installing the eSIM on your phone using the app linked to your eSIM, a QR code, or manual activation details, and second, activating it for mobile data. Below, you’ll find everything you need to start browsing in no time.
What you need to install an eSIM on Oppo devices
Before setting up your new Oppo eSIM, it’s important to check the basic requirements.
- An unlocked and eSIM-compatible Oppo phone, though you should verify compatibility since not all models support eSIM by region, and your device must be unlocked to use another provider.
- A stable Wi-Fi connection. This is required to download and add the eSIM to your device.
- For Global or Regional (Europe, South America, Africa, etc.) eSIM plans, install it no earlier than 1 day before your trip to ensure your data starts when you need it. For single-country plans, install it at any time.

How to install an eSIM on Oppo
The fastest way to set up an eSIM is directly through your provider’s app. However, you can also use two universal methods: a QR code or a manual code. Both methods follow a similar path in your phone’s settings and work across all compatible Oppo models.
1. Automated eSIM installation via App
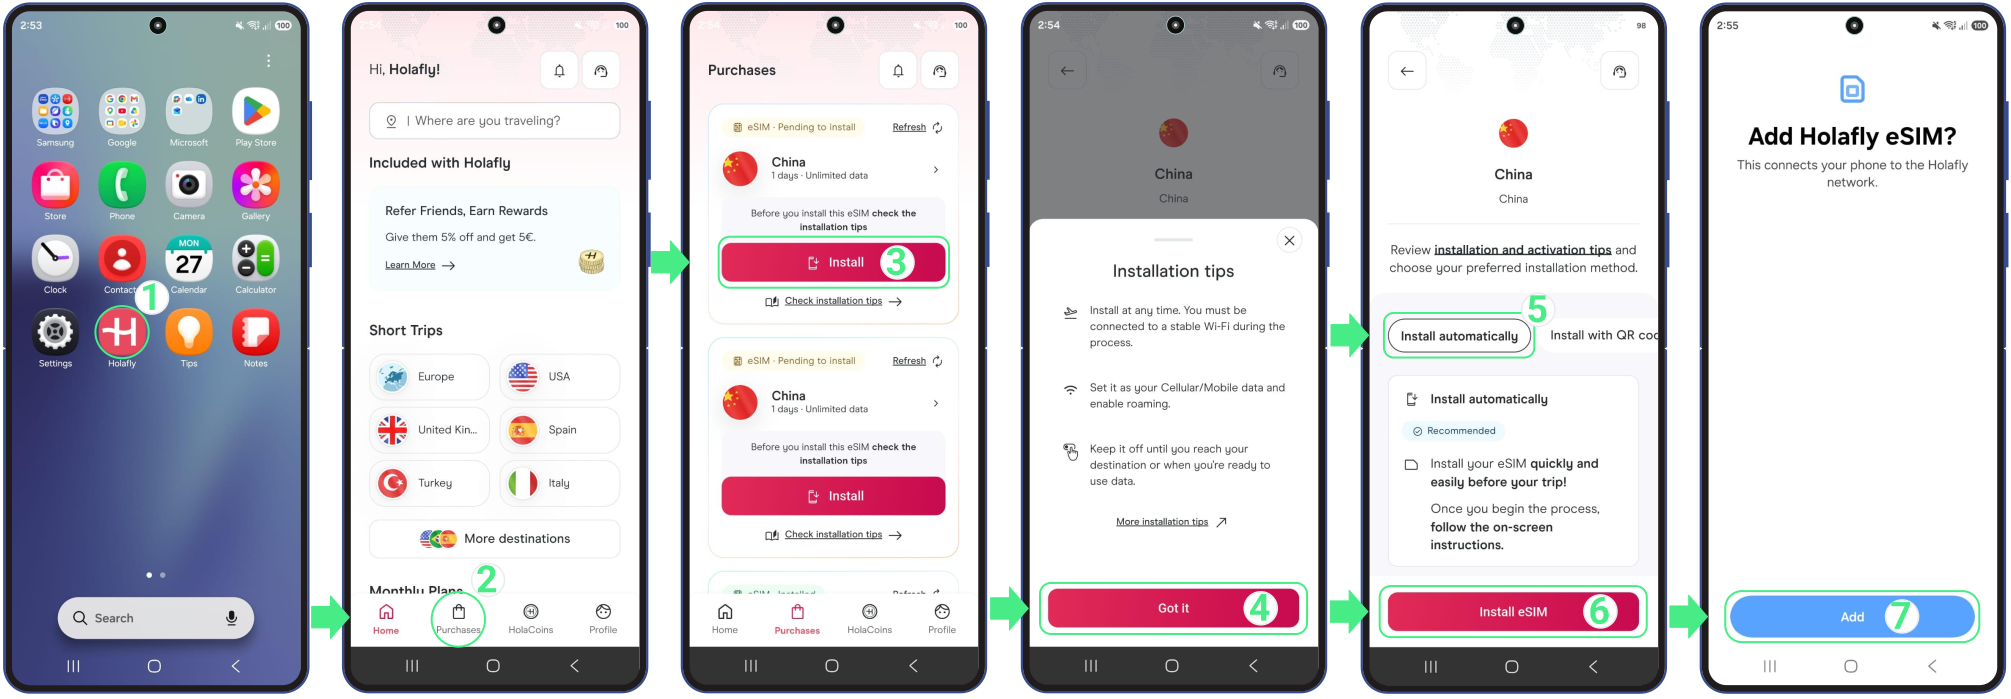
Installing your eSIM through the app is simple and only takes a few minutes. Just download or open the app here and follow these steps:
- Go to the app on your phone → Log in with the email associated with your purchase → Go to Purchases → Tap Install on the eSIM you want to add → Read the Installation tips and tapGot it to continue → Choose Install Automatically → Tap Install eSIM → Then, tapAdd and Download to save your new line inside the Mobile Network menu in settings.
2. Install an eSIM on Oppo using a QR code
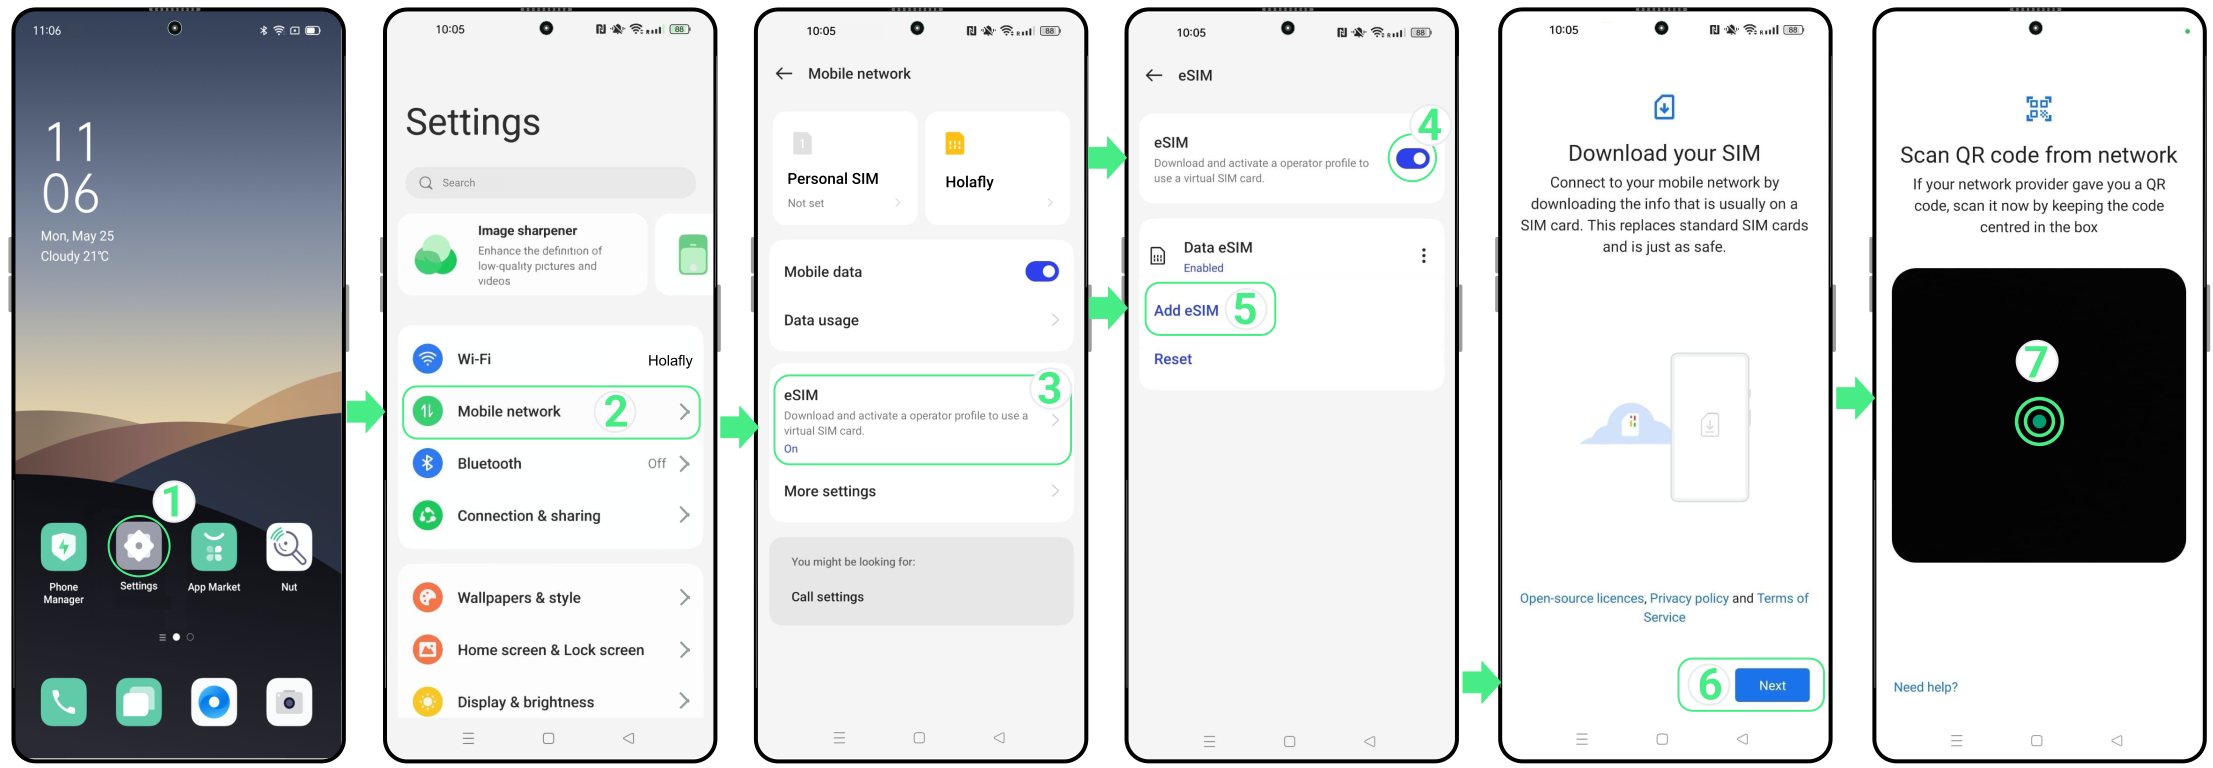
The QR code method is another easy way to install an eSIM on Oppo. Since you’ll need to scan the QR code with your phone’s camera through settings phone, open the QR code received on another device before you begin. Then, follow the steps below.
- Go to Settings → Mobile network → Tap on eSIM → Toggle on the eSIM switch → Tap Add eSIM → Select Next → Scan the QR code you received → Tap Download and wait for the installation to complete (keep this screen open until the process finishes) → Confirm that the eSIM has been added to your device.
3. Install an eSIM on Oppo using manual installation details
If your QR code won’t scan, you can copy the activation code from your confirmation email and paste it directly into your phone’s settings by following the steps below:
Note: These are text codes that you need to type or copy manually because they are not clickable links.
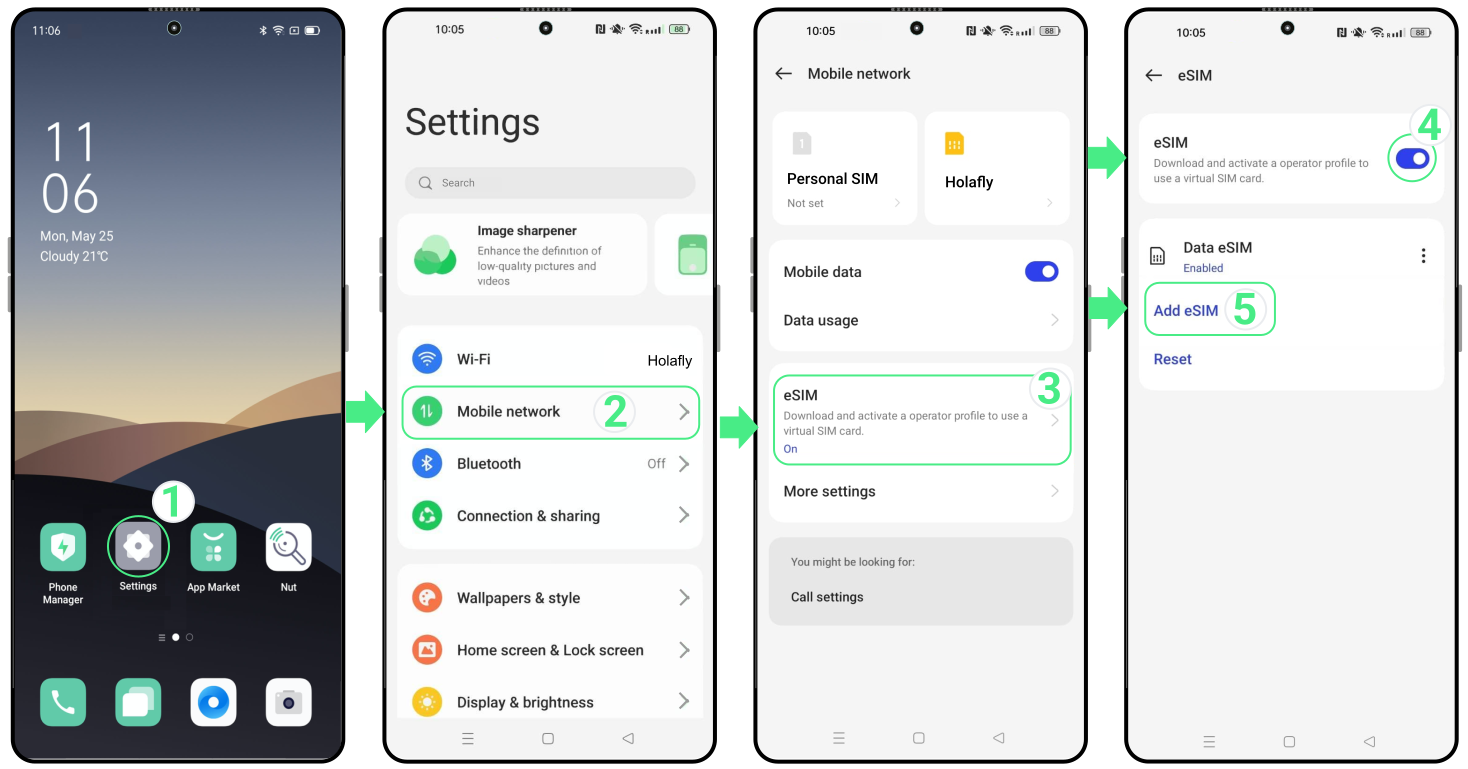
- Go to Settings → Select Mobile Network → Tap on eSIM → Toggle on the eSIM switch → Tap Add eSIM.
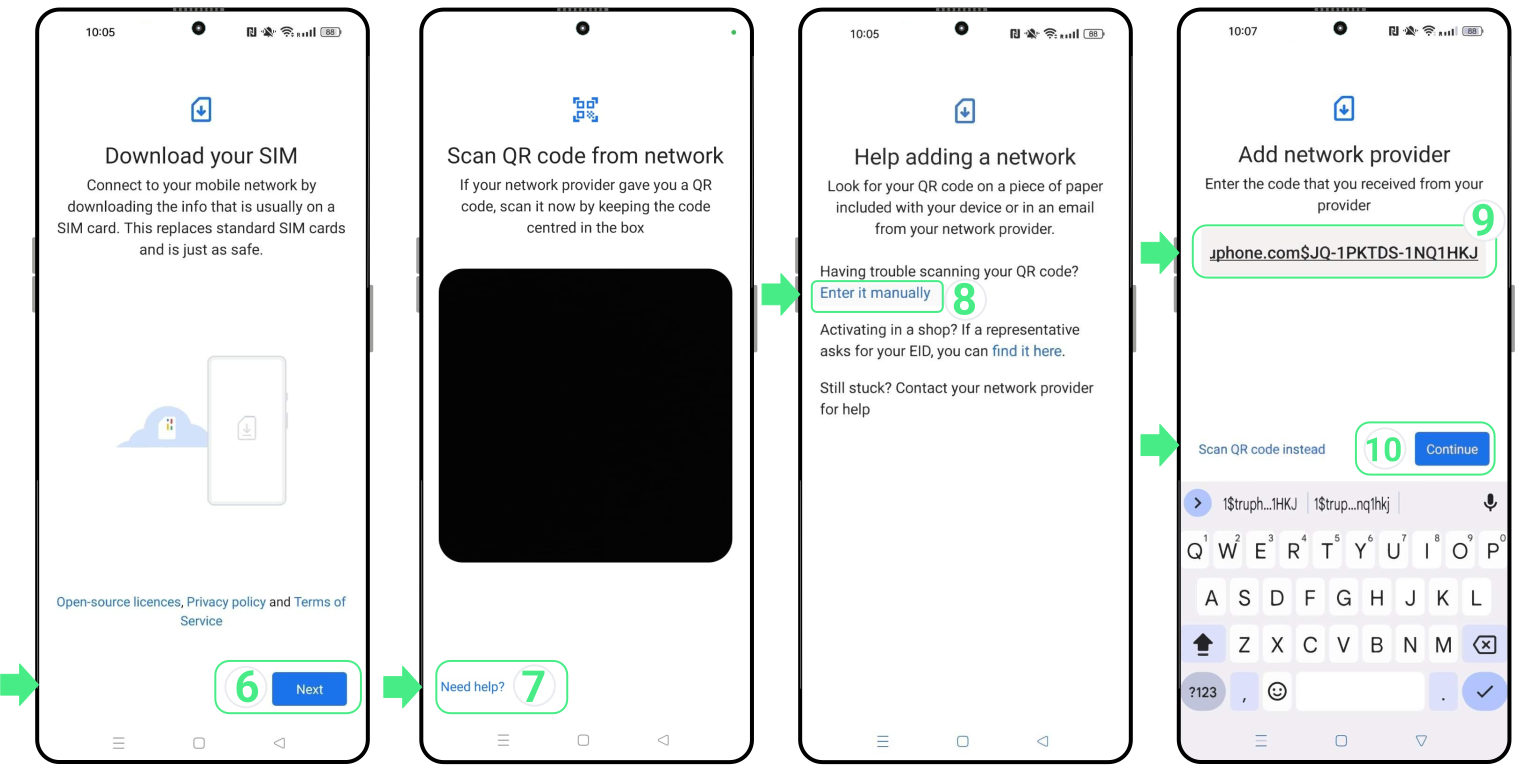
- Tap on Next → Select Need help? → Choose Enter it manually → Copy and paste the full installation details exactly as provided (Including “LPA” and the colon “:”) → Tap Continue → Select Download and wait for the installation to finish (keep this screen open) → Confirm that the eSIM appears on your device.
How to activate an eSIM on Oppo
Once the eSIM is installed, activating it only requires turning on the new line and selecting it for mobile data. This step can be done directly from your phone settings and does not require an internet connection.
If you’re using a travel eSIM, it’s recommended to enable the line only after you arrive at your destination to avoid activating it too early.
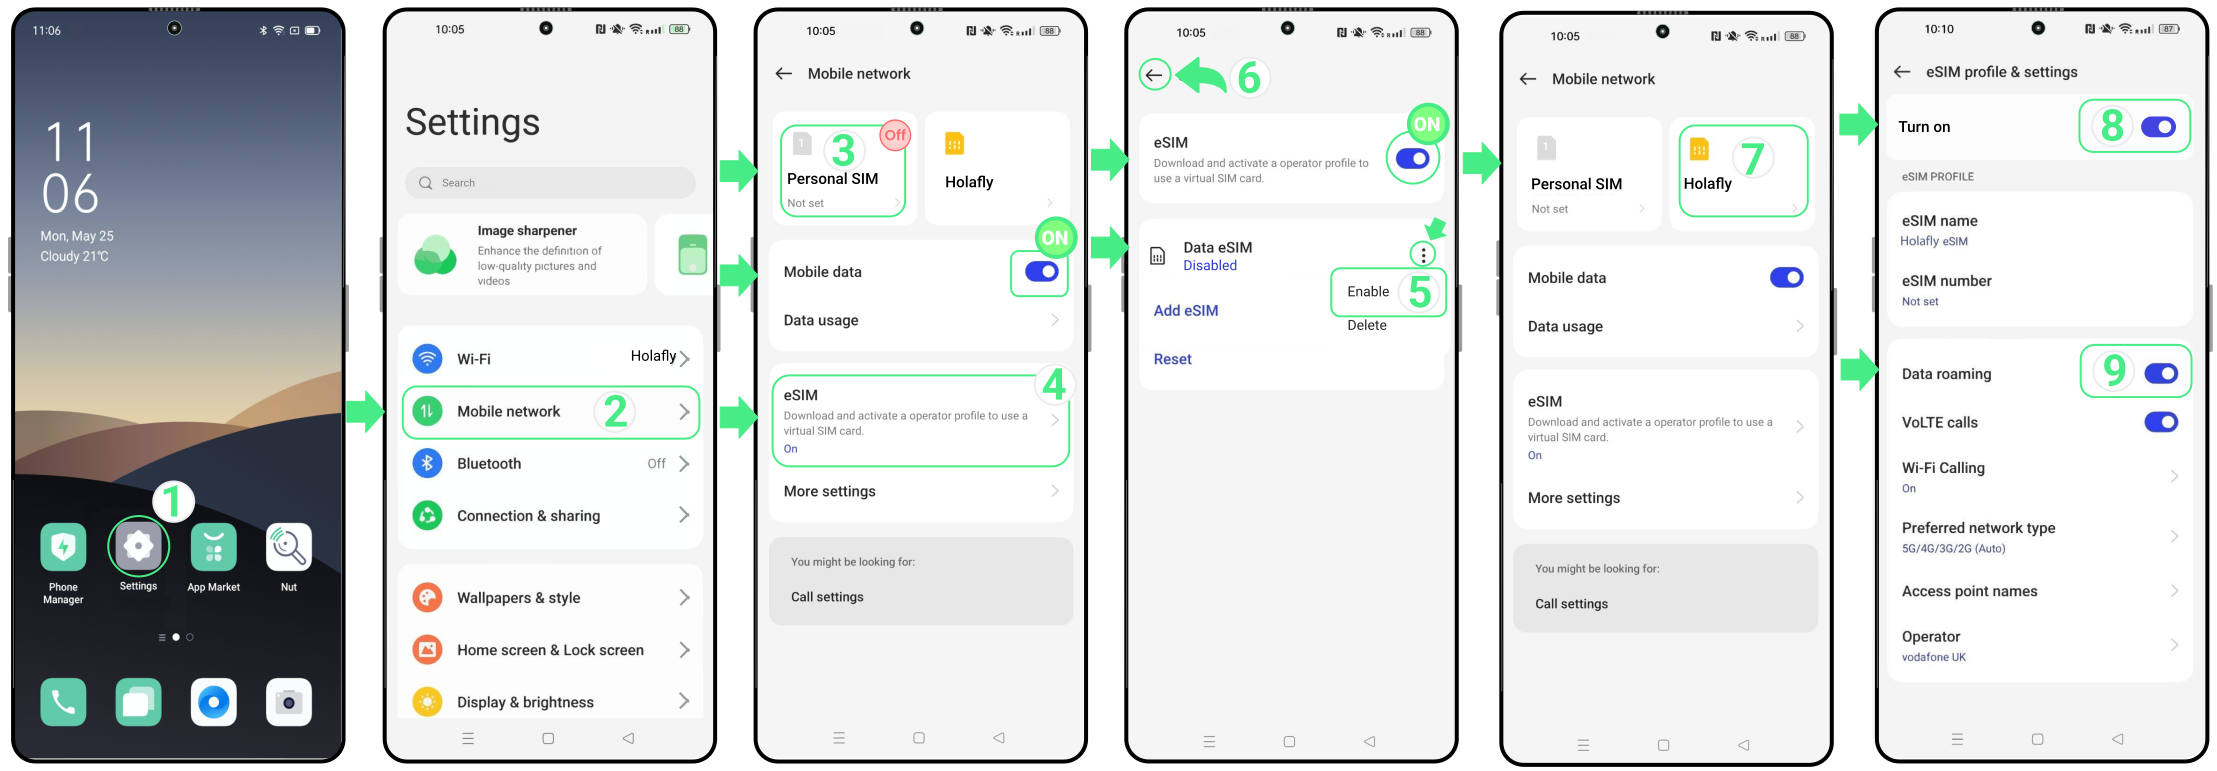
Follow these steps to activate your new eSIM:
- Go to Settings → Select Mobile network → Disable your main SIM card/eSIM (optional, if you want to avoid extra charges with your home carrier) → Tap eSIM and make sure it’s enabled by turning on the switch → Tap the three dots next to the Data eSIM of the new installed eSIM and select Enable to confirm activation → Go back to Mobile network and select the New eSIM → Turn on the Enable switch → Toggle Data roaming switch (only if you are using an international travel eSIM).
Troubleshooting tips
During Installation
If Oppo displays a message during installation, there’s no need to start over right away. In many cases, the eSIM has already been added to your phone. Before trying again, take a quick look:
- On your phone: Go to Settings → Mobile network. Your new eSIM should appear there as a new card, either with the provider name or the custom name you chose during setup.
- In the App: Check your eSIM status. If it says “eSIM Installed – Ready to use,” everything is ready for activation.

Using your mobile data
If you’re not connected right away after following the activation steps, give your Oppo a few minutes to register on a local network. If you still don’t have a connection, try selecting a network manually.
⚠️ Important: Don’t remove your eSIM. Once deleted, it couldn’t be installed again, and you won’t be able to use that data plan.