




 Language

How to install and activate an eSIM on a Google Pixel?
To activate an eSIM on a Google Pixel and start using your mobile data, you just need to complete two main steps. First, add your new line to your device through the app linked to your eSIM, a QR code, or manual setup. Then, turn the line on from your phone settings to connect to the network.
In this guide, we’ll show you how to activate an eSIM on a Google Pixel step by step. We’ll cover all installation methods and the settings to review so you can get connected in less than 5 minutes.
What you need before installing an eSIM on a Google Pixel
Before installing the eSIM, make sure your Google Pixel meets these requirements.
- Make sure your phone has at least 20% battery to complete the setup without interruptions.
- Your Google Pixel must support eSIM and be unlocked, as carrier restrictions can prevent activation.
- You need a stable internet connection, such as Wi-Fi, to download the eSIM profile.
- Have your QR code or activation details ready in case manual installation is needed.

Note: Installing your eSIM does not activate your plan or use your mobile data. However, if your regional (Europe, South America, Asia, etc.) or global eSIM includes the country you are currently in, it may start being used once it connects to a local network. We recommend installing it only one day before your trip to avoid using your plan days before you need them.
How to install the eSIM on the Google Pixel
There are three ways to install an eSIM on a Google Pixel. Review the options below and choose the one that works best for you.
1. Installation through the app
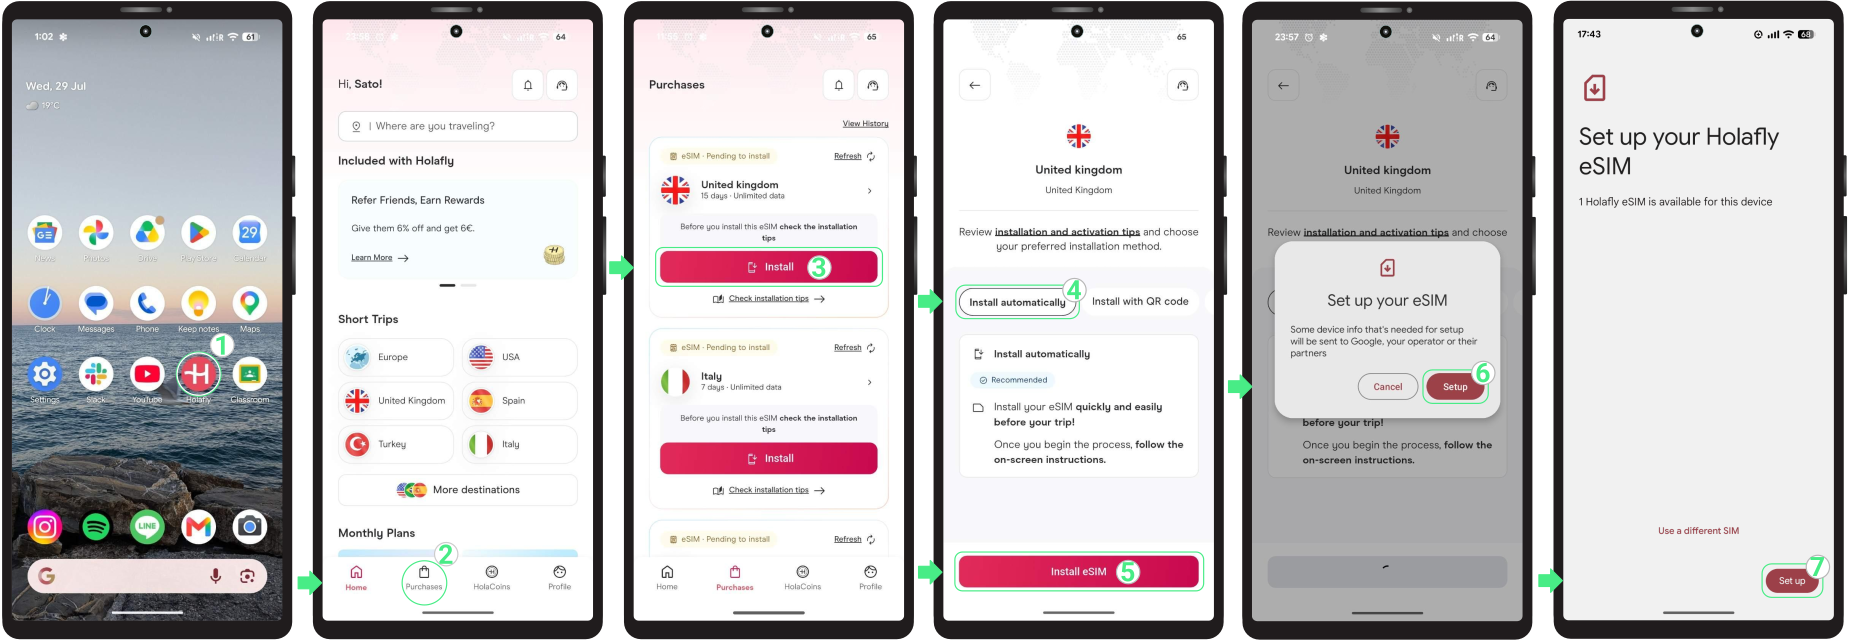
The easiest way to install your eSIM is using the Holafly app. Download or open it here and follow these steps:
- Go to the app on your phone → Log in with the email associated with your purchase → Go to Purchases → Tap Install on the eSIM you want to add → Choose Install Automatically → Tap Install eSIM → Tap Set up twice → Follow the final on-screen prompts and wait a few minutes until the process is complete.
2. Install eSIM on Google Pixel using a QR code
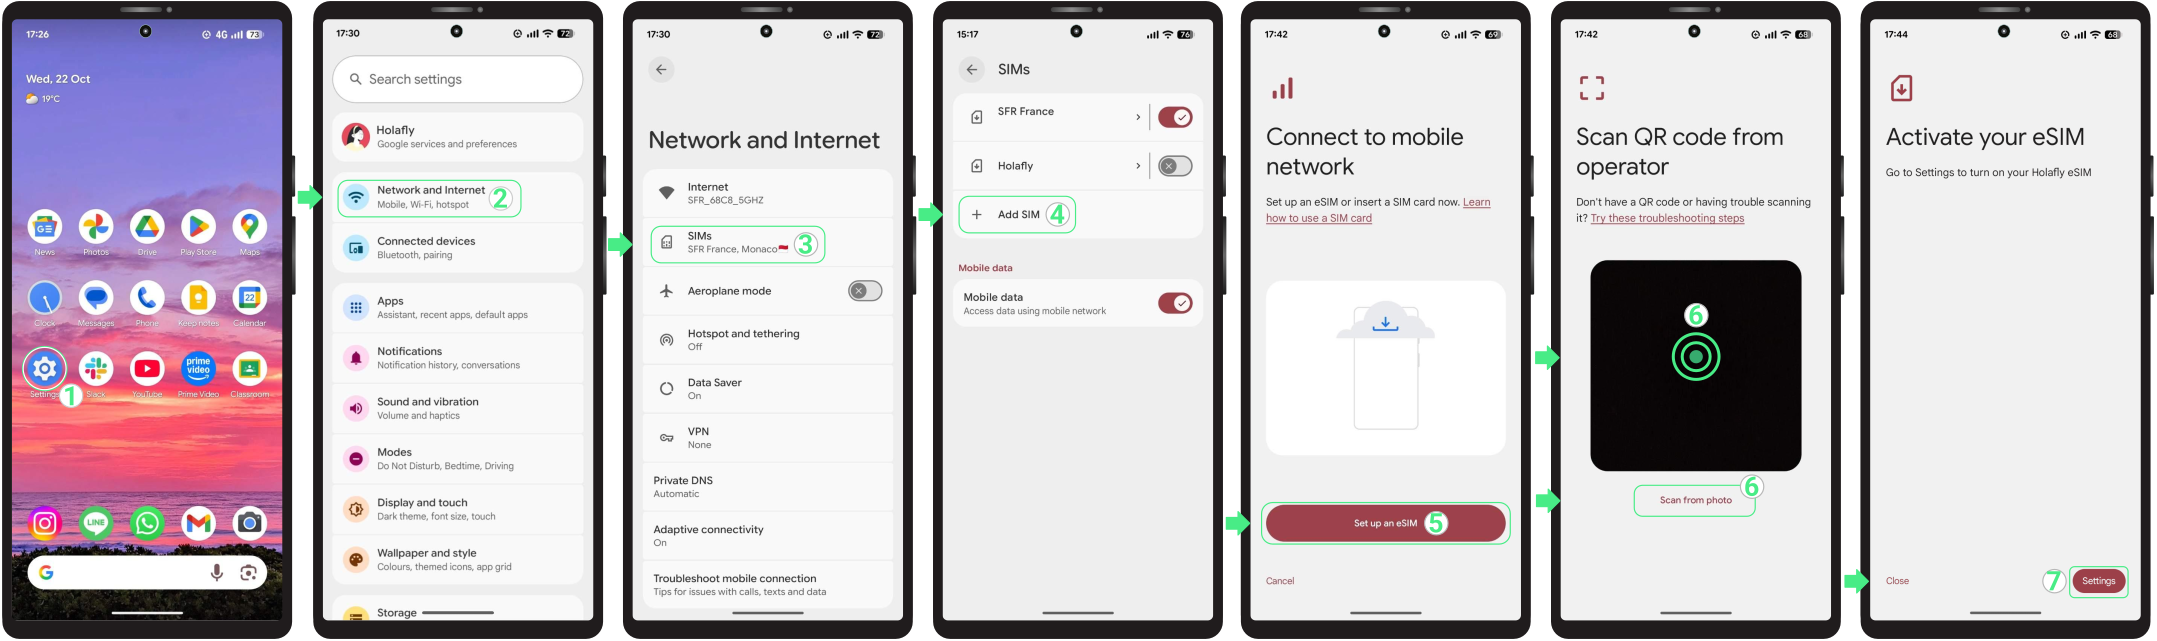
Use the QR code sent to your email to install the eSIM. Scan it from another screen, or use the “Scan from photo” option if you saved the QR code to your phone as a screenshot or photo.
- Go to Settings → Select Network & Internet → Tap SIMs → Tap + Add SIM → Choose “Set up an eSIM” → Scan your QR code, or tap the “Scan from photo” text link below to choose it from your gallery → Select Set up → Once installed, tap Settings if you want to continue with the activation.

3. Install eSIM on Google Pixel using manual codes
If you can’t scan the QR code, you can install the eSIM manually instead. You’ll just need the manual details included in your confirmation email.
Keep in mind that these are just text codes to enter yourself, and they won’t work as clickable links.
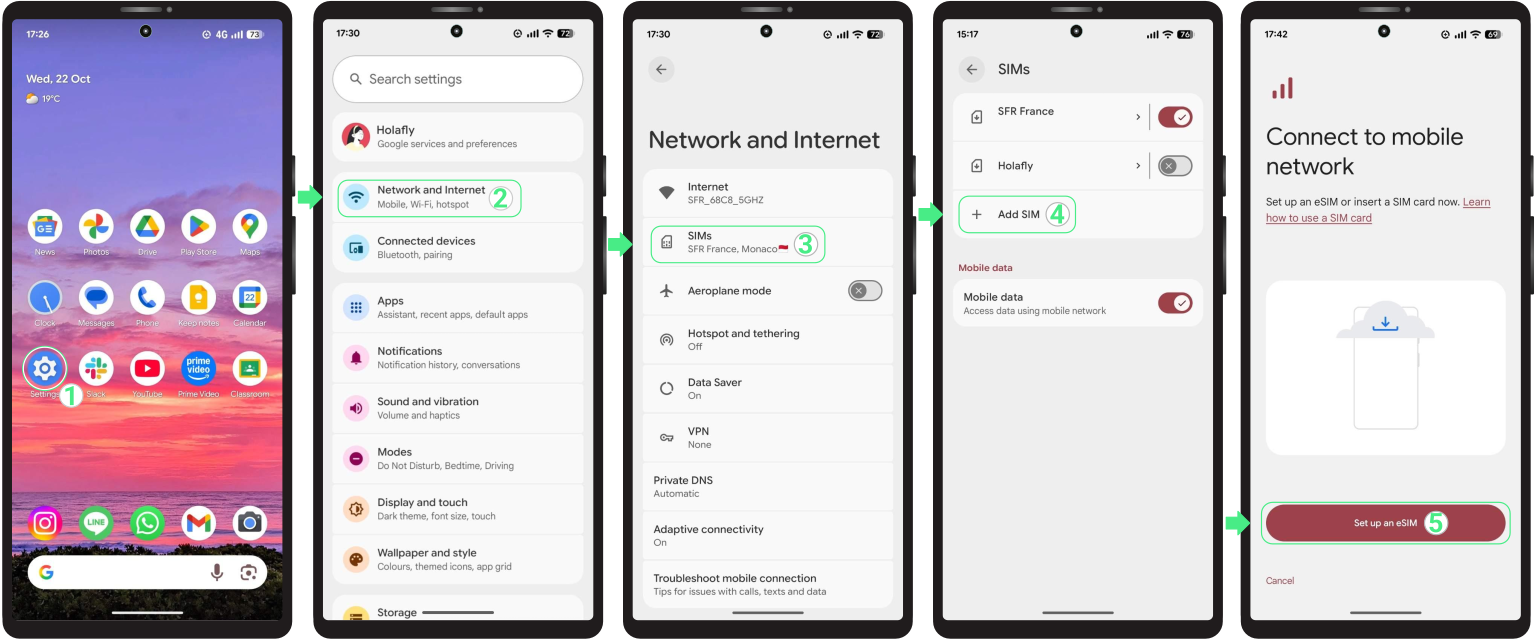
- Go to Settings → Select Network & Internet → Tap SIMs → Tap the + Add eSIM → Choose “Set up an eSIM”
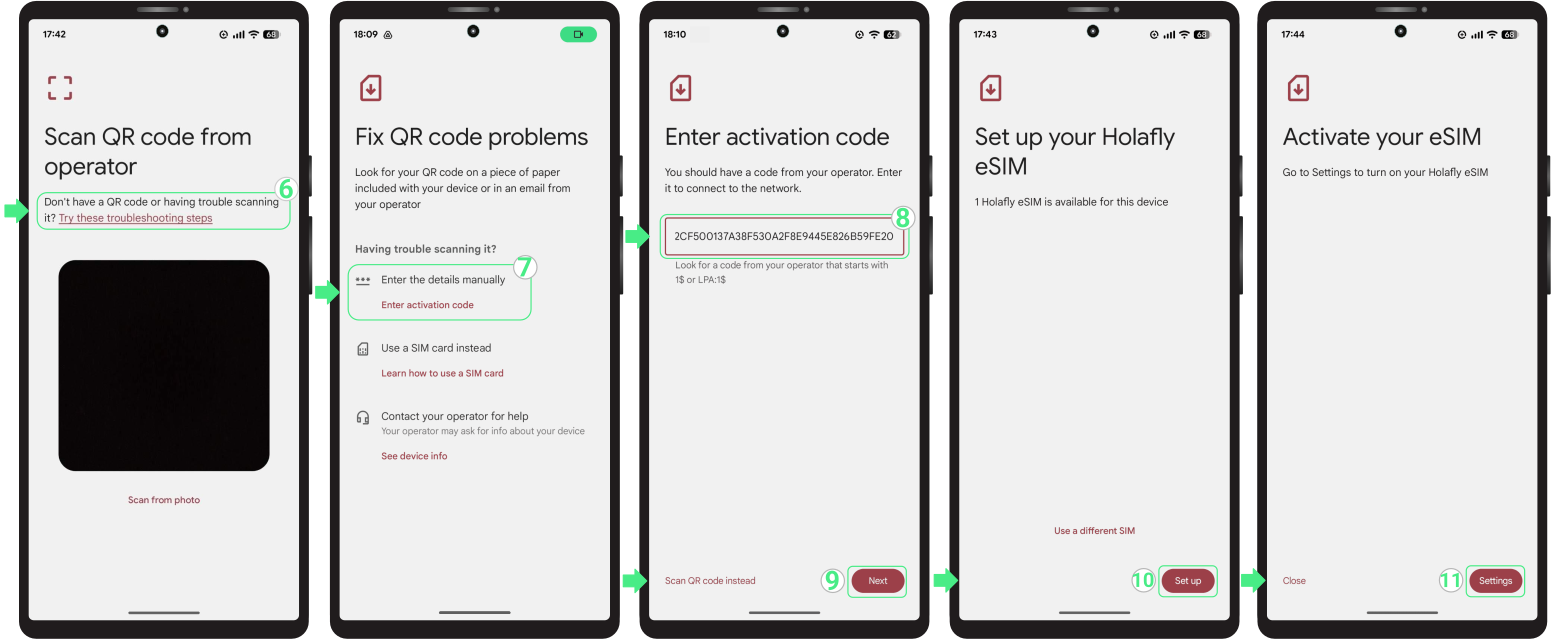
- Press “Try these troubleshooting steps” → Select Enter the details manually → Paste your provider’s activation code (including LPA and the colon ‘:’) → Make sure there are no extra spaces at the beginning or end of the code → Tap Next → Select Set up → Finally, tap Settings to continue with the activation.

Activate the eSIM on Google Pixel
Once you’re ready to start using mobile data, enable the eSIM so your Google Pixel can connect to a supported network. This is the step that starts your data service.
If you’re using a travel eSIM, it’s recommended to enable the line only after you arrive at your destination to avoid activating it too early.
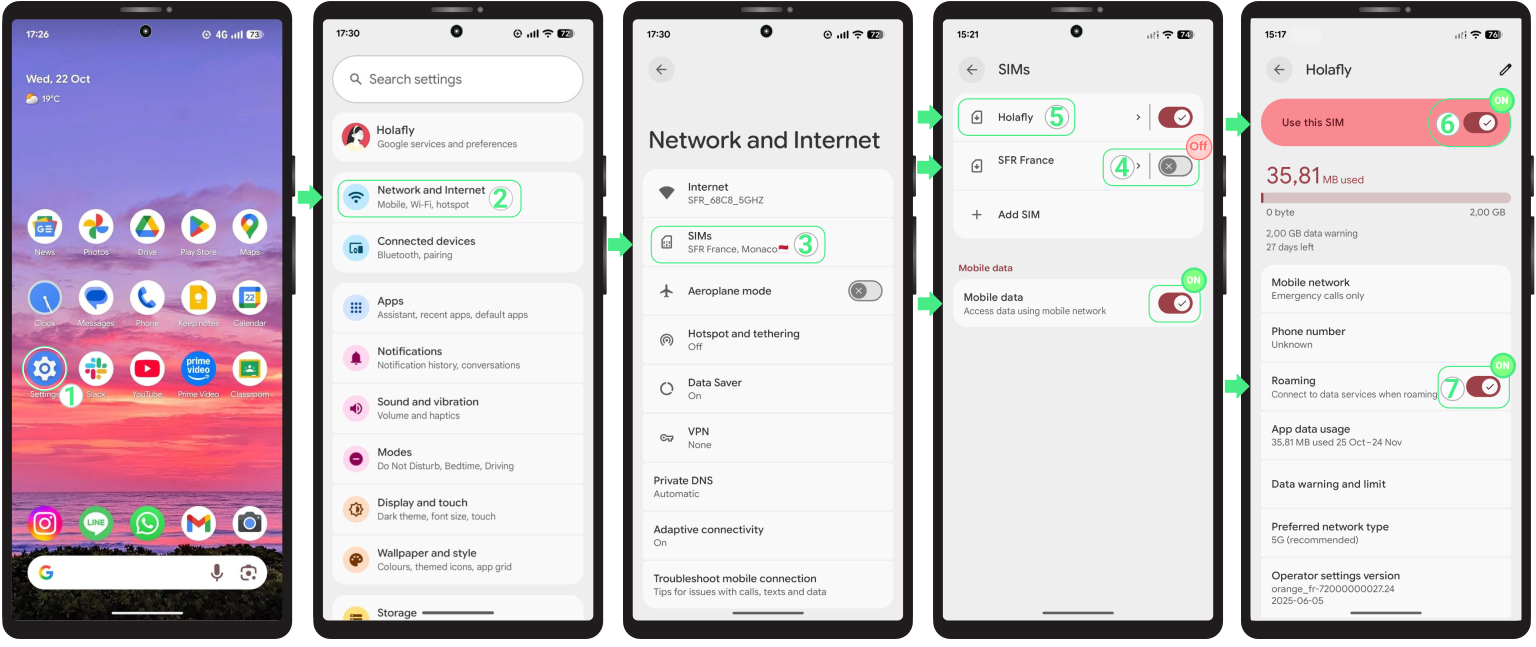
- Go to Settings → Tap Network & Internet → Select SIMs → Turn OFF your personal eSIM → Select your New Data-only eSIM → Turn Mobile data ON → Enable Use this SIM → Turn Data roaming ON (only if you are using an international travel eSIM).
Troubleshooting tips
During Installation
If your Google Pixel shows an error while installing the eSIM, don’t worry. Sometimes the phone displays a false error even when the eSIM has been successfully installed in the background. Before trying to install it again, check if it’s already on your phone:
- On your phone: Go to Settings → Network & Internet → SIMs. Your new eSIM should appear in the SIM list, usually with the name you gave it during setup.
- In the App: Check your eSIM status. If it says “eSIM Installed – Ready to use,” you’re all set.

Using your mobile data
If your eSIM is already fully activated following the steps mentioned above but your device is still not connecting to the internet, wait a few minutes while your phone connects to the network. If you are still offline, try selecting a network manually or restarting your phone.
⚠️ Important: Never delete your eSIM to fix a connection error.