




 Language

How to install and activate an eSIM on a Vivo mobile?
Vivo is embracing eSIM technology across several of its latest models, including the Vivo X90 Pro, V29 Lite 5G (European version), X100 Pro, X200 Pro, and the Vivo V40 and some V50e series.
In this guide, we show you how to set up your Vivo eSIM, whether it is directly from your provider’s app, by scanning a QR code, or by entering the installation details manually. Once installed, we explain how to activate it from your phone’s network settings so you can start browsing.!
Before you start setting up your Vivo with eSIM:
- Ensure your Vivo phone is compatible and unlocked to work with any network provider.
- Connect to a reliable Wi-Fi network.
- For Global or Regional plans (Europe, South America, Asia, etc.), install your eSIM at most 1 day before your trip. For single-country plans, you can install it days or weeks ahead, as it only activates at your destination.

How to add or install an eSIM on Vivo
There are three ways to install an eSIM on your Vivo device. Choose the installation method that best matches your setup. If your provider offers an app installation, we recommend using it for the quickest setup experience.
1. Install your eSIM via the app
Download or open the Holafly app to add your eSIM to your Vivo device, then follow these steps:
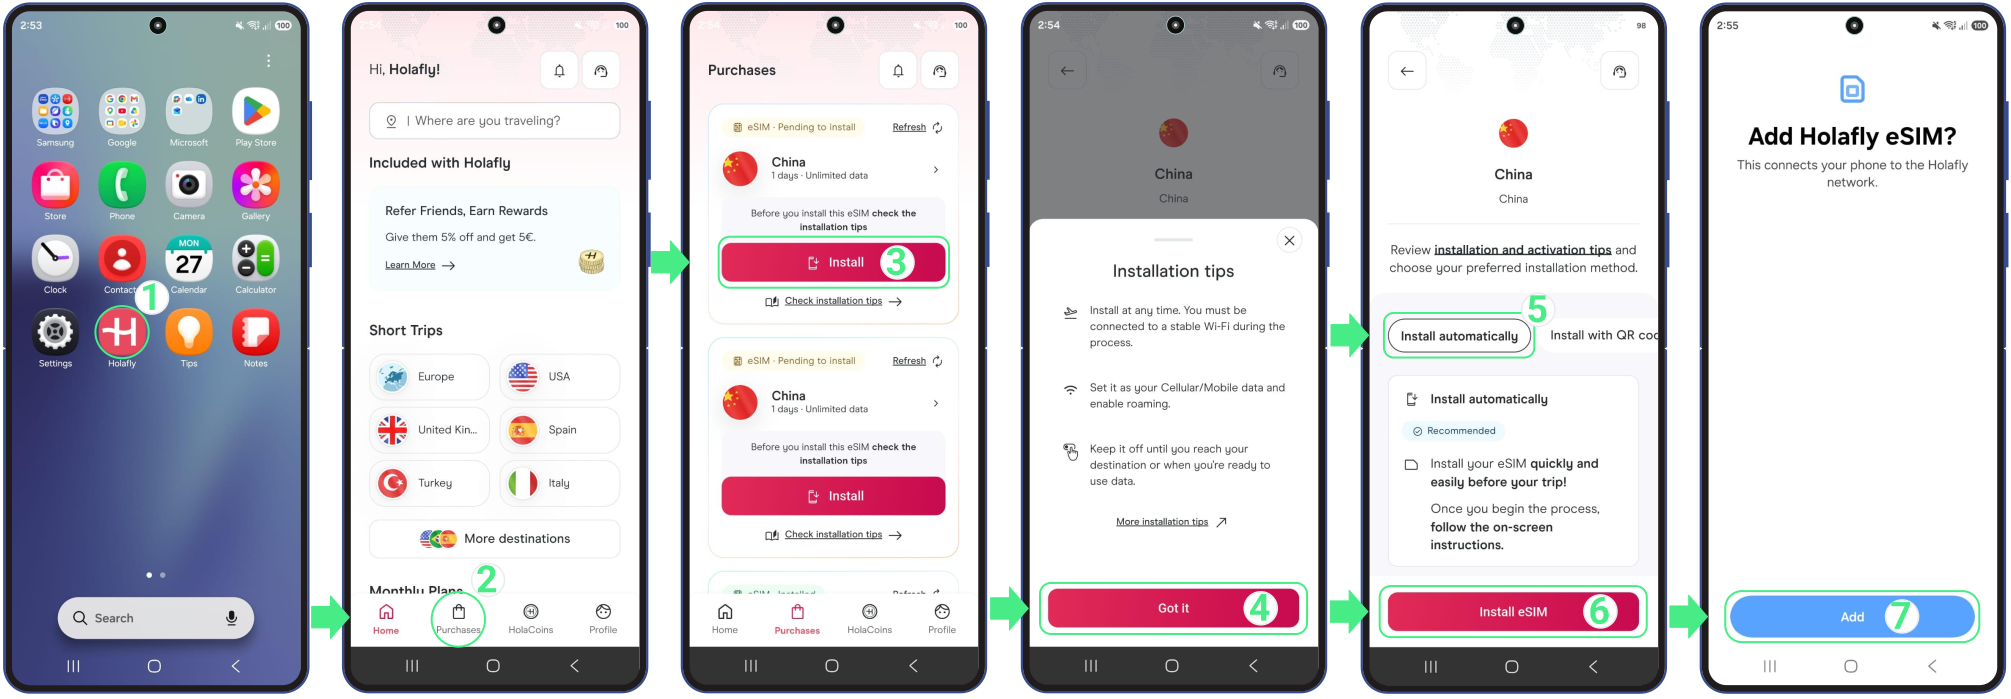
- Go to the app on your phone → Log in with the email associated with your purchase → Go to Purchases → Tap Install on the eSIM you want to add → Read the Installation tips and tapGot it to continue → Choose Install Automatically → Tap Install eSIM → Then, tapAdd to save your new line inside your Vivo’s Mobile Network menu → Once installed, tap Settings if you want to continue with the activation.
2. Install an eSIM on Vivo device with a QR code
A QR code is a very convenient option for adding an eSIM to your device. To use this method, you just need to have the code handy (either printed out or displayed on another screen) so you can scan it using the scanner that opens within your phone’s settings. Follow these steps to learn how to install your Vivo eSIM quickly:
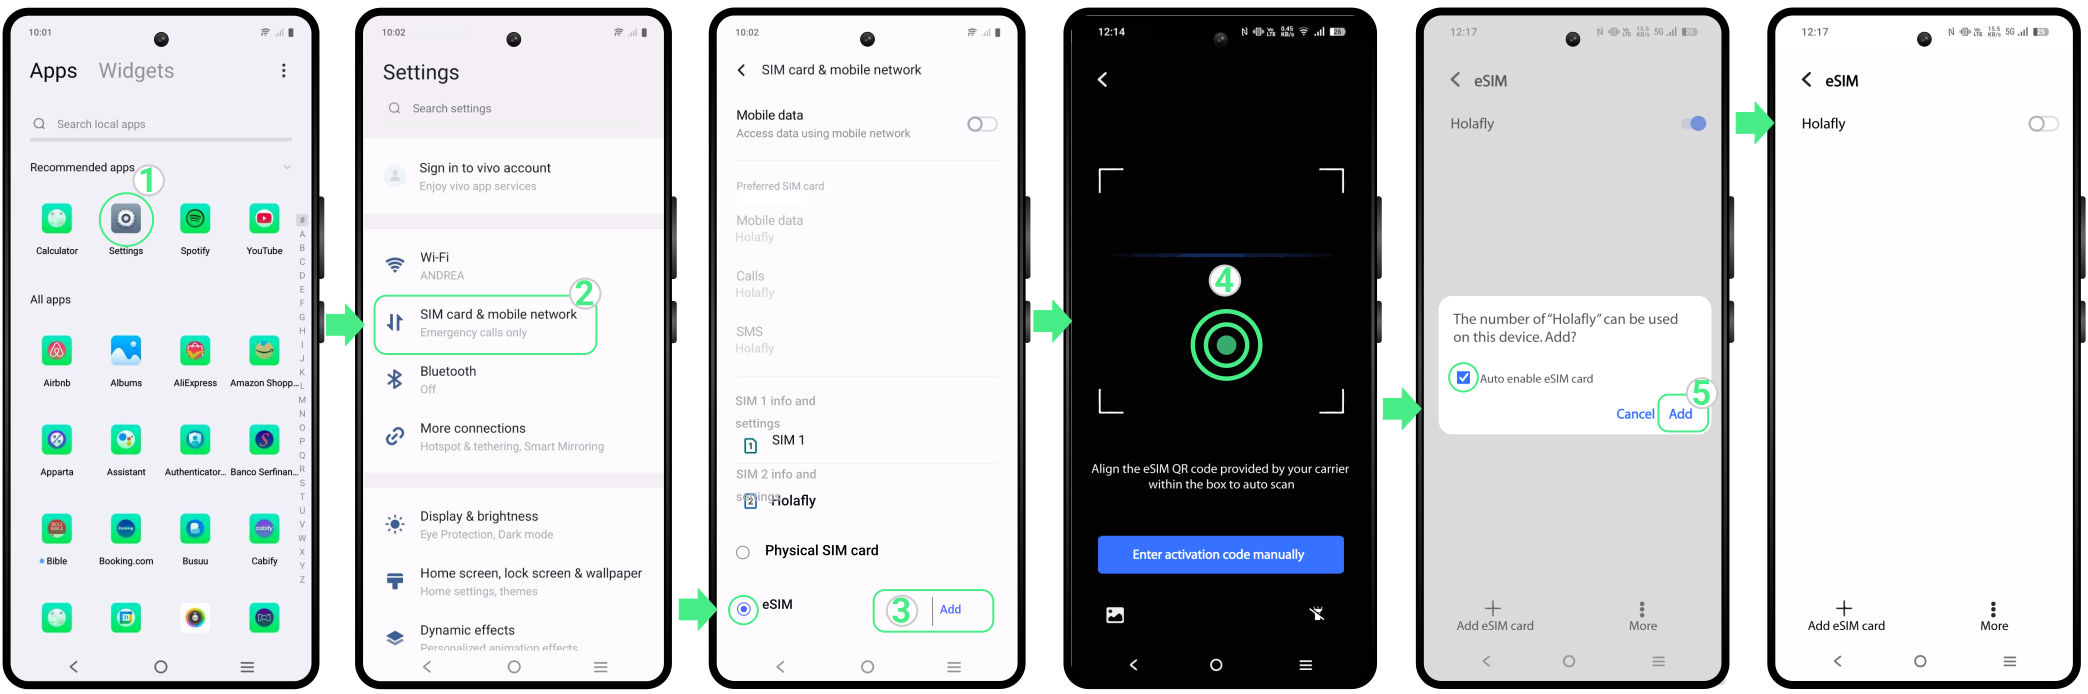
- Go to Settings → Tap on SIM card & mobile network → Turn on the eSIM option → Then Select Add → Scan the QR code (do not close this window, or the installation may fail) → Uncheck the “Auto enable eSIM card” option that appears on your screen and tap on “Add“ to complete the installation → Finally, activate your eSIM once you are ready to start using it.
3. Install an eSIM on Vivo using manual codes
Manual installation is a useful alternative if you can’t scan a QR code. This method allows you to add the eSIM by entering the activation details directly into your Vivo settings. Follow the steps below:
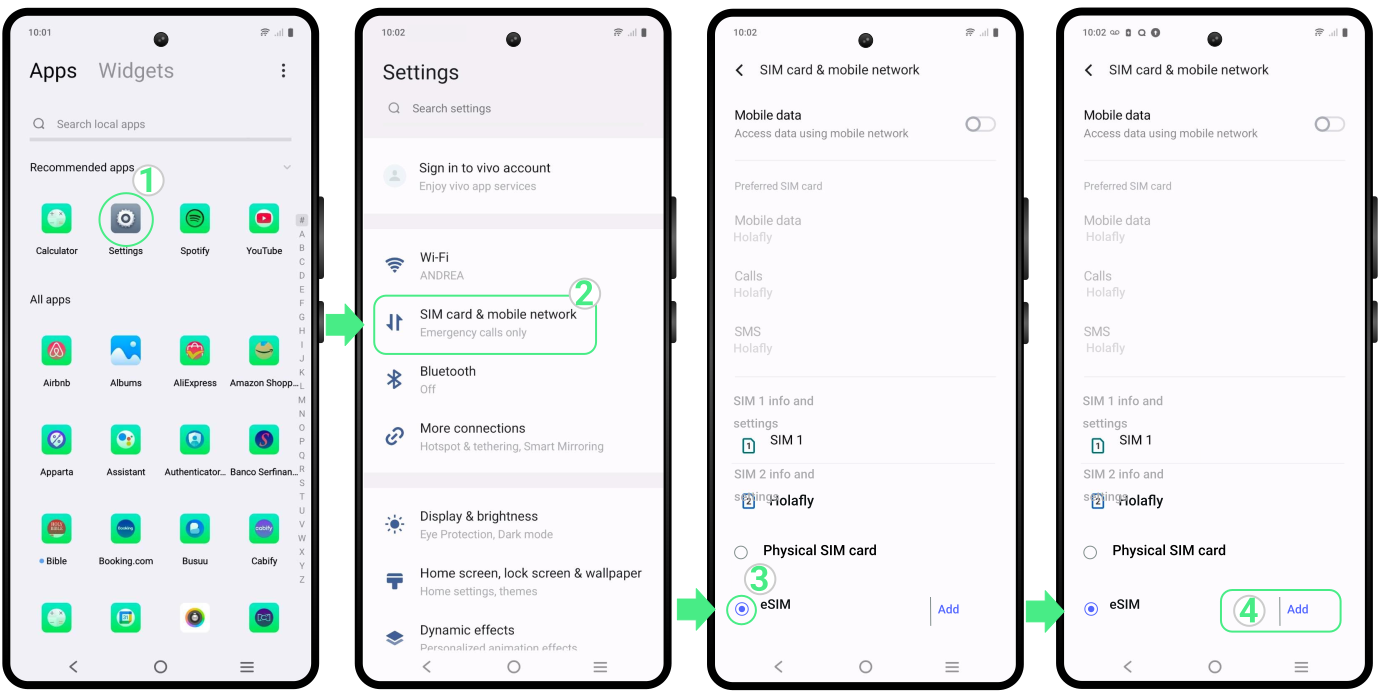
- Go to Settings → Tap on SIM Card & Mobile Network → Turn on the eSIM option → Then select Add.
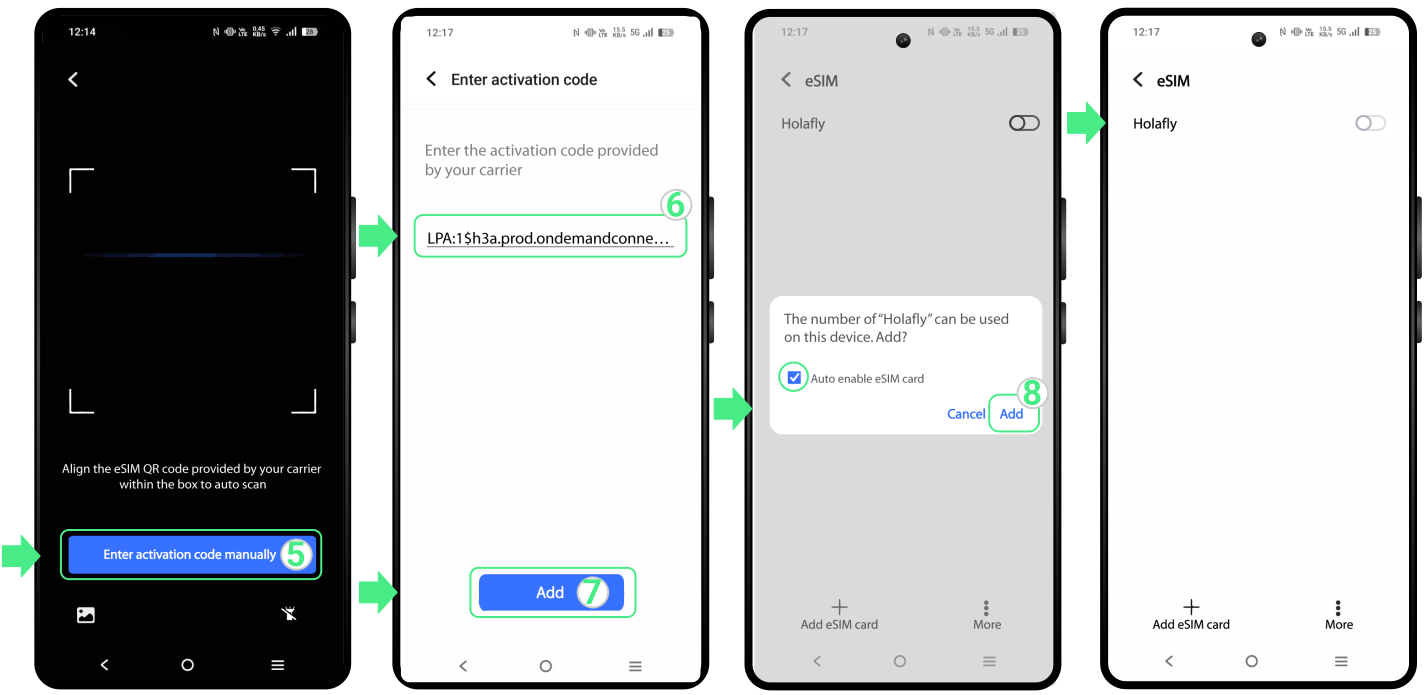
- Tap on Enter activation code manually → Copy and paste the full activation code for Android (including “LPA” and the colon “:”)that you received → Select Add → Uncheck the “Auto enable eSIM card” option that appears on your screen and click on “Add” again → Finally, activate your eSIM once you are ready to start using it.
Note: Please keep in mind that this is a manual text code, not a clickable link.
How to activate an eSIM on Vivo
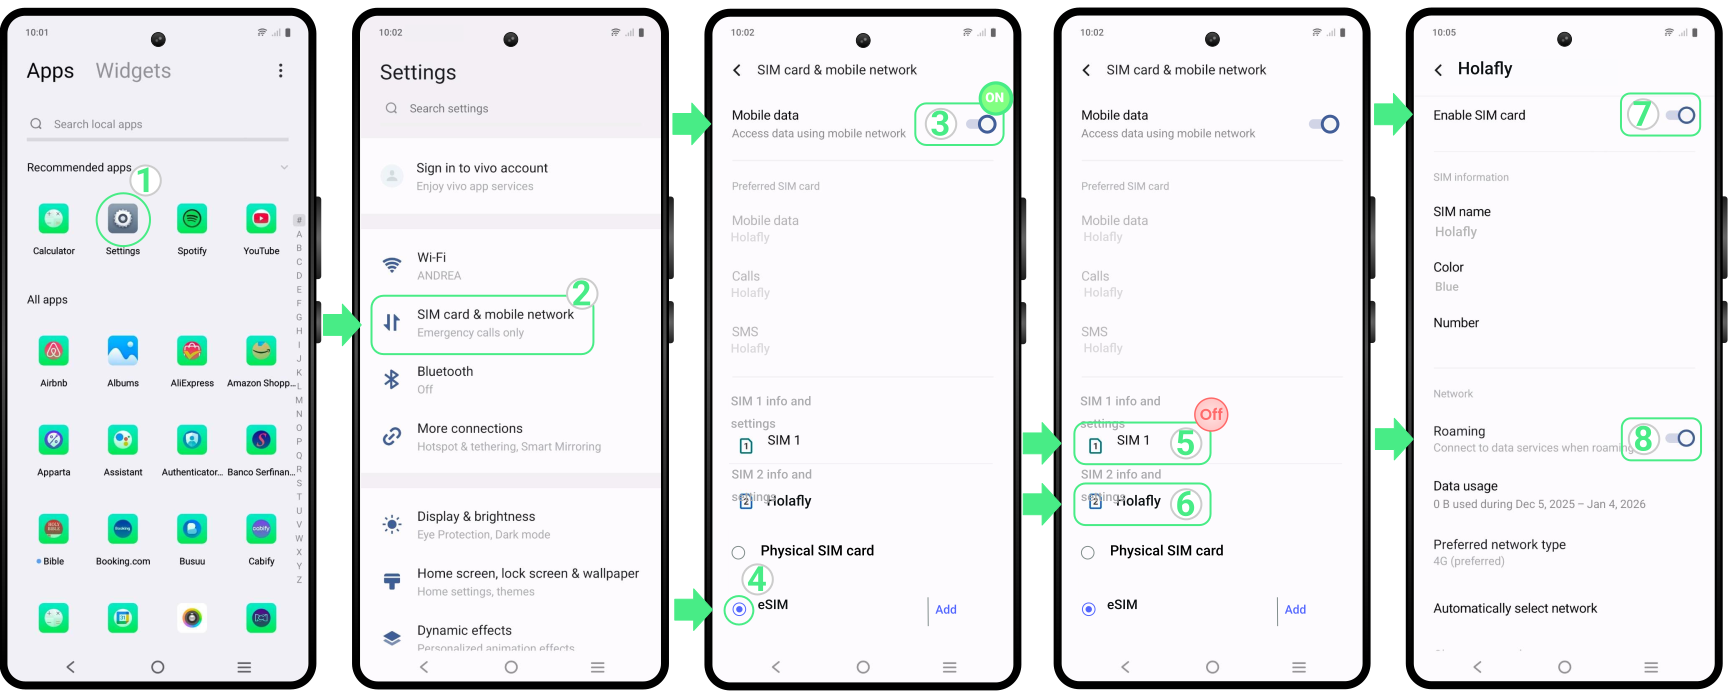
After installing your eSIM, the next step is to turn on the new line and select it for mobile data. You can do this directly from your Vivo settings by following the steps below.
Note: If you’re using a travel eSIM, it’s best to turn on the line once you arrive at your destination to avoid starting your plan before your trip begins.
- Go to Settings → Tap on SIM Card & Mobile Network → Scroll down and ensure the eSIM option is activated → Turn off your personal SIM (optional, if you want to avoid extra charges with your home carrier), and select your Newly installed eSIM → Enable SIM card toggle and switch on Roaming when you are using a travel eSIM.
To keep in mind
- If you are using this new eSIM as a travel eSIM, consider temporarily turning off your primary lines in your network settings to prevent your home carrier from charging you for international roaming.
- eSIM availability on Vivo devices may vary depending on the country, region, and carrier. Some models may not support this technology in certain areas, such as China, Hong Kong, and Macau.
- On Vivo phones that support both eSIM and Dual SIM, you can use a physical SIM and eSIM simultaneously, but only one can be active for mobile data at a time.
- Settings, paths, and images may vary depending on your Vivo model and software version, but the general process remains the same.

Troubleshooting tips
During installation
If you saw an error message or your screen froze during the process, the eSIM may have actually downloaded successfully in the background on your Vivo device. Before trying to install the eSIM again, check the following:
- On your phone: Go to Settings → SIM Card & Mobile Network. If your new line appears there (usually under the name selected during setup or your provider’s name) it means the eSIM was successfully installed.
- In the app: Check the status of your eSIM. If it shows “eSIM Installed – Ready to use”, you can proceed with activation.
Using your mobile data
If your eSIM is correctly activated, but you still can’t connect, try selecting a network manually from your eSIM settings.
 Important: Avoid deleting your eSIM from the device. Once removed, it may not be possible to reinstall it, and you could lose access to that data plan.