




 Language

How to install and activate an eSIM on a Samsung Phone
To install and activate an eSIM on a Samsung phone, you first need to add your eSIM to your device and then turn on the line when you’re ready to use it. Follow this guide to learn how to activate an eSIM on a Samsung phone in less than five minutes.
Before you start: Pre-installation checklist for Samsung
Before installing an eSIM on a Samsung phone:
- Confirm that your Samsung phone supports eSIM and is unlocked to use eSIMs from other carriers.
- Connect to a stable Wi-Fi connection before you begin.
- Depending on your samsung model, some menu names look slightly different, but the process is the same.

Note: Installing your eSIM does not activate your plan or use your mobile data. However, if your regional (Europe, South America, Asia, etc.) or global eSIM includes the country you are currently in, it may start being used once it connects to a local network. We recommend installing it only one day before your trip to avoid using your plan days before you need them.
How to Install an eSIM on a Samsung Phone (3 Easy Methods)
There are three ways to install an eSIM on your Samsung phone. Choose the option that works best for you and follow the steps below.
1. Install your eSIM using the App:
This is the easiest option for a quick setup. You can download or open the Holafly app here and follow these steps:
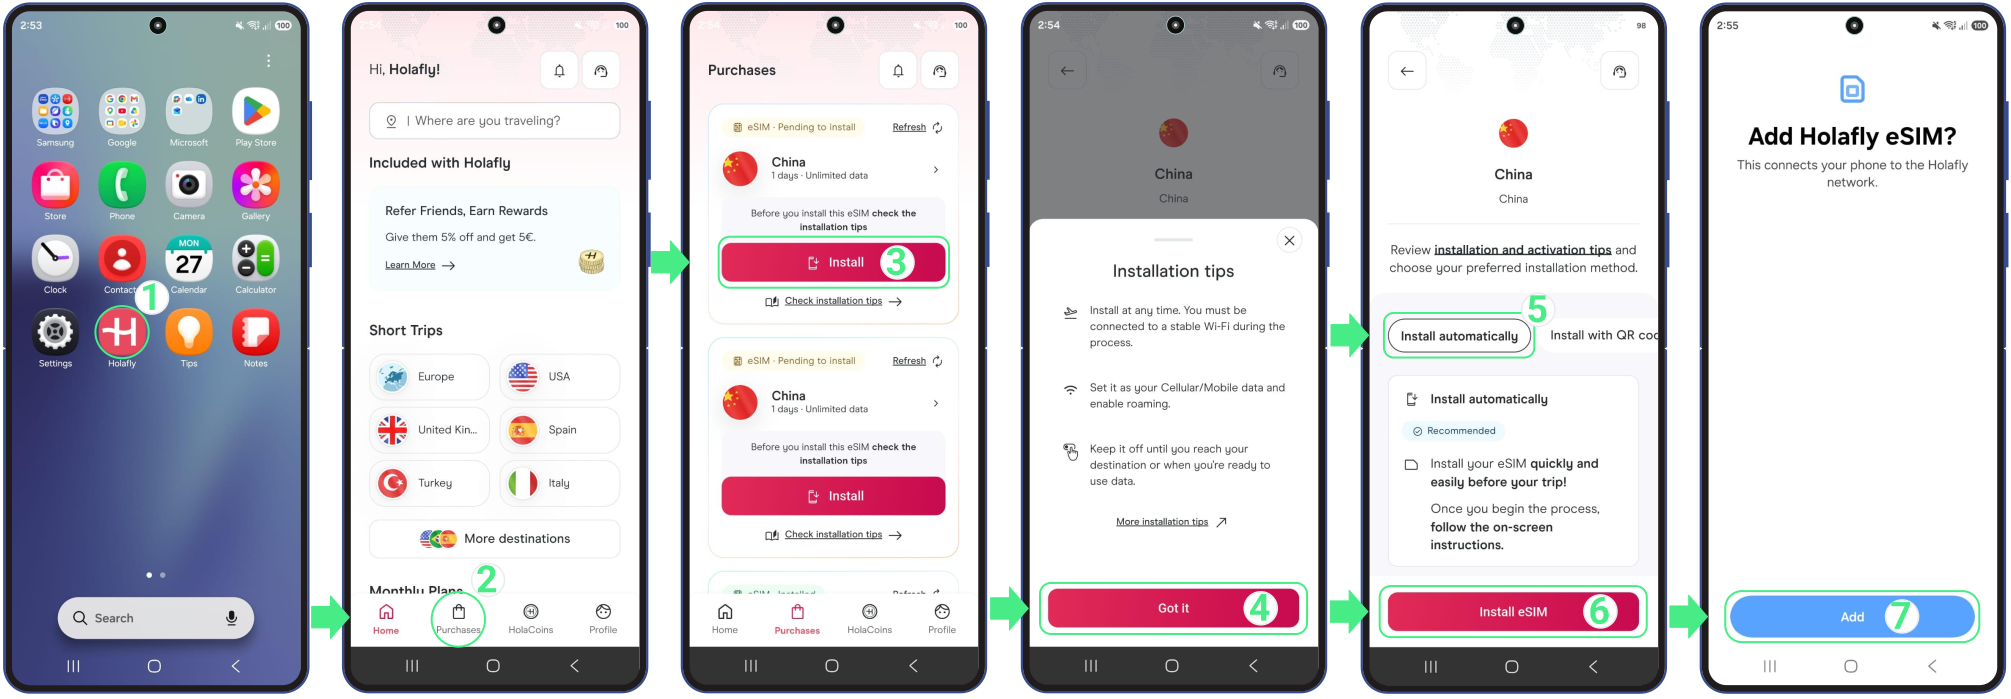
- Go tothe app on your phone → Log in with the email associated with your purchase → Go to Purchases → Tap Install on the eSIM you want to add → Read the Installation tips and tap Got it to continue → Choose Install Automatically → Tap Install eSIM → Add → Wait a few minutes while your device verifies the eSIM information → After the eSIM is added, follow the on-screen prompts to complete the setup.
2. Install an eSIM using a QR Code
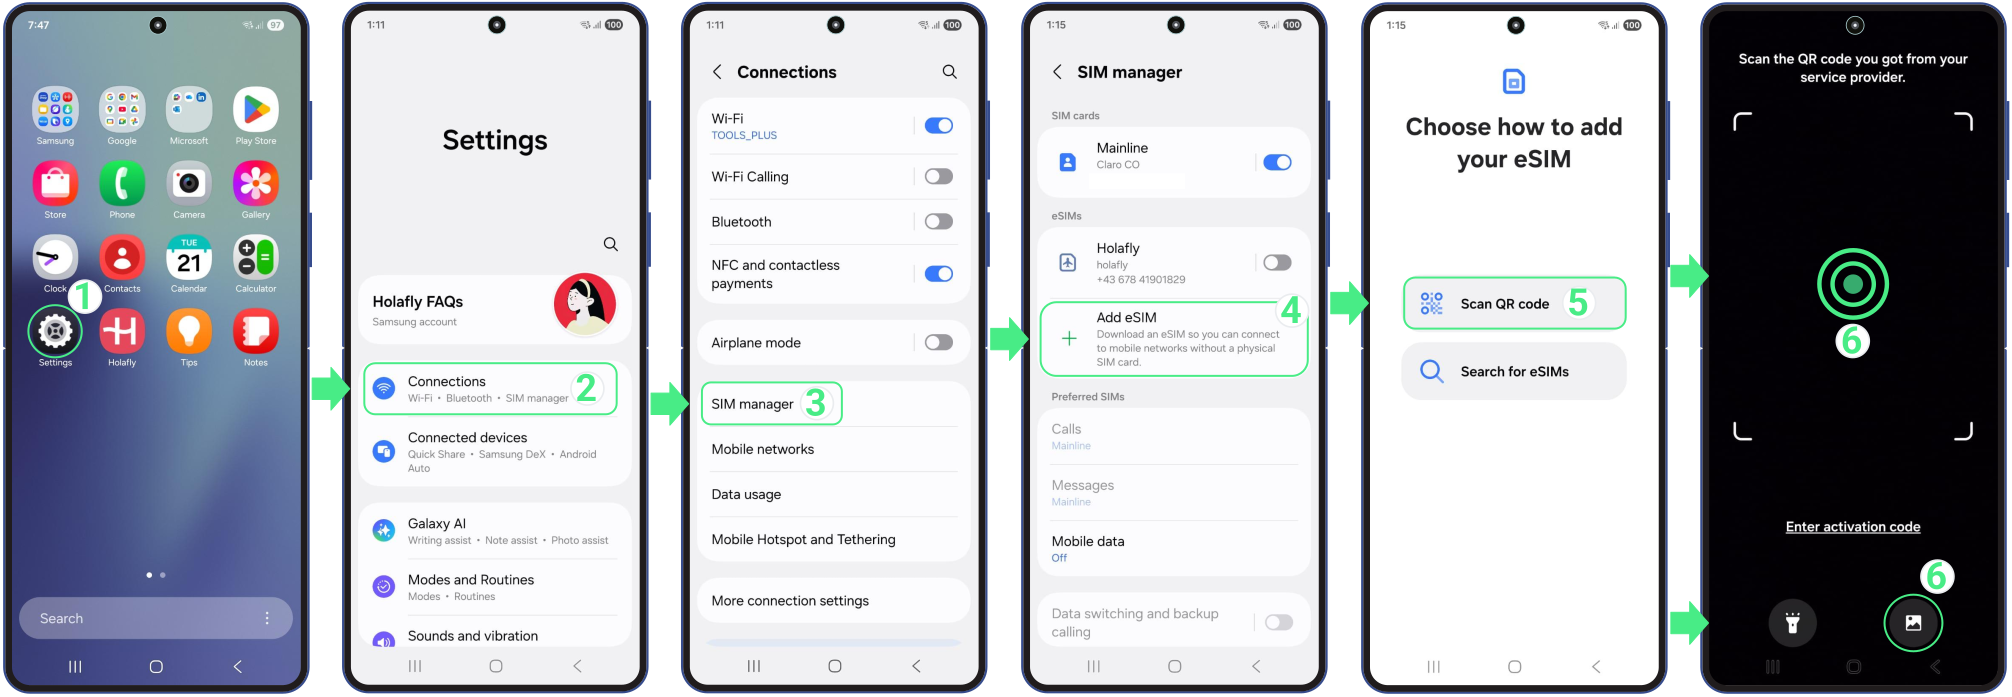
Using a QR code is a simple way to add an eSIM on a Samsung phone. If you’ve saved the QR code as a photo or screenshot, you can upload it directly from your gallery instead of scanning it from another device. Follow these steps:
- Go to Settings → Tap on Connections → Select SIM Manager → Then on Add eSIM → Tap on Scan QR Code button → Then, scan the QR code or tap the gallery icon in the bottom right corner to upload the QR code image from your photos → Finally, Add the eSIM → Your mobile plan will be automatically downloaded.

3. Manual eSIM Installation
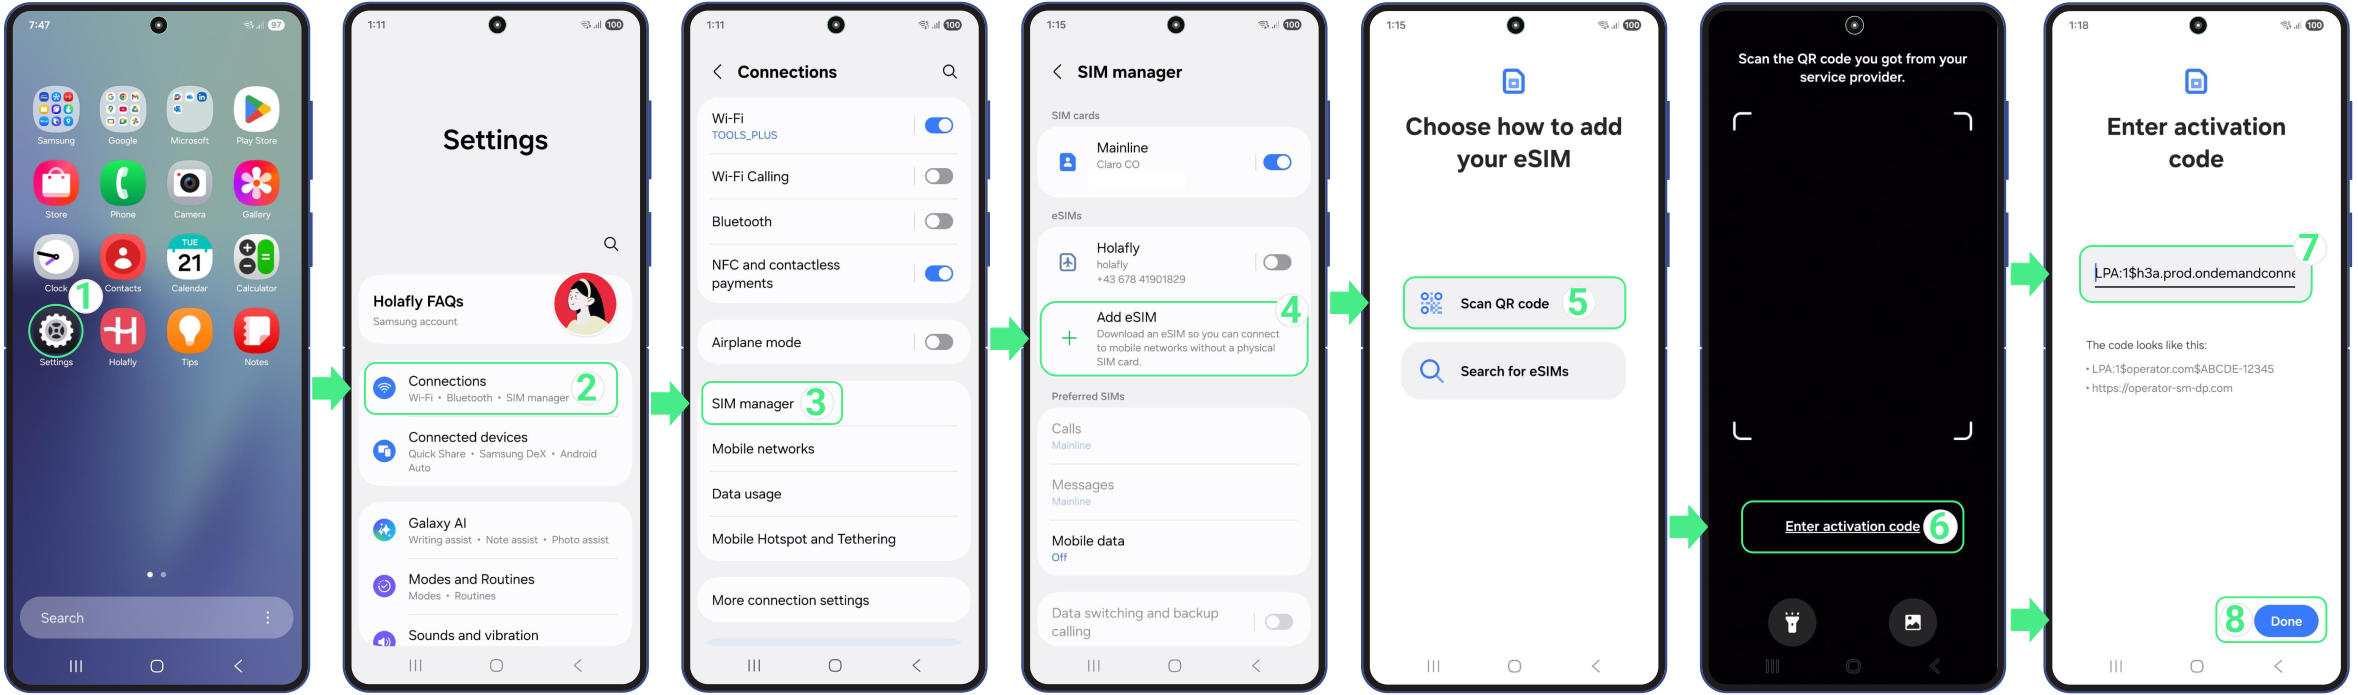
This is a good backup option if you can’t use the app or a QR code. It lets you complete the setup by entering the eSIM details received directly into the phone’s settings. Follow these steps:
- Go to Settings → Tap on Connections → Select SIM Manager → Select Add eSIM → Tap on Scan QR Code → Select Enter activation code → Type or paste the full activation code (including LPA and the colon ‘:’) → Tap on Done → And finally, tap on Add → Once the eSIM is downloaded, continue through the remaining steps to finish the setup.
Don’t forget that these are text codes to enter manually (copy and paste) because they aren’t direct clickable links.
Complete the eSIM setup
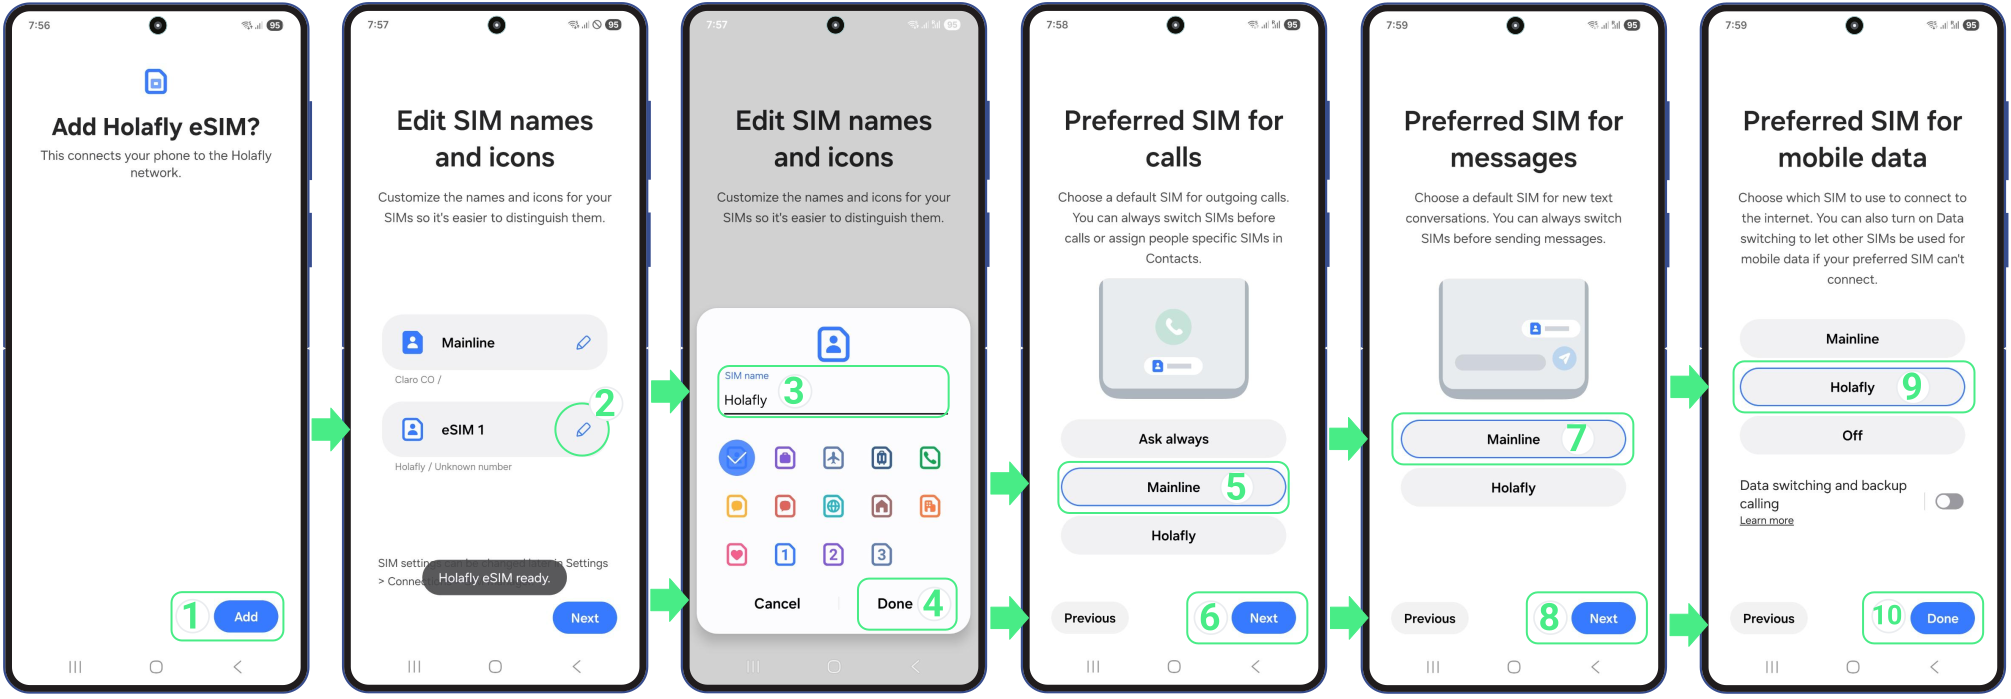
After adding the eSIM to your Samsung, your device will guide you through a short setup process to configure how you want to use your lines. During these steps, you can assign names to your SIM/eSIM cards and choose which line to use for calls, messages, and mobile data when needed.
- When the Add new eSIM? screen appears, tap Add → Edit the SIM name and icon (use a descriptive name you’ll easily recognize later, such as provider or destination) → Tap Done → Confirm the new SIM name and tap Next → Choose your main line as the preferred SIM for calls → Tap Next → Select your main line to send messages and keep it as default → Tap Next → Set the newly named eSIM as the preferred SIM for Mobile data → Tap Done to finish the setup.
How to Activate an eSIM on Samsung Phone
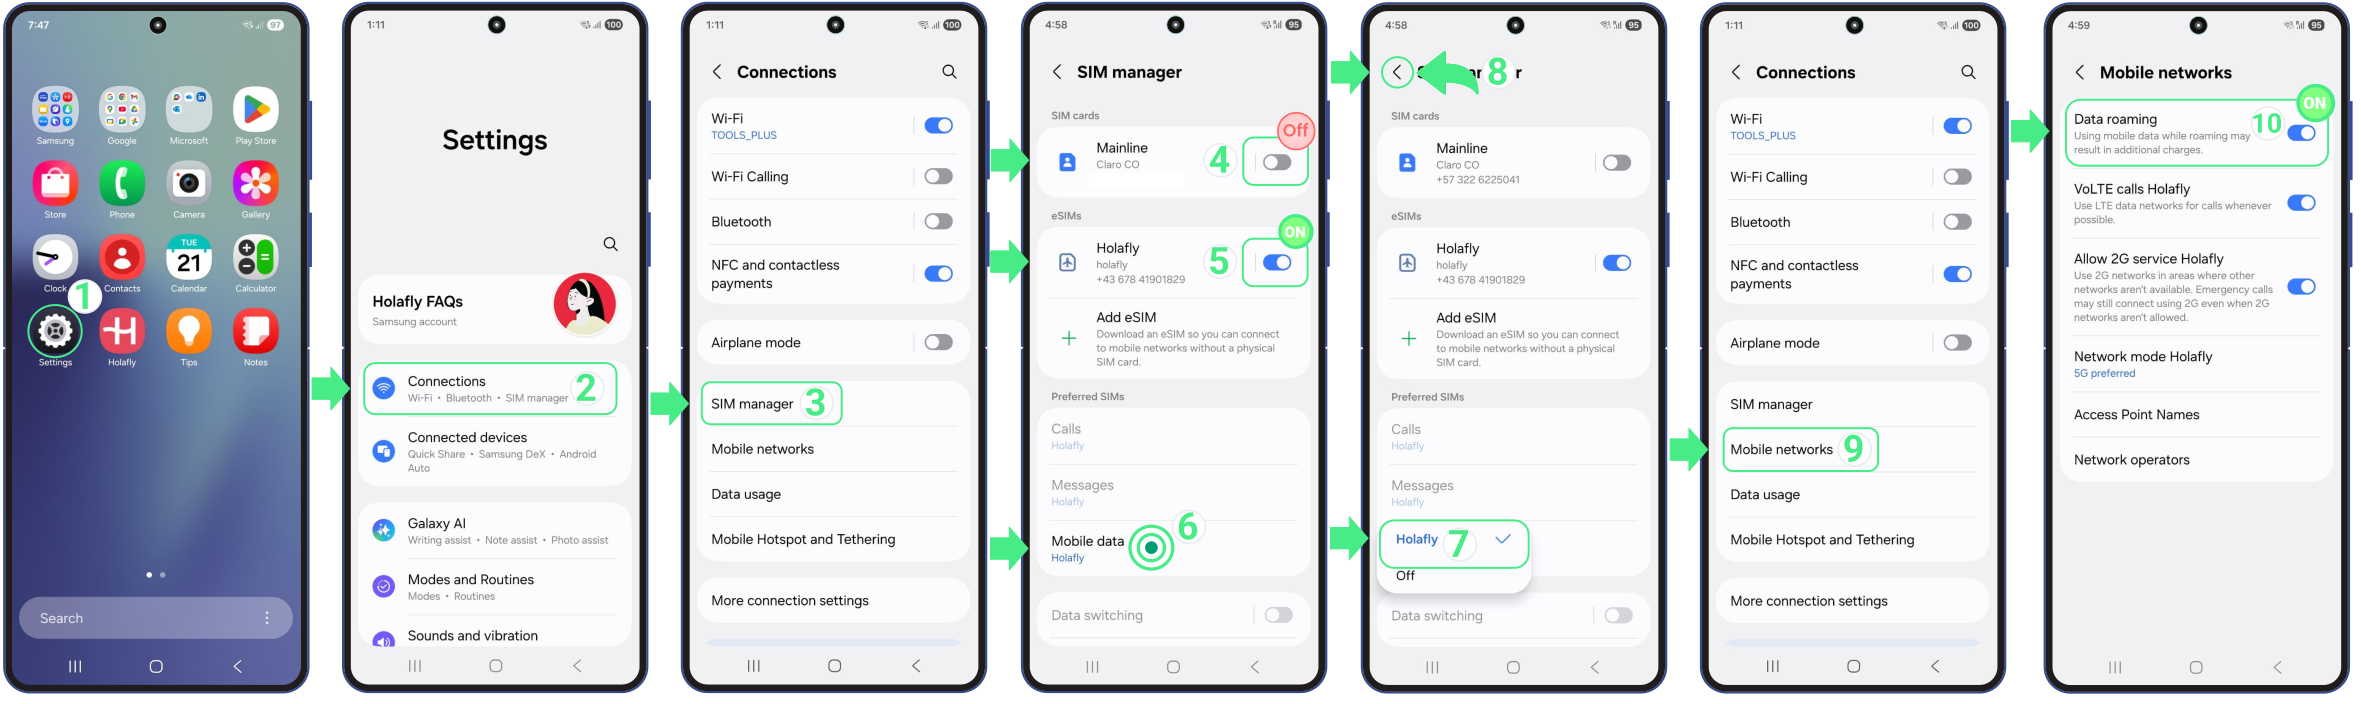
Activating your eSIM on Samsung is the final step to get your line up and running. You only need to enable the eSIM profile and select it for mobile data in your settings. If you are using a travel eSIM, this should only be done once you arrive at your destination to ensure your device connects correctly and your plan starts at the right time.
- Go to Settings → Tap on Connections → Then on SIM Manager → Turn off your personal SIM to avoid charges from your home carrier → Turn your New eSIM ON → Select this eSIM under Mobile data (it will appear with the name you assigned or as the most recently added eSIM) → Go back to Connections → Tap Mobile networks → Turn on Data Roaming for the travel eSIM to start using mobile data.
Troubleshooting Tips
During Installation
If your Samsung screen says “Can’t add eSIM,” don’t worry! This usually means it was installed successfully on the first attempt. Before trying again, check if it’s already there:
- On your phone: Go to Settings → Connections → SIM manager. Your new line should appear in your eSIM list, usually named eSIM 1, eSIM 2, or any custom name you assigned.
- In the App: Check your eSIM status. If it says “eSIM Installed – Ready to use,” you are all set!

Using your mobile data
Once your eSIM data plan is turned on, your Samsung should connect to the internet automatically. However, if your data doesn’t start working right away, ensure Data Roaming is enabled (for travelers only) and give your phone a few minutes to complete the connection. If you still face issues, simply go to Mobile networks → Network operators to select a carrier manually.
⚠️ Important: Never delete your eSIM to fix a connection error.