Language


How to transfer an eSIM from one iPhone to another: A quick guide
Switching iPhones? Here's how to transfer your eSIM from one iPhone to another—we'll show you how to activate eSIM on your iPhone, check if it's good to go, contact your carrier and get your eSIM and new phone working!

To transfer an eSIM from one iPhone to another, use Quick Transfer, request a new QR code from a manufacturer, or set it up manually.
In this guide, we walk you through exactly how to transfer your eSIM from one iPhone to another.
From checking if your eSIM is activated correctly to dealing with any carrier quirks, we’ve laid out all the steps so you can get your new iPhone fully connected.

An eSIM you can rely on
Transfer your eSIM to Holafly and enjoy unlimited data wherever you go.
What do I need before transferring an eSIM?
Before transferring your eSIM, consider the following aspects:
- Compatible iPhone models. Make sure both your old and new iPhones are eSIM-compatible. All iPhones starting from the XR and XS support eSIM technology.
- Carrier support for eSIM transfer. Not all carriers handle eSIM transfers the same way. Major carriers like AT&T, Verizon, and T-Mobile in the US support eSIM transfers, but the process can vary. If your carrier doesn’t support automatic transfer, you may need to contact them for a QR code or activation instructions
- Stable internet connection (if applicable). For iPhone models before the iPhone 14 series, you’ll need a stable WiFi or cellular connection to complete the eSIM transfer. The iPhone 14 series and newer can transfer eSIMs to new phones without an internet connection, thanks to improved built-in features.
How to transfer eSIM from one iPhone to another
Whether you’re upgrading to the latest model or just switching devices, there are several simple ways to transfer your eSIM.
1. Transfer your eSIM using Quick Transfer
Quick Transfer is Apple’s automatic data transfer service that allows you to quickly transfer most data, including your eSIM, from your old iPhone to the new one.
After the transfer, the eSIM will automatically deactivate on your old device, so the number is only active on your new iPhone.
This transfer process involves a few key steps:
- Both iPhones need to run on iOS 18.4 or later, be unlocked, and have Bluetooth on
- Place your iPhones near each other.
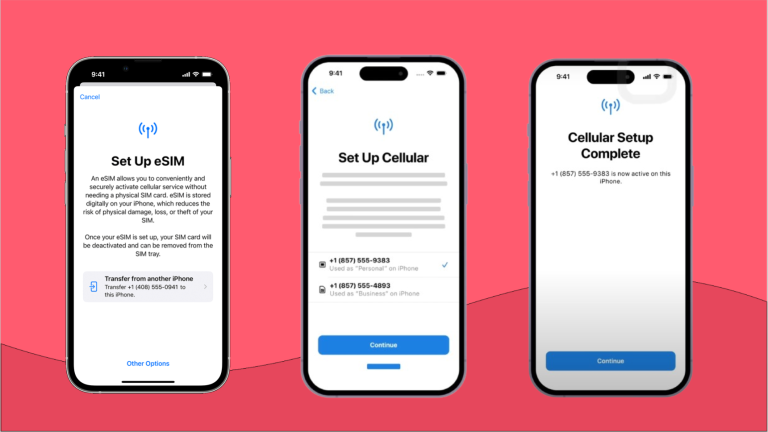
- Open Settings app on New iPhone. Go to Settings app > Cellular / Mobile Add > Add eSIM.
- Select Transfer From Another iPhone and select the number you want to transfer, or select Transfer from Nearby iPhone if no numbers show up.
- A prompt will appear on your old iPhone. Tap Transfer eSIM.
- When prompted, enter the verification code displayed on your new iPhone.
- Follow the prompts to complete the transfer and activation.
With iOS 26, you can transfer several phone numbers at once, while previous versions only allow the transfer of one number at a time.
Also new with iOS 26, when setting up your eSIM, you’ll be asked to choose to set it as your Home eSIM or for use Abroad. Then, select if you’ll be using it for Voice and Data, or Data Only. This allows you to set up a travel eSIM for data, while keeping your regular eSIM as the primary one for calls and texts.
💡Alternatively, you can use the same steps to convert a used physical SIM into an eSIM.
2. Transfer an eSIM card with a QR code
Manual transfer means you’ll have to set up an eSIM on your new iPhone yourself, rather than it being set up automatically. To do so, you’ll need to contact your carrier and ask for a QR code for your new phone.
You might need to use this method if:
- Your carrier doesn’t support quick transfer.
- You’re moving to a different carrier. In this case, you’ll need to transfer your eSIM using the QR code.
- You experience technical glitches. Sometimes software issues or an outdated iOS version might prevent Quick Start from working. The QR code method serves as a reliable alternative.
Here’s how to transfer eSIM from one iPhone to another with a QR code
- Contact your carrier to get a QR code for your new phone.
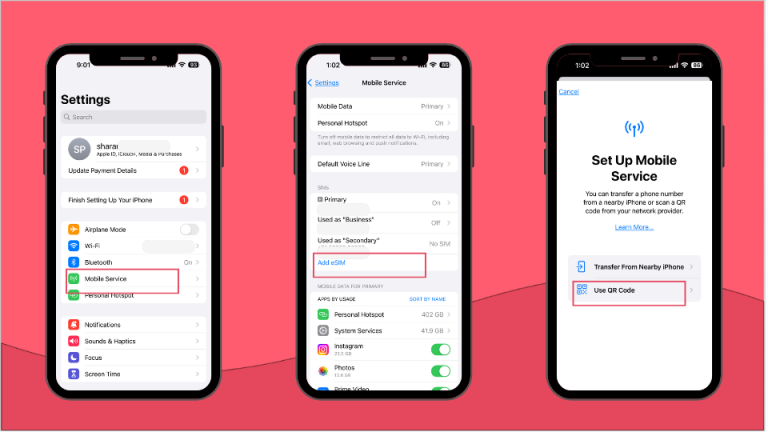
- When you receive the QR code, go to Settings > Mobile/Cellular Service > Add eSIM > Scan QR code.
- Scan the QR code provided by the carrier.
- Tap Continue at the bottom of the screen, then tap Add Cellular Plan.
- Follow the prompts to complete the setup.
- Once done, the eSIM should become active on your new phone and automatically deactivate on your old one.
3. Manually enter the eSIM card information
If you’re having issues scanning the QR code, you can set up the eSIM on your new phone manually. All the necessary information should be included in the email that was sent together with the QR code. Here’s what you’ll need:
- SM-DP+ Address: This stands for Subscription Manager Data Preparation (SM-DP+), which is essentially a server address where your eSIM profile is stored. It typically looks something like this:
- smdp.vodafone.com
- esim.tmobile.com
- Activation code: This is a unique code provided by your carrier that links your iPhone to your eSIM profile. It acts like a key that unlocks your mobile service on the new device. The activation code is typically a string of numbers and letters, such as:
- 1234567890ABCDEF
- XYZ9876543210
- Other details: Depending on your carrier, you might need additional information, such as a confirmation code or a one-time password (OTP). These details ensure that the correct eSIM profile is linked to your device.
Once you have all of the above information handy, here’s how you can set up your eSIM on iPhone:
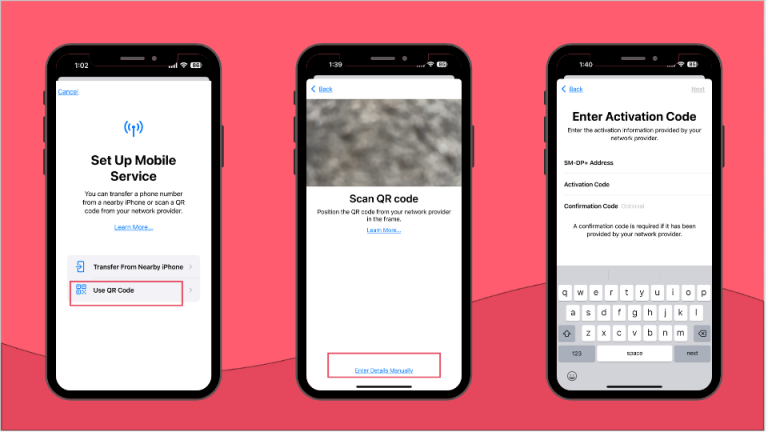
- Go to Settings > Mobile/Cellular Service > Add eSIM > Scan QR code.
- Below, select the option Enter Details Manually.
- Type in the SM-DP+ address provided by your carrier.
- Next, enter the activation code exactly as provided.
- If your carrier requires a confirmation code or OTP, enter those details as prompted.
- Follow the prompts to complete the setup.
- Once done, the eSIM should become active on your new phone and automatically deactivate on your old one.
After you’re all done, you might want to double-check it. Learn how to check if eSIM is activated in iPhone.
Get your travel eSIM from Holafly
Need reliable data abroad? Holafly offers travel eSIMs for 200+ destinations worldwide, each offering unlimited data and 24/7 customer support. Simply pick your destination, choose any number of days from 1 to 90, and enjoy staying connected wherever you go.
When setting up your Holafly eSIM on iOS 26, choose it for use abroad, and set it as data-only. That way, you can keep using your regular monthly plan for texts and calls while enjoying Holafly’s internet coverage abroad.
An eSIM you can rely on
Transfer your eSIM to Holafly and enjoy unlimited data wherever you go.
Plans that may interest you


A senior SEO writer from Lithuania, combining my passion for writing and travel at Holafly. With years of experience in technical fields, I'm here to answer all of your questions about staying connected. I specialize in turning even the most complicated topics into something everyone can understand.