Language
 How to set up an eSIM on Apple Watch
Learn how to connect your Apple Watch to an eSIM in 3 simple steps. Enjoy using it without needing to carry your iPhone everywhere you go.

Apple Watch is good for more than just keeping track of time. Setting up an eSIM on your Apple Watch is one of the best things you can do, as it gives you instant access to the internet, as well as messages and calls.
Not sure how to do it? Follow along for detailed instructions on how you can set up an eSIM on your Apple watch.
An app that gives back


What do you need to set up an eSIM on Apple Watch?
Before you start setting up an eSIM or SIM card on your Apple watch, there are a few things you need to have available.
- An eSIM-compatible iPhone (iPhone XS or later) with the most recent iOS version.
- An eSIM-compatible Apple Watch with the latest OS version. These include Apple Watch Series 3 or later, Apple Watch Ultra LTD, Apple Watch Ultra 2, and Apple Watch SE.
- Check that your network operator supports eSIM on Apple Watch devices.
How to set up an eSIM on Apple Watch
Once you have your iPhone and Apple Watch ready and have checked in with your network operator, you’ll need to use the eSIM manager on your iPhone to pair the phone with your Apple Watch.
Next, follow three simple steps to get your watch online:
1. Pair Apple Watch to iPhone
Even though some Apple watches can work as standalone devices, you’ll still need to connect them to your iPhone first. Here’s how you can do just that:
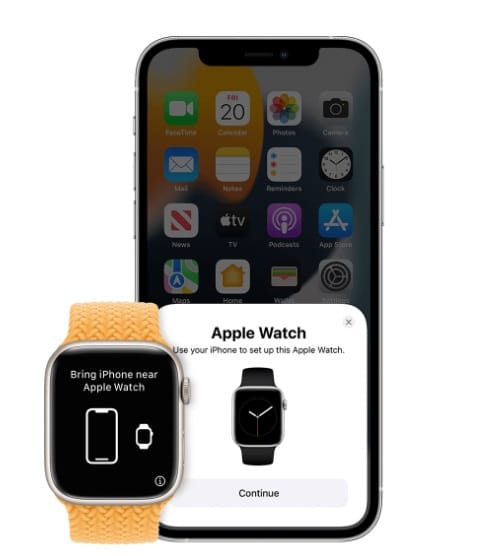
- Put the watch on your wrist and turn it on.
- Hold your Apple Watch next to your iPhone and wait for the Apple Watch logo to appear on the phone, then tap continue.
- Choose the Set Up for Myself option if it’s your watch or Set Up for a Family Member if you’re setting up an Apple Watch for someone else in your family.
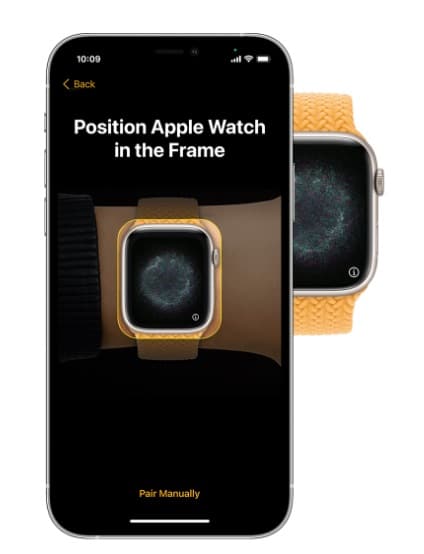
- Hold your Apple Watch in front of your iPhone camera in a spot that’s highlighted on your screen.
- Choose the Set Up as New Apple Watch if it’s your first Apple Watch or tap the Make This Your New Apple Watch if you’re replacing an older device with a new one.
- Put the watch on your wrist and tap continue.
- Sign in with your Apple ID.
If you need more information, you can find detailed specifications to set up your Apple Watch on the Apple support page.
2. Add a cellular plan to your Apple Watch
Once your Apple Watch is paired to your iPhone, follow these steps to add an Apple Watch eSIM to your device.
- On your iPhone, open the Apple Watch app.
- Tap the My Watch tab, then tap Cellular.
- Tap Set Up Cellular. Follow the instructions for your carrier. Enter your username and password to access the account you manage with your carrier.
- Review the Terms and Conditions, fee, and tap Agree. Some carriers have a number-sharing fee that may range from $5 to $10 USD.
- Your eSIM profile will be downloaded to your Apple Watch. This process will take a few minutes.
- You will be notified of service activation. Some carriers notify you by SMS on your watch, others do it via a pop-up on your iPhone.
- Your new profile will appear under Cellular settings inside the Apple Watch app.
- Your watch should have a 4G/5G signal indicator if the process is successful.
When you finish this stage, you’ll be able to turn off or leave your iPhone at home and go for a walk with your watch, as it will have an independent internet connection. Your Apple Watch will work as an extension of your phone. You’ll be able to use your Apple Watch to answer calls, make calls, and send or receive messages as if it were your mobile phone.
3. Change the network provider on your Apple Watch
You’ll need to manually change the network on your device if you decide to change carriers, use multiple carriers, or want to connect your Apple Watch to a travel eSIM for your holidays to avoid international roaming charges.
- Connect to the desired network on your iPhone.
- Open the Apple Watch app on your iPhone.
- Tap the Cellular opinion on the My Watch screen.
- Your Apple Watch should automatically connect to the same network as your iPhone.

Unlimited data. Peace of mind.
Make sure you have travel data that's there when you need it most.
Apple Watch GPS and GPS + Cellular
Most recent Apple Watch models come in two variants — GPS and GPS + Cellular. The key distinction is that a GPS-only watch must be connected to your iPhone for it to have cellular service. The GPS + Cellular models can stay connected to the internet, make calls, and send messages even without being connected to your phone.
That said, while these phones do differ slightly in how they work, the eSIM setup process remains the same for either one.
Keep in mind that if you plan to use an eSIM on your watch, both your iPhone and your watch need to be eSIM-compatible. All iPhone models starting with the XS support eSIM technology, as do Apple Watches starting from Series 3.
Using a dual SIM on your Apple Watch
If you don’t want to share the same SIM or eSIM card between your watch and your phone, you can use the instructions above to add multiple plans to your Apple Watch. With that done, you can use one plan on your phone and another on your watch.
If one of the plans runs out of data, minutes, or messages, you can simply switch back to sharing a single plan on both devices for a while until the limits reset or are topped up.
Things to keep in mind
Whether you’re still considering buying an Apple Watch or have yours already set up, there are a few things to keep in mind about these devices:
- Apple Watch as an extension of your cell phone: With Apple smartwatches, you can make and receive calls and send and receive messages, among other essential functions, but you will still need to pair it with your iPhone to do so.
- Compatibility between Apple Watch and iPhone: Some new Apple Watches may not be compatible with older iPhone models. Make sure your watch is compatible with your phone. If you want to use an eSIM, they need to be compatible with eSIM technology as well.
- Multiple numbers on your Apple Watch: Any Apple Watch can store several numbers in its system, but only one phone number can be active at a time.
- Data usage: Since your Apple Watch is synched with your iPhone, all data used by the watch will be charged to the cellular network plan that it’s connected to.
Still wondering what an eSIM is?
If you’re used to physical SIM cards on your phone, the eSIM technology on your Apple Watch may seem alien at first. That said, it’s no different than that on eSIM-only phones such as the latest iPhones.
GPS + Cellular Apple Watches have an embedded chip that replaces physical cards and allows you to stay connected to a cellular network even when you’re away from your phone. Other than not having a physical card, it works exactly the same as any other SIM.
Once you’re familiar with how eSIM technology works, Holafly makes it easy to stay connected across 200+ destinations with unlimited data and 24/7 customer support.
What’s more, Holafly always has your back with Always On, a perk included with every Holafly eSIM that provides 1 GB of monthly backup data at no extra cost. Whether you’re on a layover or crossing into a country your plan doesn’t cover, simply keep your eSIM installed and your Always On backup data is ready across 70+ global destinations.

eSIMs for every destination
Get eSIMs for 200+ destinations with Holafly, keeping you connected wherever you go.
FAQs
The GPS + Cellular models of Apple Watch can work without having your iPhone nearby thanks to eSIM technology. You will still need to link your Apple Watch with an iPhone for the eSIM to start working in the first place, but the two devices can be separated afterwards.
The cost of an eSIM is the same for an Apple Watch as it is for a mobile phone. The only additional cost you may face is a number sharing fee, which allows you to use the same eSIM plan on both your iPhone and Apple Watch.
Plans that may interest you


A senior SEO writer from Lithuania, combining my passion for writing and travel at Holafly. With years of experience in technical fields, I'm here to answer all of your questions about staying connected. I specialize in turning even the most complicated topics into something everyone can understand.