




 Language

How to install and activate eSIM on iPhone?
To install an eSIM on iPhone, you can use the app linked to your eSIM, or choose one of the two universal methods, scanning a QR code or entering the details manually. This process only prepares the plan on your device, helping you safely save it on your phone ahead of time. Then, to activate it, you just turn it on like a switch and select it for mobile data when you are ready to use it. Follow our step-by-step guide below to learn how to activate eSIM on iphone.
What you need before you start
- An eSIM-compatible iPhone that is unlocked to use another carrier’s network.
- A stable Wi-Fi connection.
Note: Installing your eSIM does not activate your plan or use your mobile data. However, if your regional or global eSIM includes the country you are currently in, your plan may start counting once it connects to a local network. We recommend installing it only one day before your trip to avoid using your plan days before you need them.

How to install an eSIM on iPhone
First, add the eSIM to your iPhone settings to prepare for activation. Below, you’ll find different ways to install an eSIM on iPhone. For the easiest setup experience, we recommend using the Holafly app. You can download or open the app here.
1. Installation via the app
Ideal for a one-tap setup on iOS 17.4 or later. To install your eSIM through the app, follow these steps:
- Open theApp → Log in using the email associated with your purchase → Go to Purchases → Tap Install on the eSIM you want to add → Choose Install Automatically → Tap Install eSIM → Tap Activate to start the installation → Then, tap Continue when the Activate eSIM screen appears (this step only continues the setup; the eSIM will not activate yet).
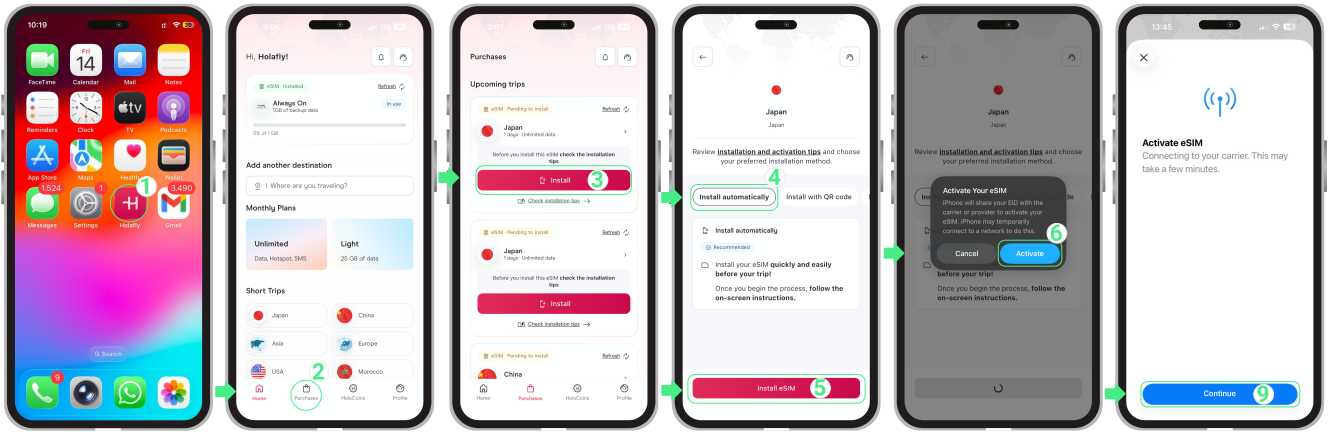
2. Add an eSIM to iPhone using a QR code
You can install your eSIM using the QR code sent to your email in two ways. If you’re using iOS 17.4 or later, you can install it directly from the Mail app by pressing and holding the QR code. You can also use the standard method by scanning the QR code through your iPhone settings. You’ll find both options below.
Install by long-pressing the QR code
- Open the email with your eSIM installation details → Press and hold the QR code image → Tap Add eSIM → Tap Activate when the Activate Your eSIM message appears → Tap Continue (this step only continues the setup; the eSIM will not be activated yet).
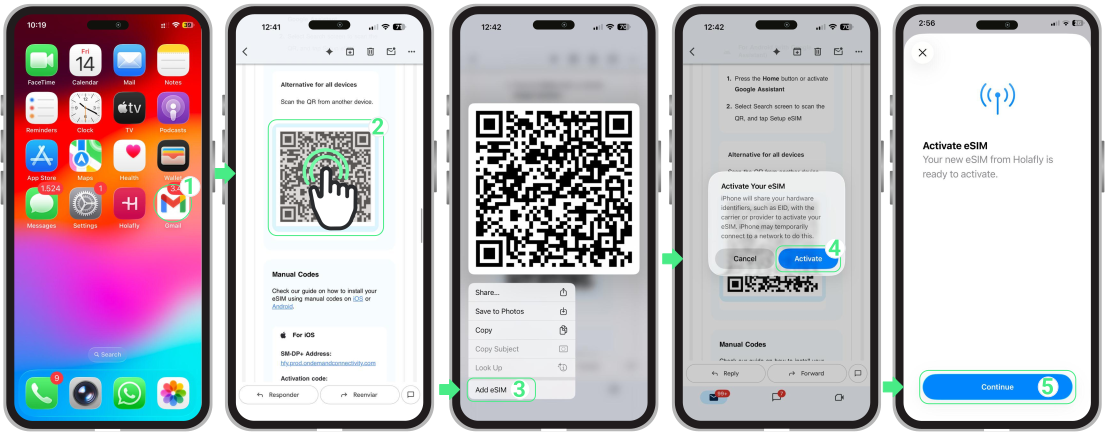
Install by scanning the QR code
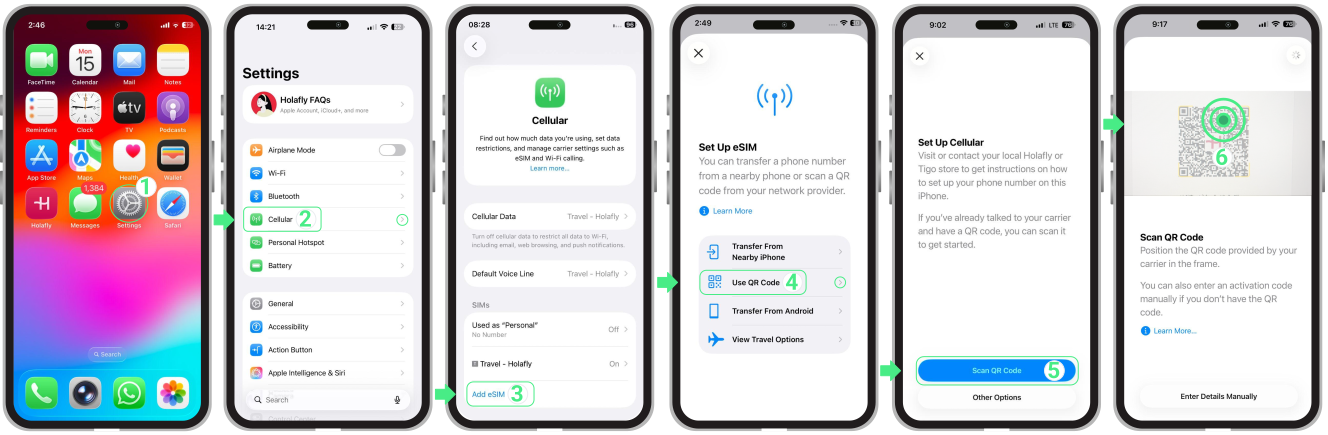
Important: To avoid errors, scan the code only via Settings → Cellular, not your phone’s camera app:
- Go to Settings → Tap Cellular or Mobile Service → Select Add eSIM → Tap Scan QR code → Point your camera at the QR code to begin installation→ Tap Continue when the Activate eSIM screen appears (this moves the setup forward but doesn’t activate the eSIM yet) → Continue with the setup.
3. Manual Installation
This option is helpful if you can’t scan the QR code or if your camera isn’t working. Instead, you can manually enter the installation details sent to your email.
Please note that these are manual text codes instead of clickable links.
- Go to Settings → Tap Cellular or Mobile Service → Select Add eSIM → Tap Scan QR code.
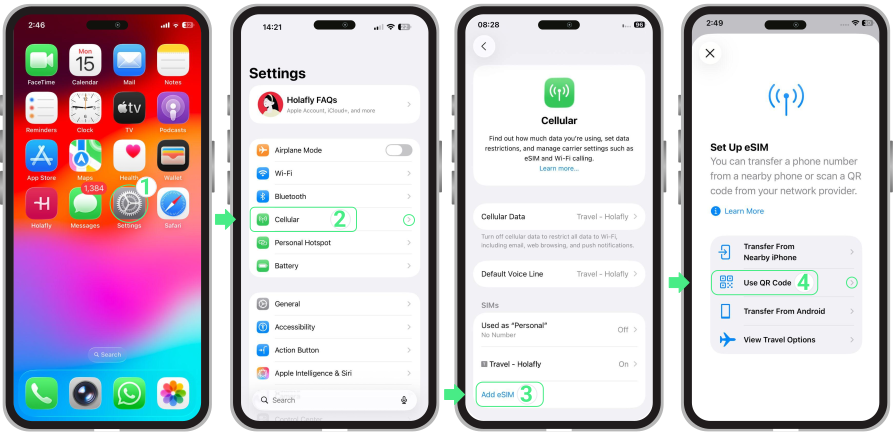
- Tap Enter Details Manually → Copy and paste the SM-DP+ address and Activation Code (these are codes, not links) → Next → Tap Continue → Follow the on-screen steps to complete the setup.
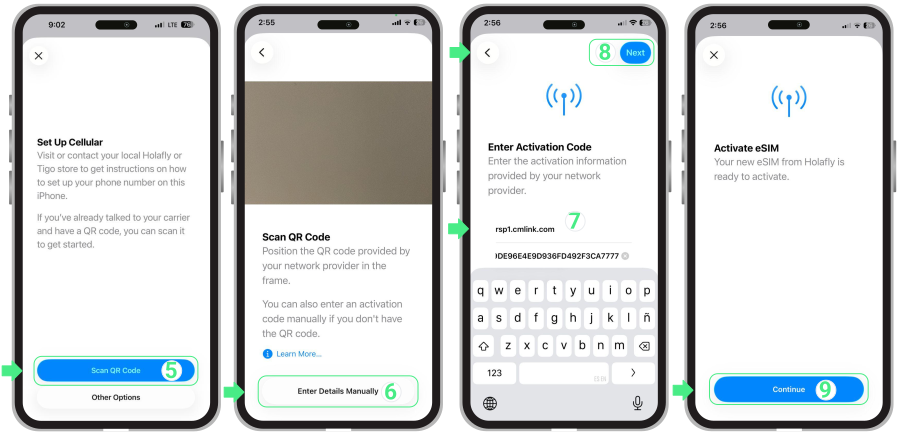
Complete your iPhone eSIM setup
After installing your eSIM, follow the steps below to complete the setup on your iPhone and get it ready for your trip. The setup screens may look slightly different depending on your iOS version, so we’ve included instructions for both iOS 26 and iOS 18 below.
Note: iPhone XS, XS Max, and XR models don’t receive the latest iOS updates and will follow the classic manual labeling process instead (iOS 18).
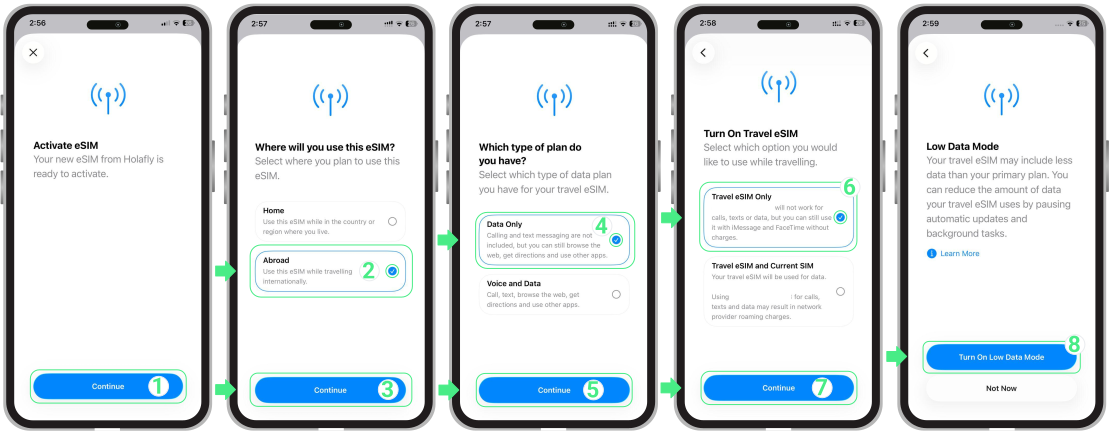
For iPhone with iOS 26:
- On the Activate eSIM screen, tap Continue → On the screen Where will you use this eSIM?, select Abroad to indicate the eSIM will be used internationally and avoid early activation → Tap Continue → On the screen Which type of plan do you have?, choose Data Only to use mobile data without calls or SMS → Tap Continue → On the screen Turn On Travel eSIM, select Travel eSIM Only to use the eSIM during your trip → Tap Continue → To finish the setup, tap Turn On Low Data Mode.
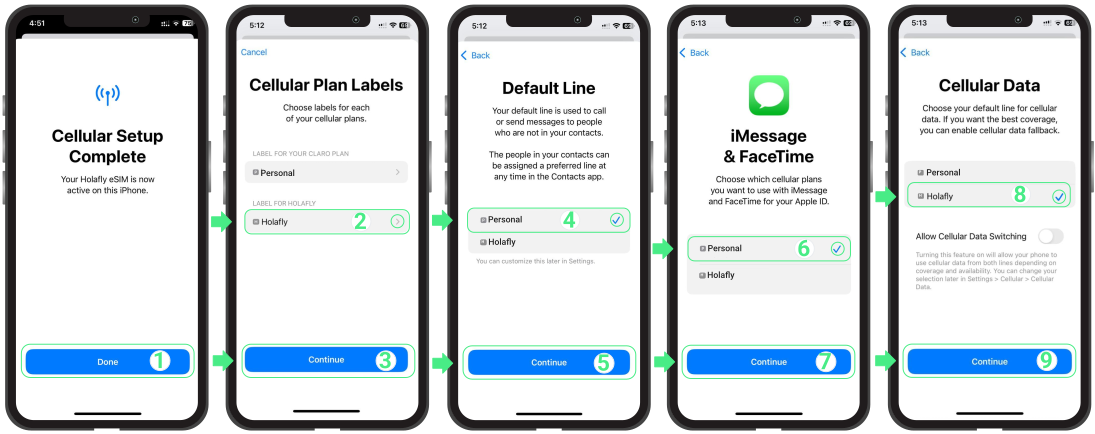
For iPhone with iOS 18:
- When the Cellular Setup Complete screen appears, tap Done → Assign a name to your new eSIM line and tap Continue → Choose your Default Line for calls and messages → Select Continue → Select Personal to keep using your main number for iMessage and FaceTime, tap Continue → Set the new eSIM as your Cellular Data line.
How to activate an eSIM on iPhone
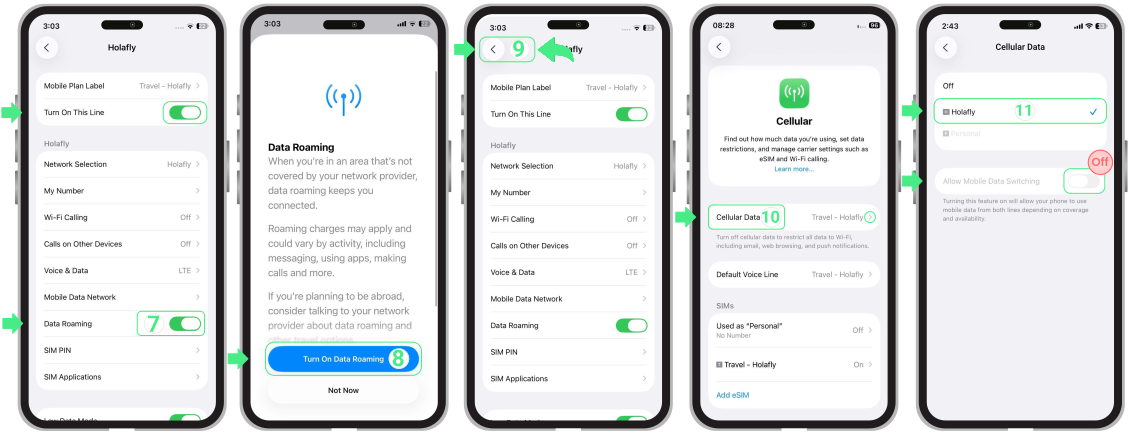
Once installed, activate your eSIM by turning the line on and selecting it for mobile data (no internet required). If you’re using a travel eSIM, complete these steps only after you arrive at your destination. Then, enable Data Roaming and turn off your personal SIM to avoid extra charges.
- Go to Settings → Cellular or Mobile Service → Turn off your personal SIMs or other eSIMs by switching off Turn On This Line → Go back to Cellular or Mobile Service → Select the eSIM you want to activate (your new Travel eSIM, which may appear with a custom name).
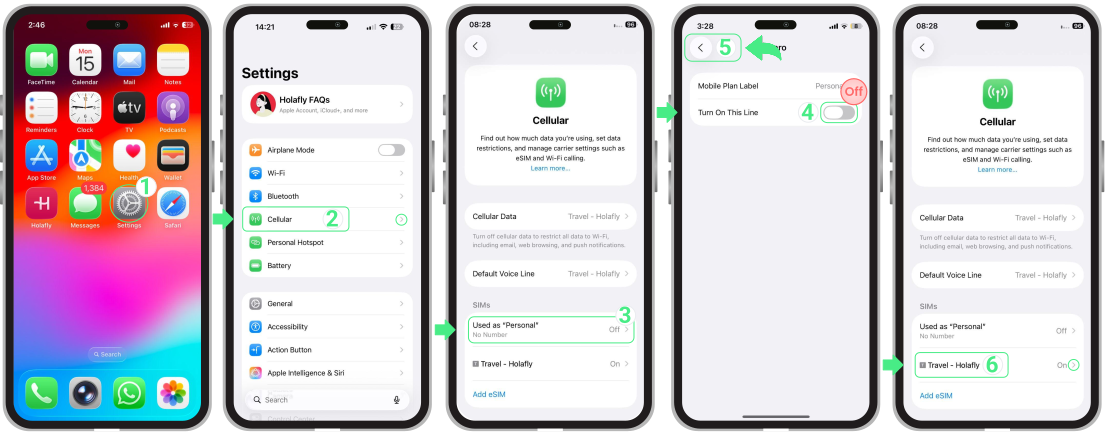
- Make sure the Turn On This Line button is enabled → Turn on Data Roaming → If prompted, tap Turn On Data Roaming to confirm → Return to Cellular or Mobile Service → Tap Cellular Data or Mobile Data and select the Travel eSIM as your data line → Check that Allow Mobile Data Switching is turned off to prevent the iPhone from switching between lines automatically.
Troubleshooting tips
During Installation
If your screen says “eSIM cannot be added” or “This code is no longer valid,” please don’t worry! This almost always means the eSIM was actually installed successfully on the first try, and your phone is just throwing a false alarm.
Before trying anything else, let’s check if it’s already there:
- On your iPhone: Go to Settings → Cellular. Look at the bottom of your SIM list, your new line will be there, usually named Travel, Secondary, Business, or Holafly.
- In the App: Check your eSIM status. If it says “eSIM Installed – Ready to use,” you are all set!
Using your mobile data
If you’ve followed the activation steps but still have no internet, open your eSIM settings and manually select a network.
⚠️ Important: Don’t delete your eSIM to fix connection issues.