




 Language

iPhone XR eSIM: how to install and activate it
The iPhone XR supports eSIM technology, as it was among the first Apple devices to introduce digital SIM capabilities alongside the iPhone XS and XS Max. This feature allows you to use a digital cellular plan without needing a physical nano-SIM and can be set up in 5 minutes directly from your device settings.
The eSIM can be installed by scanning the QR code, directly through your eSIM app, or by entering the activation details manually. Once installed, it is activated by selecting the line for mobile data. Below are the steps to get started with an eSIM on your iPhone XR.
What you need to use eSIM on an iPhone XR
Before installing an eSIM on an iPhone XR, it’s helpful to confirm the basics to ensure the setup goes smoothly.
- A compatible model. Most iPhone XR devices include eSIM, except for those manufactured for China, Hong Kong, or Macao.
- Your iPhone must be unlocked. If your phone is tied to your current company, it won’t let you add any other SIM or eSIM.
- Stable Wi-Fi and enough battery. Make sure you have a good internet connection and keep your phone plugged in during the eSIM setup.
- For Global or Regional plans (Europe, South America, Asia, etc.), install your eSIM at most 1 day before your trip. For single-country plans, you can install it days or weeks ahead, as it only activates at your destination.

How to install an eSIM on iPhone XR
There are several ways to install an eSIM on iPhone XR. If your eSIM includes app installation (iOS 17.4 or later), that’s usually the quickest option. You can also install it using universal methods such as via a QR code or manual activation details.
Follow the instructions below for the method that works best for you.
Note: For travel eSIMs, we recommend completing the installation before your trip and activating it once you arrive at your destination.
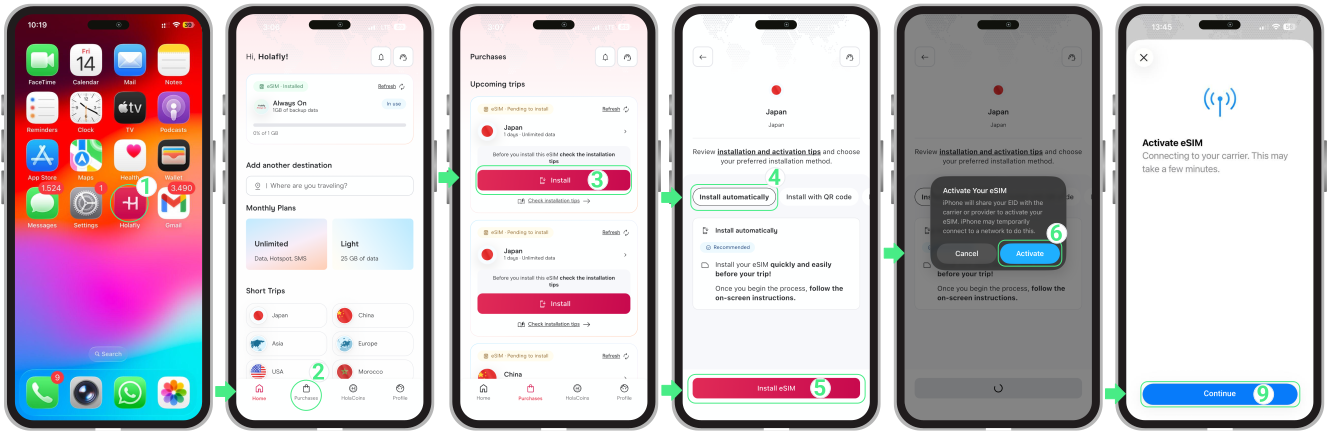
eSIM Installation via the app
Perfect for a quicker setup on iOS 17.4 or later. You can add your eSIM directly from the Holafly app in just a few taps:
- Open the app → Sign in with the email used for your purchase → Go to Purchases → Select the eSIM you want to install → Tap Install → Choose Install Automatically → Tap Install eSIM → Select Activate to begin the setup → When the Activate eSIM screen appears, tap Continue to move to the next step.
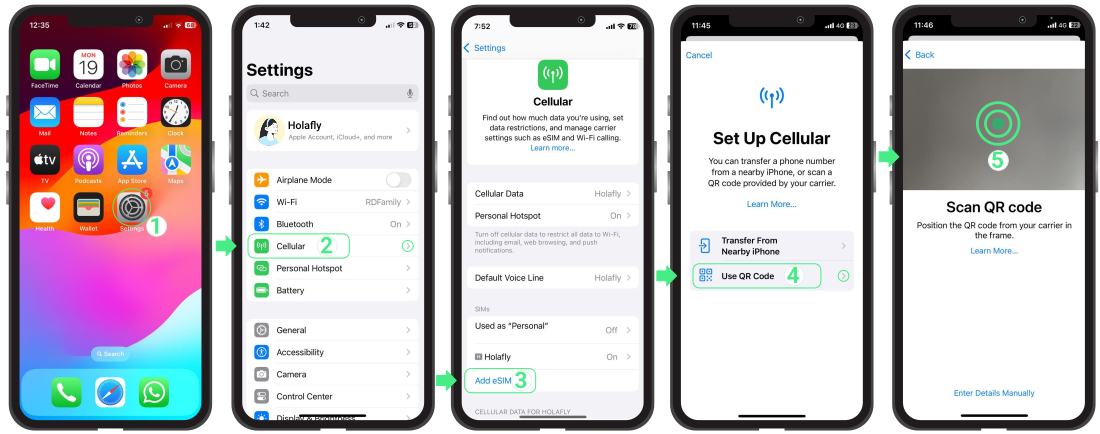
Install an eSIM on iPhone XR using a QR code
This is another easy way to install an eSIM on iPhone XR. To scan it, open it on another device before you begin, then follow the steps below:
- Go to Settings → Cellular or Mobile Data → Add eSIM → Use QR Code → Scan the QR code → Tap Continue when the “Activate eSIM” screen appears (this step moves the setup forward but does not activate the eSIM yet) → Continue with the on-screen setup until it finishes.
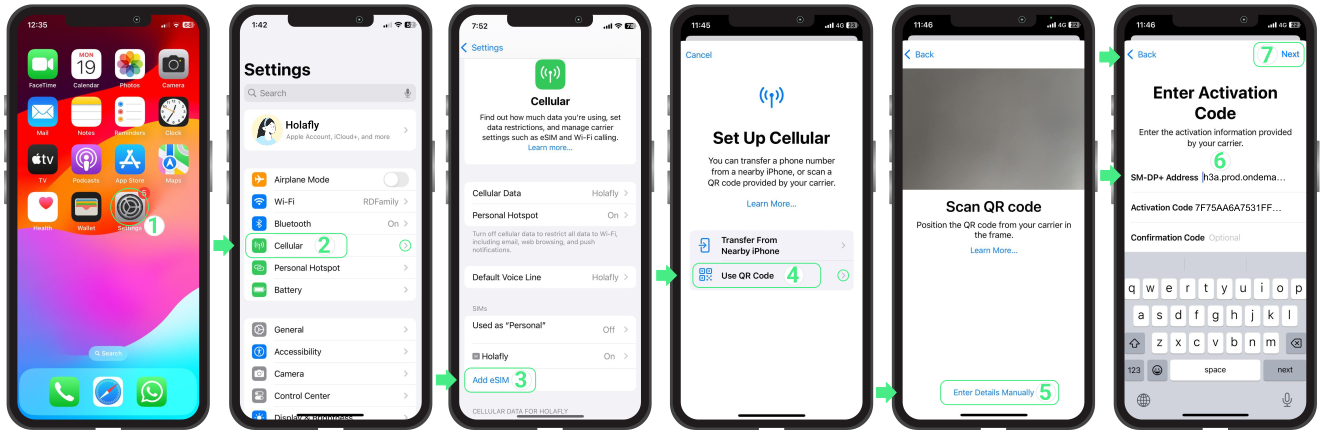
Manual eSIM installation for iPhone XR
A perfect alternative if you can’t scan the QR code right now. Just use the activation text details received with your purchase and follow these steps:
Note: Please keep in mind that these are manual text codes, not clickable links.
- Go to Settings → Cellular or Mobile Data → Add eSIM → Use QR Code → Tap Enter Details Manually → Copy and paste the complete SM-DP+ address and activation code into the designated fields → Tap Next → Tap Continue when the “Activate eSIM” screen appears → Complete the setup on screen.
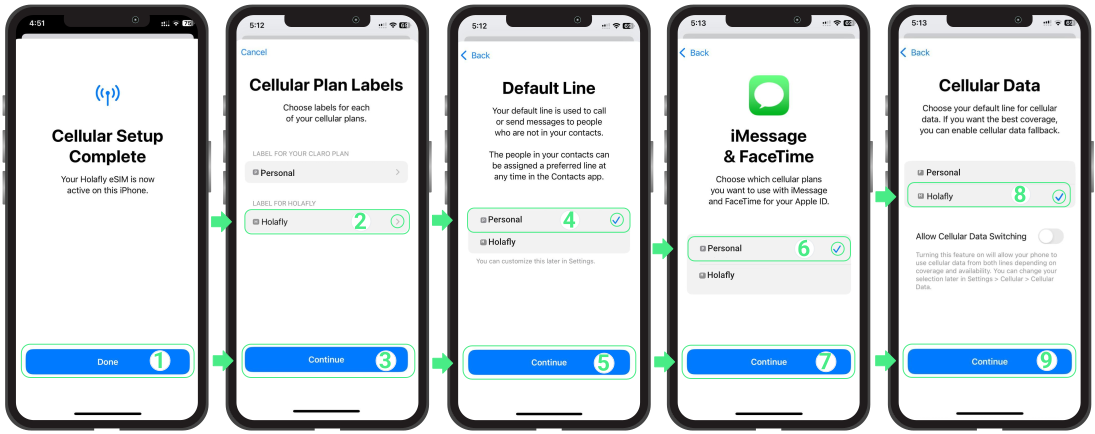
Complete the eSIM setup on iPhone XR
Once the installation is complete, iPhone XR will guide you through a few final setup steps. If you already have another line on your device, you’ll be asked to label each one so you can easily tell them apart. If the new eSIM is for cellular data only, make sure to select it for Cellular Data while keeping your personal line for calls and messages.
Note: These configuration steps apply to iPhone XR, XS and models running iOS 18 or earlier.
- When the Cellular Setup Complete screen appears, tap Done → Assign a name to your new eSIM line and tap Continue → Choose your Default Line for calls and messages, Select Continue → Select Primary to keep using your main number for iMessage and FaceTime, tap Continue → Set the new eSIM as your Cellular Data line.
How to activate an eSIM on iPhone XR
Once the eSIM is installed and configured, the final step is activation. Activating an eSIM on iPhone XR only requires turning the line on and selecting it for mobile data from your device settings.
For local plans, the eSIM activates immediately after you turn it on.
For travel eSIMs, activation is completed by enabling Data Roaming once you arrive at your destination.
- Go to Settings → Cellular or Mobile Data → Turn off your physical SIM or other lines to avoid conflicts with your home carrier → Go back to Cellular.
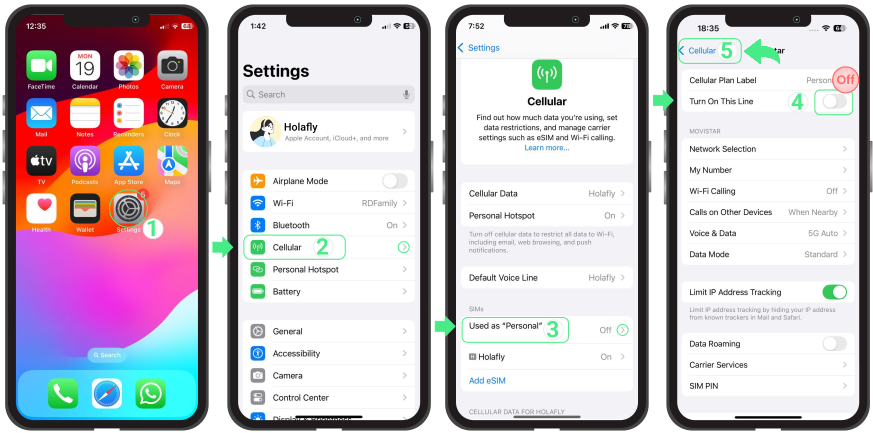
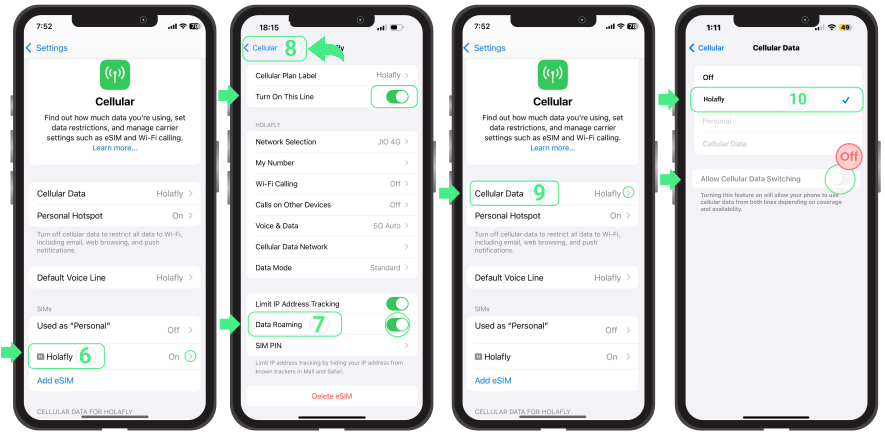
- Select your New installed eSIM → Make sure Turn On This Line is enabled → Turn on Data Roaming (only required for travel eSIMs) → Go back to Cellular menu → Tap Cellular Data and select the new eSIM as your data line → Confirm that Allow Cellular Data Switching is turned off.
Troubleshooting tips
During Installation
If your iPhone XR shows a message during installation, don’t worry. In many cases, the eSIM has already been added successfully. Before starting over, check whether it’s already installed:
- On your iPhone: Go to Settings → Cellular or Mobile Service. Your new eSIM should appear in the list of available lines, usually with the name assigned during setup.
- In the App: Check your eSIM status. If it says “eSIM Installed – Ready to use,” you’re ready to continue with activation.

Using your mobile data
Once your eSIM is fully activated following the steps above, your iPhone XR should automatically connect to the network within a few minutes.
If you don’t see any signal after a short wait, you can resolve this by going to your cellular settings and selecting a network operator manually.
⚠️ Important: Don’t remove your eSIM. Once deleted, it can’t be installed again, and you won’t be able to use that data plan.