



 Language

How to fix iPhone eSIM Network not available error
In the event of this error appears, toggling Airplane Mode or verifying that Data Roaming is enabled on your travel eSIM is often enough to restore service. When you see an iPhone eSIM network not available status, it typically means the line hasn’t fully registered with a local network, or a key setting is off. Below you’ll find what to review to get back online, whether at home or abroad.
Common reasons why iPhone eSIM shows “Network Not Available”
- Incorrect data selection. The travel eSIM is not selected as the primary line for Cellular Data in your settings.
- Delayed network refresh or being outside the plan’s covered area.
- Carrier-locked devices that do not support third-party eSIMs.
- Line conflicts caused by an active physical SIM or a secondary line.
- Misconfigured settings, outdated iOS, or an incomplete eSIM setup.
- Network congestion or a weak signal. Coverage is excellent in urban areas, but your connection may be weaker or unstable in remote areas (deserts, mountains, jungles, or open waters) or crowded places, such as concerts, stadiums, and festivals, where networks can become congested.

Quick fixes to restore your service
- Confirm your eSIM is turned ON and selected for Cellular Data. If you are traveling, also ensure Data Roaming is enabled for your eSIM under Settings → Cellular.
- Toggle Airplane Mode ON for 15 seconds, then OFF to refresh network registration.
- Turn OFF other lines under Settings → Cellular to prevent them from interfering with your data-only eSIM and causing a No Service status.
- Restart your iPhone to clear temporary software malfunctions that may be affecting mobile data or eSIM performance.
Troubleshooting tips
If the quick fixes didn’t work, don’t delete your eSIM because you may not be able to reinstall it, and follow these steps instead.
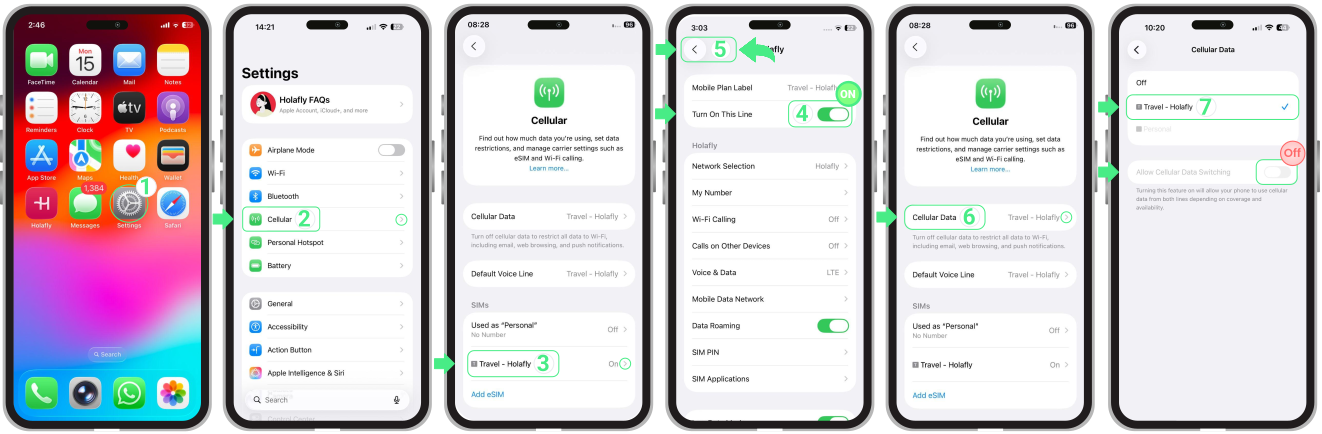
1. Set your travel eSIM for Cellular Data
To get online abroad, you must set the travel eSIM as your active data line. If your primary SIM remains selected, the eSIM signal may stay inactive.
- Go to Settings → Cellular (or Mobile Service) → Tap your Travel eSIM → Enable Turn On This Line → Then, go back and tap Cellular data and select your Travel eSIM → Turn OFF “Allow Cellular Data Switching” to prevent the iPhone from using your primary line.
Note: We recommend turning off your primary local SIM to avoid unexpected roaming charges from your home carrier.
2. Enable data roaming on your iPhone
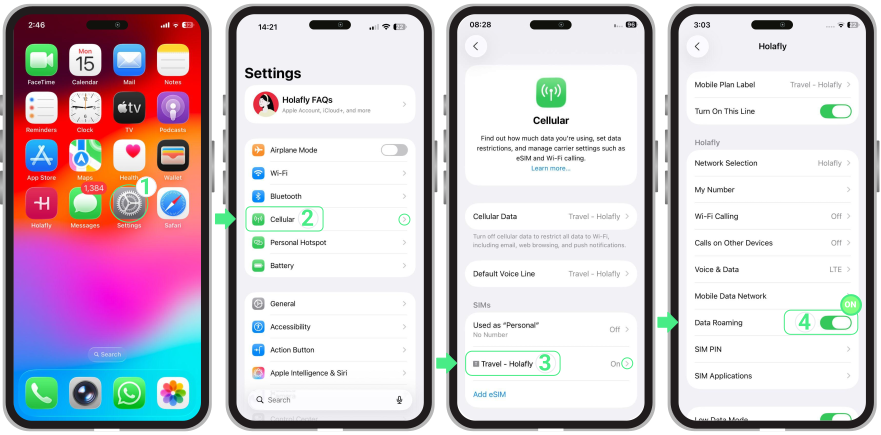
For international plans, Data Roaming must be active to connect to local networks and prevent signal drops outside your home country. This is the most effective step for travel eSIMs showing SOS or No Service:
- Go to Settings → Tap on Cellular or Mobile Service → Tap on your Travel eSIM → Turn Data Roaming ON.
3. Manually select a network operator on your iPhone
If your device remains on SOS or shows No service after eSIM activation, manually selecting can help your device connect to a compatible carrier:
- Go to Settings → Tap on Cellular (Mobile Service) → Tap your eSIM line → Network Selection → Turn OFF Automatic → Wait a few minutes for the available networks to appear on the screen → Then try one by one all the operators listed (each time you select one, wait 30 seconds while it connects to the network) → Select the operator with the strongest signal → Try browsing again.
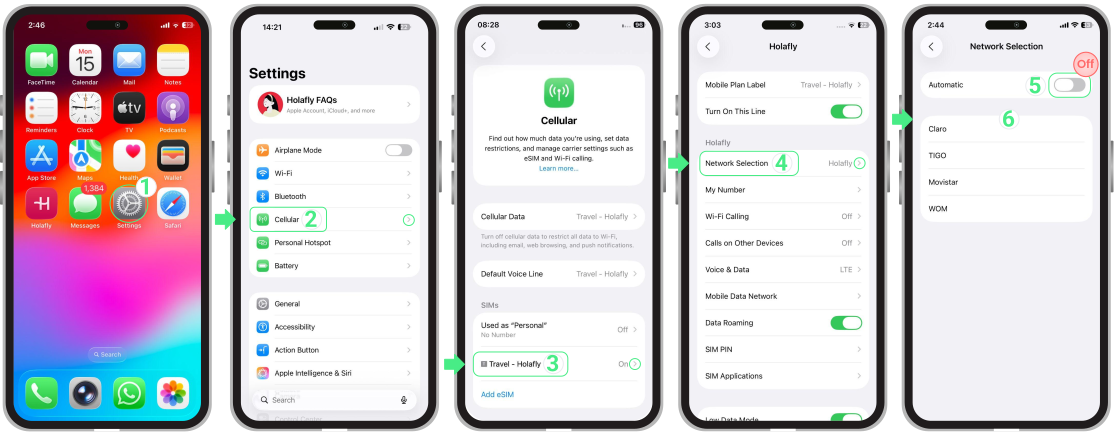
Note: If you want to know which specific operator to connect to, go to our website, search for the country you are in, and check the Coverage and Network sections to see all compatible networks for your mobile plan.
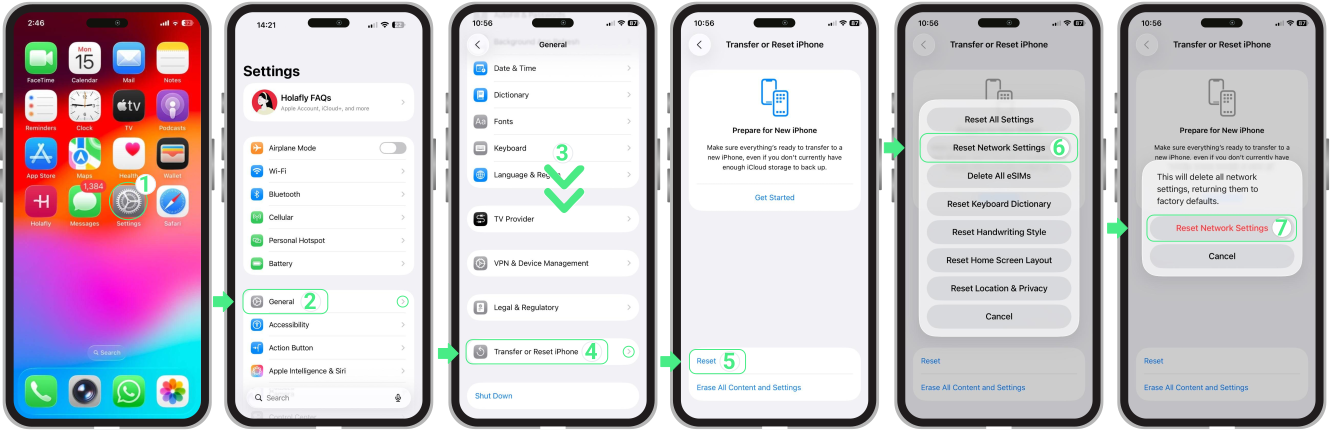
4. Reset network settings
If the steps above didn’t bring your connection back, resetting network settings is a good option to clear any misconfiguration errors.
Important:This action won’t delete your eSIM, but it will remove saved Wi-Fi networks and cellular preferences.
Here’s how to do it:
- Go to Settings → Tap on General → Select Transfer or Reset iPhone → Tap on Reset → Select Reset Network Settings → Enter your device passcode when prompted → Tap Reset Network Settings again to confirm.