




 Language

How to install and activate an eSIM on a Sony phone?
To install and activate an eSIM on a Sony device, you can use the app associated with your eSIM or universal methods like scanning a QR code or entering the installation details manually. Either option will add the line to your device in just a few minutes. Once installed, the final step is activation, which is when you turn it on to connect to the network.
eSIM technology is available across many Sony Xperia models, from popular devices like the Xperia 1 IV, Xperia 5 IV, and Xperia 1 V to newer releases such as the Xperia 1 VII and Xperia 10 VII. Follow the step-by-step instructions below to complete your eSIM setup in just a few minutes.
What you need to know before setting up
- Make sure your Sony device supports eSIM technology and is unlocked (this means it can be used with any mobile company, not just the one where you bought it).
- Ensure you’re connected to a stable, secure Wi-Fi network instead of a public one.
- For Global or Regional (Europe, South America, Africa, etc.) plans, install it no earlier than 1 day before your trip to ensure your data starts when you need it. For single-country plans, install it at any time.

How to install an eSIM on your Sony device
There are three ways to install an eSIM on your Sony device. Choose the installation method that best matches your setup. If eSIM app installation is available, we recommend using it for the quickest setup experience.
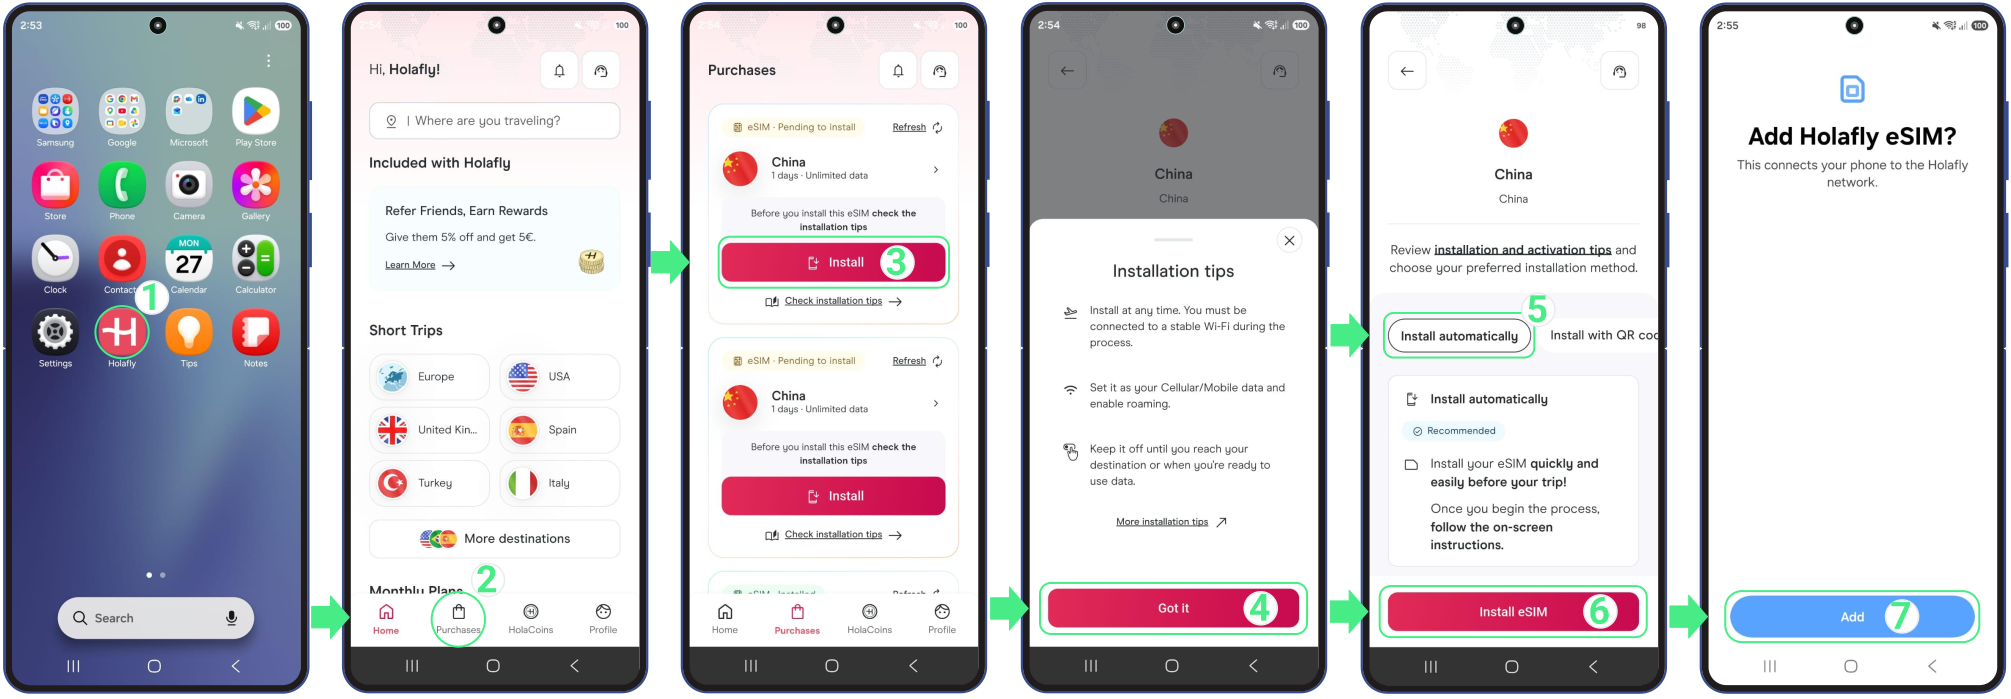
1. Automatic installation via the app
This is the easiest and most modern way to set up your eSIM line. If you are using Holafly, download or open the app here and follow these steps:
- Go to the app on your phone → Log in with the email associated with your purchase → Go to Purchases → Tap Install on the eSIM you want to add → Read the Installation tips and tapGot it to continue → Choose Install Automatically → Tap Install eSIM → Then, tapAdd and Set up to save the new line inside your Sony’s Mobile network menu → Once installed, tap Settings if you want to continue with the activation.
2. Install an eSIM on Sony by using a QR code
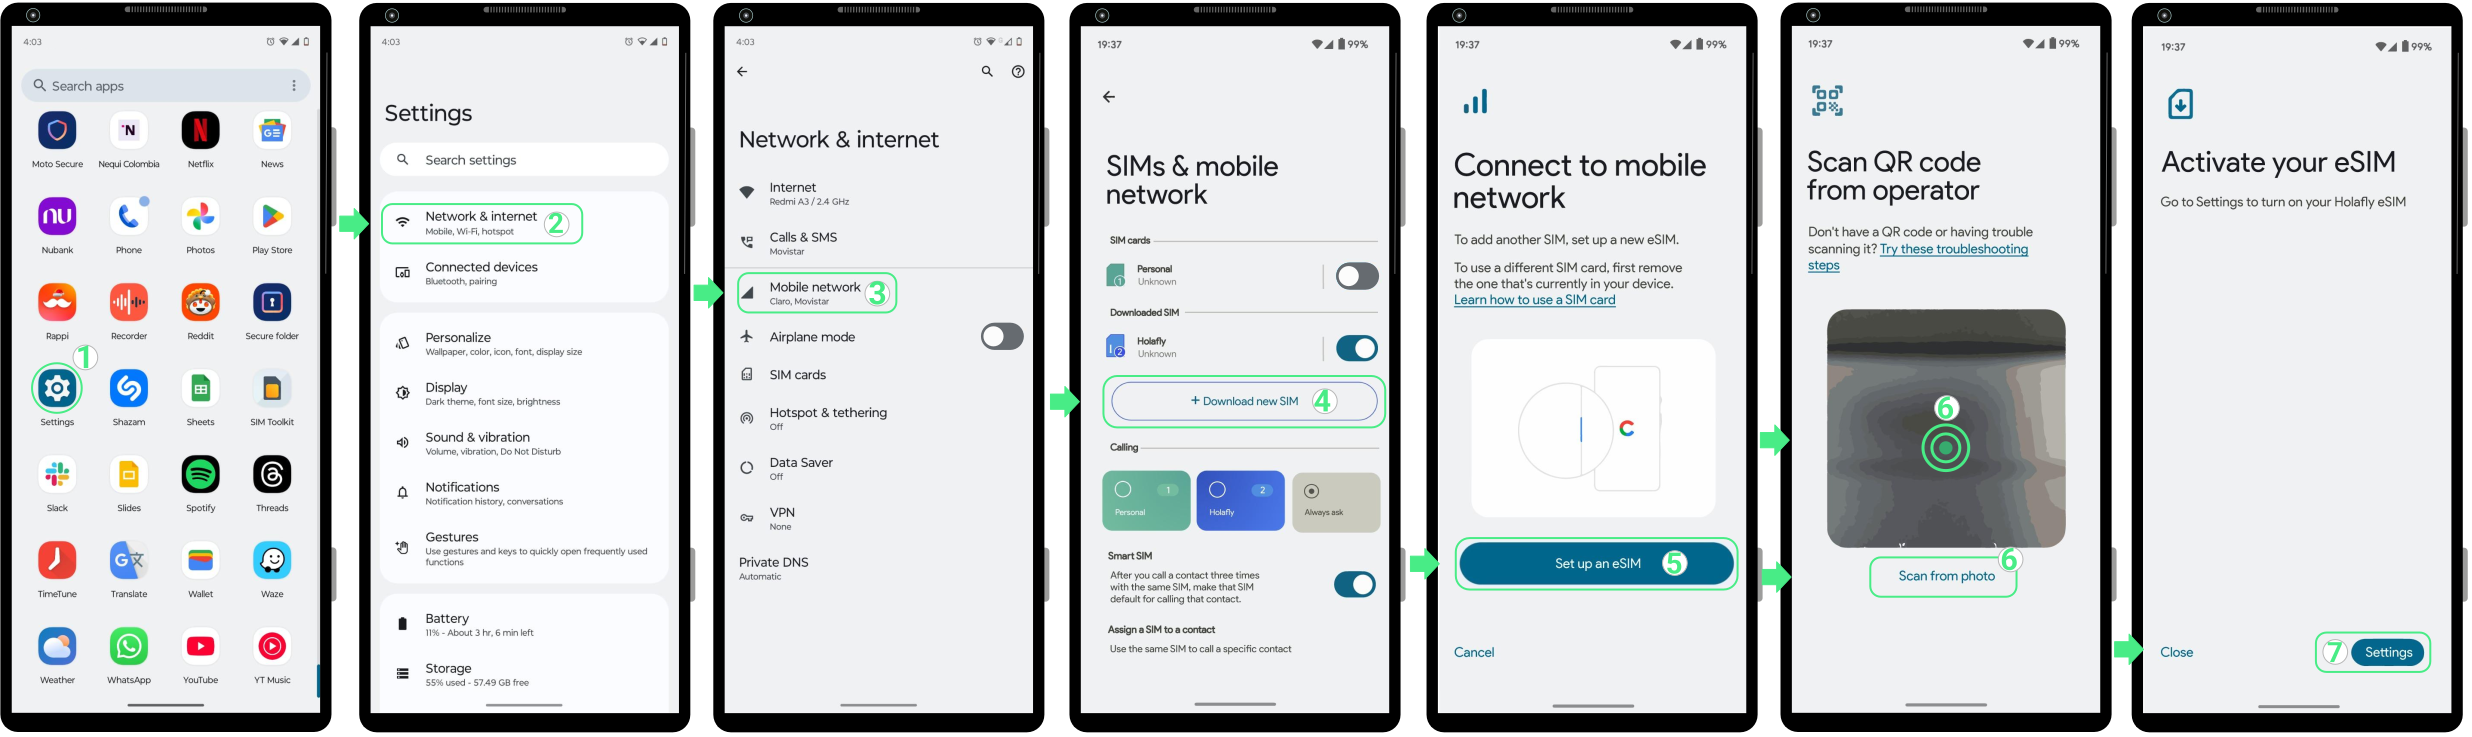
You can add your eSIM directly from your phone’s settings, either by scanning the QR code or by selecting its image from your photo gallery. Before you begin, make sure you have the QR code displayed on another screen or saved as an image on your device.
It is highly important to complete this setup directly through your Sony’s settings menu instead of using your default camera app, as the standard camera will not recognize the mobile configuration. Follow these steps:
- Go to Settings → Access Network & Internet → Tap on Mobile network → Tap on Download new SIM → Select Set up an eSIM → Scan your QR code or tap the “Scan from photo” text link at the bottom to choose it from your gallery → Then, tap on the Set up button to successfully add your eSIM → Once added, tap Settings to turn on the toggle to activate your new eSIM line.
3. Install an eSIM on Sony by entering details manually
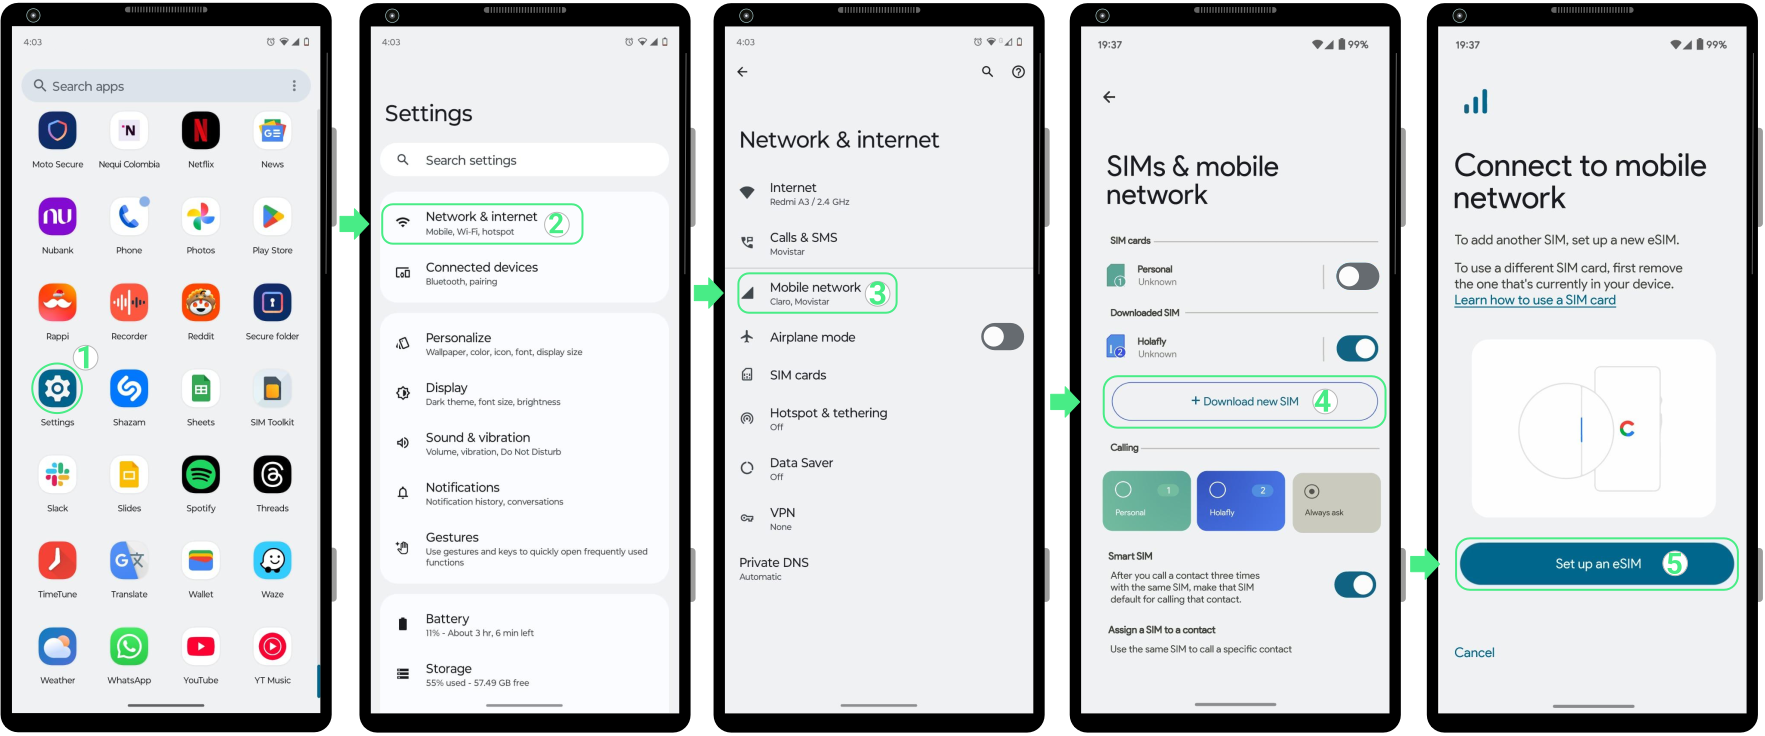
Alternatively, you can complete the installation by entering the manual activation code you received directly into your Sony settings.
- Go to Settings → Access Network & Internet → Tap on Mobile network → Click on Download new SIM → Choose Set up an eSIM.
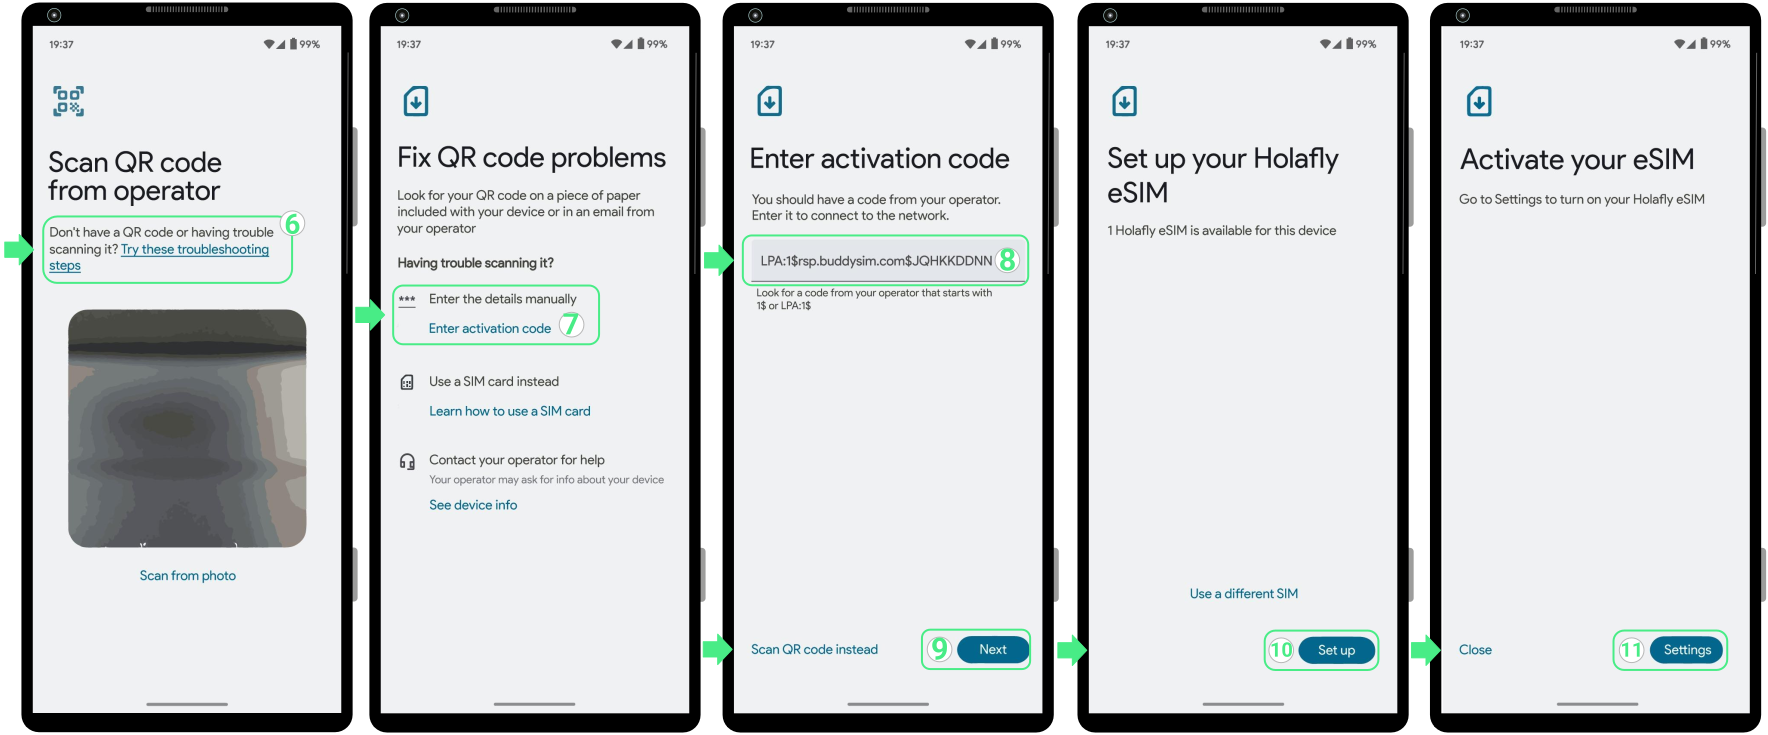
- Tap on Try following these troubleshooting steps → Select Enter activation code → Copy and Paste the manual code for Android that you received (including LPA and the colons “:”) → Tap on Next → Select Set up to successfully add your eSIM → And finally, select Settings if you want to continue with the activation.
Note: Please keep in mind that this is a manual text code, not a clickable link.
How to activate an eSIM on Sony
Once your eSIM is installed, you can activate it by turning on the new line and selecting it for mobile data. For travel eSIMs, wait until you arrive at your destination before turning it on to avoid activating your plan too early.
Follow the steps below to complete the activation once you’re ready:
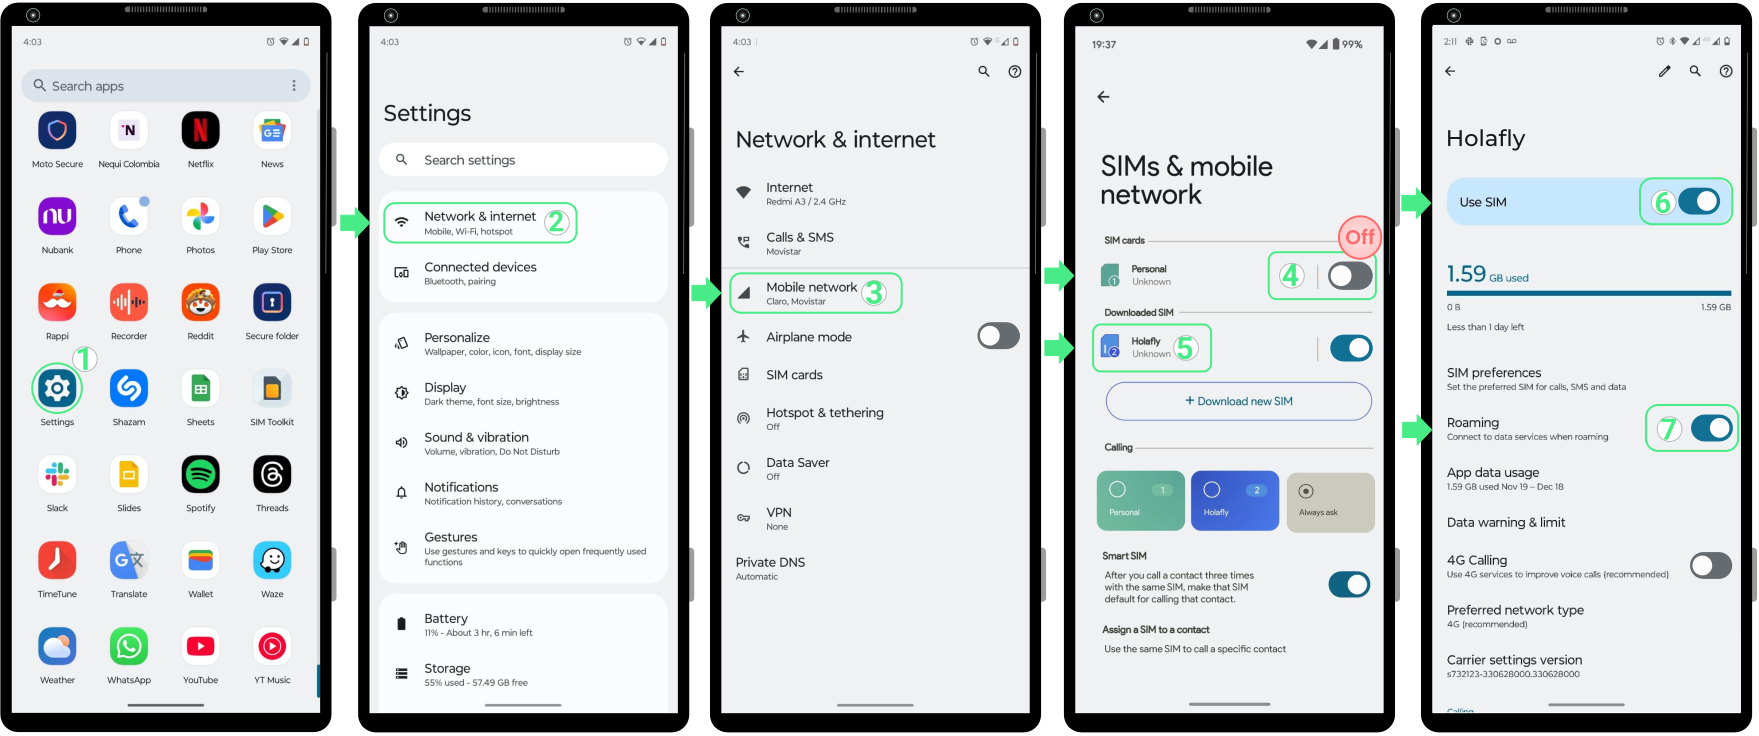
- Go to Settings → Select Network & Internet → Tap on Mobile network → Disable the other SIMs to avoid charges from your home carrier (Your personal SIMs/eSIMs) → Select your newly installed eSIM → Then, turn on the Use SIM switch and also always enable Roaming when you are using a travel eSIM.
To keep in mind
- eSIM support on Sony devices may vary depending on the carrier and the country of manufacture.
- Xperia models in the U.S. generally do not support eSIM, while some versions in Europe do.
- For Sony devices with eSIM and Dual SIM support, you can use both a physical SIM and the eSIM simultaneously, but only one can be active for mobile data at a time.

Troubleshooting tips
During Installation
If your Sony device shows a message during installation, there’s no need to restart the process immediately. In some cases, the eSIM is installed successfully even if the setup doesn’t finish as expected. Before trying again, check whether it’s already available on your device:
- On your Sony device: Go to Settings → Network & internet → Mobile network. If you see a new eSIM listed there under your downloaded SIMs (showing your provider’s name or a custom label), your line has already been successfully installed.
- In the App: Check your eSIM status. If it says “eSIM Installed – Ready to use,” you can proceed with activation.
Using your mobile data
Once you arrive at your destination and have turned on your eSIM following the activation steps above, your Sony device should register on a local network within a few minutes. If you still don’t have internet after waiting a moment, simply select a network operator manually from your eSIM’s network settings.
⚠️ Important: Don’t delete your eSIM. If you remove it, you most likely won’t be able to reinstall it.