


 Language
How to transfer an eSIM from one iPhone to another: A quick guide
Switching iPhones? Here's how to transfer your eSIM from one iPhone to another,, from using eSIM Quick Transfer to scanning a QR code or entering your eSIM details manually.
To transfer an eSIM from one iPhone to another, you can use eSIM Quick Transfer if your mobile provider supports it, scan a QR code provided by your provider, or enter your eSIM details manually.
In this guide, we walk you through exactly how to transfer your eSIM from one iPhone to another, including what you need before you start and what to do if your mobile provider doesn’t support Quick Transfer.
Say goodbye to plastic SIMs
Our eSIMs can't be damaged, broken, or lost – they're the future for every type of traveler.
What do I need before transferring an eSIM?
Before transferring your eSIM, consider the following aspects:
- Compatible iPhone models. Make sure both your old and new iPhones are eSIM-compatible. iPhone XS, iPhone XS Max, iPhone XR and later models support eSIM, although availability can vary by country or region.
- Mobile provider support for eSIM transfer. Not all mobile providers support eSIM Quick Transfer. If yours doesn’t, you may need to contact your provider for a QR code, activation link or other setup instructions.
- Stable internet connection (if applicable). For iPhone models before the iPhone 14 series, you’ll need a stable WiFi or cellular connection to complete the eSIM transfer. The iPhone 14 series and newer can transfer eSIMs to new phones without an internet connection, thanks to improved built-in features.
How to transfer an eSIM from one iPhone to another
Whether you’re upgrading to a new iPhone or just switching devices, there are several ways to move your eSIM. The easiest option is eSIM Quick Transfer, if your mobile provider supports it.
1. Transfer your eSIM using Quick Transfer
eSIM Quick Transfer lets you transfer a mobile plan from your previous iPhone to your new iPhone without contacting your mobile provider, if the provider supports the feature.
Before you start, Apple says both iPhones should:
- Be signed in to your Apple Account
- Be nearby with Bluetooth turned on
- Have iOS 18.4 or later installed
- Have your previous iPhone unlocked with its device passcode
To transfer your eSIM:
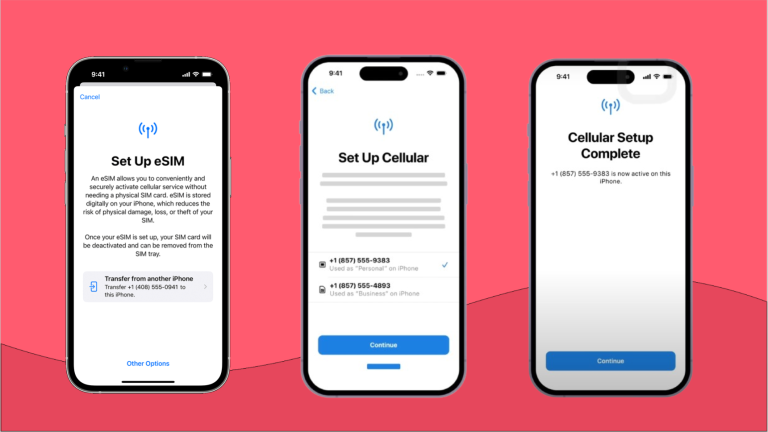
- On your new iPhone, open Settings > Mobile Service and tap Set Up Mobile or Add eSIM.
- Choose the mobile plan you want to transfer from your previous iPhone. If no numbers appear, tap Transfer From Nearby iPhone.
- Follow the instructions on your previous iPhone.
- Tap Transfer or enter the verification code displayed on your new iPhone if prompted.
- Wait for the mobile plan to activate on your new iPhone.
- Once the new plan is activated, the previous SIM is deactivated.
With iOS 26, you can transfer several phone numbers at once, while previous versions only allowed the transfer of one number at a time.
Also new with iOS 26, when setting up your eSIM, you’ll be asked to choose to set it as your Home eSIM or for use Abroad. Then, select if you’ll be using it for Voice and Data, or Data Only. This allows you to set up a travel eSIM for data, while keeping your regular eSIM as the primary one for calls and texts.
💡Alternatively, you can use the same steps to convert a used physical SIM into an eSIM.
2. Transfer an eSIM with a QR code
If your mobile provider doesn’t support eSIM Quick Transfer, you may need to set up the eSIM using a QR code provided by the provider.
Manual transfer means installing the eSIM on your new iPhone yourself.To do so, you’ll need to contact your carrier and ask for a QR code for your new phone.
You might need to use this method if:
- Your mobile provider doesn’t support quick transfer.
- You’re replacing your existing eSIM and your provider issues a new QR code.
- You’re experiencing problems with Quick Transfer and your provider recommends using a QR code instead.
Here’s how to transfer eSIM from one iPhone to another with a QR code:
- Contact your mobile provider and request an eSIM QR code for your new iPhone.
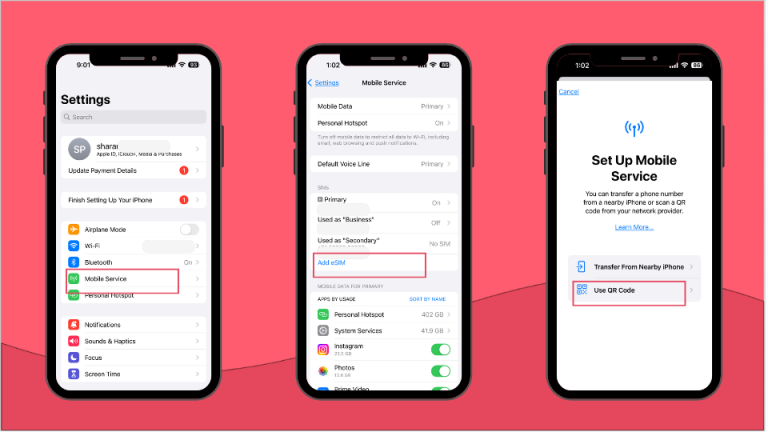
- On your new iPhone, go to Settings > Mobile/Cellular Service > Add eSIM.
- Select Use QR Code and scan the QR code provided by your mobile provider.
- Tap Continue at the bottom of the screen, then tap Add Cellular Plan.
- Follow the prompts to complete the setup.
- Once done, the eSIM should become active on your new phone and automatically deactivate on your old one.
The exact process can vary between providers, so follow any additional instructions from your mobile provider.
3. Manually enter your eSIM details
If you’re having issues scanning the QR code, you can set up the eSIM on your new phone manually. All the necessary information should be included in the email that was sent together with the QR code. Here’s what you’ll need:
- SM-DP+ Address: This stands for Subscription Manager Data Preparation (SM-DP+), which is essentially a server address where your eSIM profile is stored. It typically looks something like this:
- smdp.vodafone.com
- esim.tmobile.com
- Activation code: This is a unique code provided by your carrier that links your iPhone to your eSIM profile. It acts like a key that unlocks your mobile service on the new device. The activation code is typically a string of numbers and letters, such as:
- 1234567890ABCDEF
- XYZ9876543210
- Other details: Depending on your carrier, you might need additional information, such as a confirmation code or a one-time password (OTP). These details ensure that the correct eSIM profile is linked to your device.
Once you have all of the above information handy, here’s how you can set up your eSIM on iPhone:
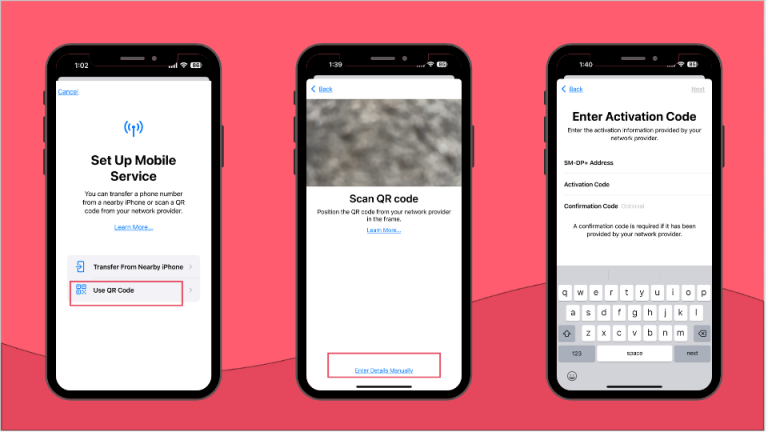
- Go to Settings > Mobile/Cellular Service > Add eSIM
- Select Use QR Code, then choose Enter Details Manually.
- Enter the SM-DP+ address provided by your mobile provider.
- Enter the activation code exactly as provided.
- Enter a confirmation code if your provider requires one.
- Follow the onscreen instructions to complete the setup.
- Once done, the eSIM should become active on your new phone and automatically deactivate on your old one.
The exact information required depends on your mobile provider and eSIM plan.
After you’re all done, you might want to double-check it. Learn how to check if eSIM is activated in iPhone to make sure everything is working correctly.
Get your travel eSIM from Holafly
Need reliable data abroad? Holafly offers travel eSIMs for 200+ destinations worldwide, each offering unlimited data and 24/7 customer support. Simply pick your destination, choose any number of days from 1 to 90, and enjoy staying connected wherever you go.
Every Holafly eSIM also includes Always On, which provides 1 GB of monthly backup data at no extra cost in 150+ destinations. It activates automatically once your main data allowance ends, as long as your eSIM remains installed on your device.
When setting up your Holafly eSIM on an iPhone running iOS 26, you can choose to use it while travelling and select it as your mobile data line. This lets you keep your regular Australian mobile plan available for calls and texts while using the Holafly eSIM for data overseas.

Connectivity made easy
Activate your eSIM in a few simple steps and manage your plan through our dedicated app.
Plans that may interest you

Formerly a travel journalist turned marketing copywriter, I found my way back to the travel world with Holafly—my dream company that made remote work possible. My motto? “Dream big and make it happen.” I’m passionate about writing, exploring the world, and staying active through walking, running, swimming, and hiking. I also love learning, reflecting, and connecting with inspiring minds.