Before you begin installation with a QR code, there are a few important points to be aware of:
You must have the QR code on another screen or device to scan it with your phone camera.
Make sure you have a stable internet connection throughout the process.
Please note that the QR code can only be scanned once.
Do not remove the eSIM from your device as you will not be able to use it again.
Before you begin manual installation, there are a few important points to be aware of:
Manual installation codes can only be used once.
Make sure you have a stable internet connection throughout the process.
Do not remove the eSIM from your device as you will not be able to use it again.
Let’s get started together
01.
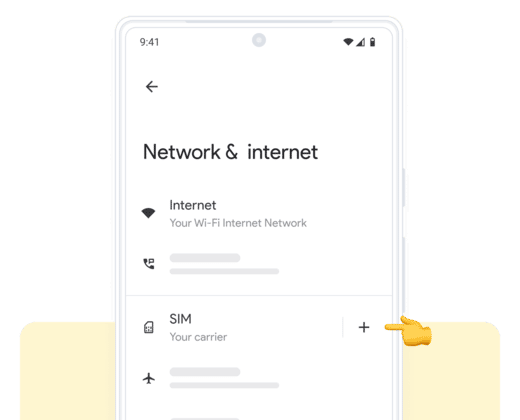
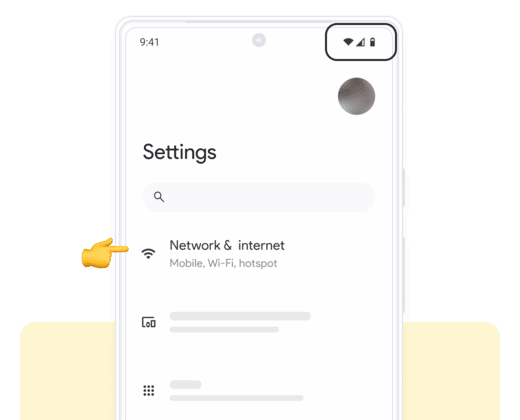
Open Settings on your device
Press “Network & internet” and then the “+” icon next to your main plan. Now, press “Download a SIM instead?” and then “Next” to start the installation process.
02.
Open your email
Open your email on a different device to the one you will be using for installation and find the email we sent you with the QR code.
If you have not received your code, please contact us.
03.
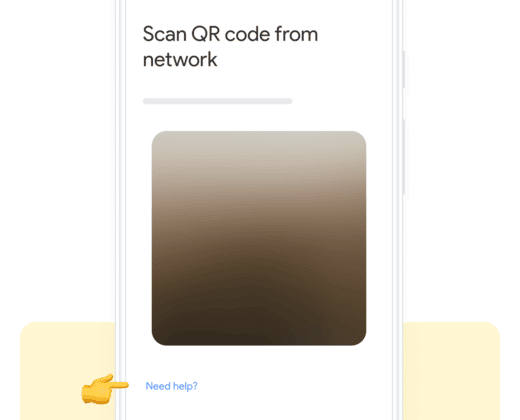
Scan the QR code and follow the installation steps
Scan the code sent to your email and follow the on-screen steps to install your eSIM. When you arrive at your destination, follow the activation instructions to connect to the internet.
Go to your mobile phone settings and then to “Network & Internet”. Verify that you have a stable internet connection (Wi-Fi or mobile data).
02. New eSIM
In “Network & Internet”, click on the “+” icon next to your main mobile plan to add your new plan.
03. Add your eSIM
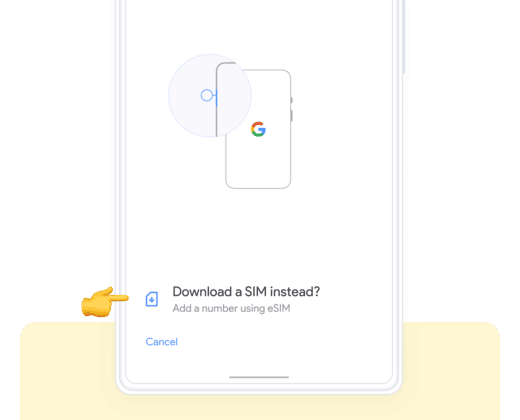
At the bottom of the screen, press “Download a SIM instead?” a message will pop up asking if you want to use 2 SIMs. Press “Yes.” Wait a few seconds and continue the process.
04. Scan the QR code
Scan the QR code we sent to your email by pointing the box shown on the screen over the QR code. Wait a few seconds while your new mobile plan is identified.
05. Download your mobile plan
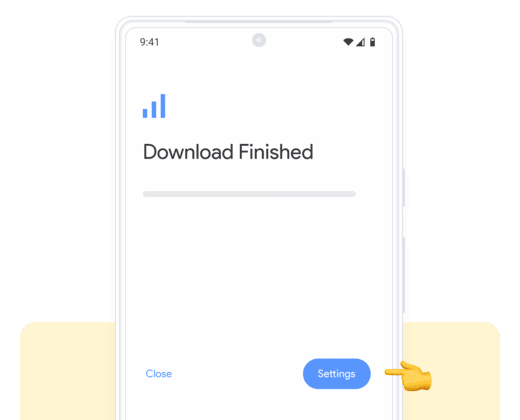
Wait a few seconds until the plan is identified. Press “Download” to add it to your device.
06. Installation confirmation
Your eSIM that is associated with this data plan is now installed. You can turn data roaming on or off by pressing “Settings” and opening your new Holafly mobile plan (we recommend only turning it on when you are at your destination).
07. Label your new data plan
If you want to change the name of your eSIM, click on your new plan and select the edit icon in the top right corner.
We recommend naming it, for example “Holafly Spain.”
Let’s get started together
01.
Open your email
Find the message where we sent you the Android activation code when you made the purchase.
If you have not received your code, please contact us.
02.
Open “Settings” on your device
Press “Network & Internet” and then the “+” icon next to your main plan. Now click on “Download a eSIM instead?”.
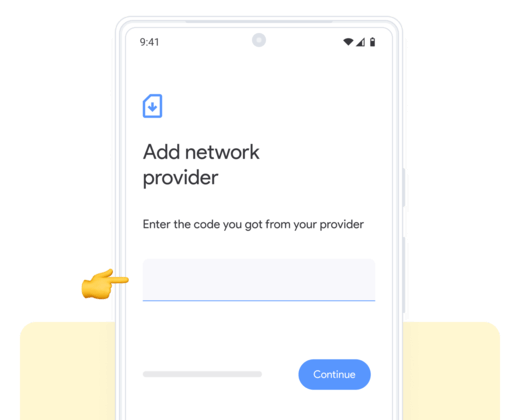
03.
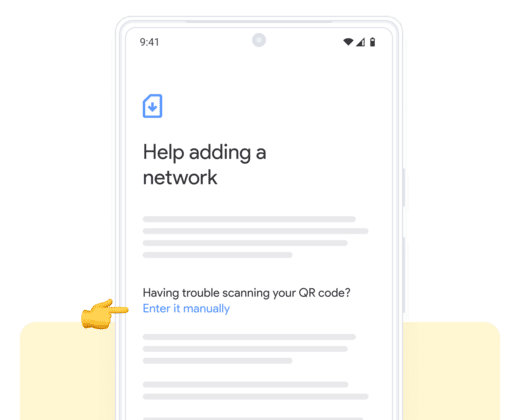
Follow the installation steps
At the bottom of the screen, press “Need help?” and you will find a highlighted option that says “Enter it manually” Enter the code and follow the steps that your device displays.
Go to your mobile phone settings and then to “Network & Internet”. Verify that you have a stable internet connection (Wi-Fi or mobile data).
02. New eSIM
In “Network & Internet”, click on the “+” icon next to your main mobile plan to add your new plan.
03. Add your eSIM
At the bottom of the screen, press “Download a SIM instead?” a message will pop up asking if you want to use 2 SIMs. Press “Yes.” Wait a few seconds and continue the process.
04. Help section
Scroll down and click on “Need help?”; you will find an option to install your eSIM manually.
05. Enter Manually
Now, locate and click on the “Enter Manually” option.
06. Enter the code
Copy and paste the manual installation code for Android to manually install your eSIM.
Press “Continue” and wait a few seconds.
07. Download your mobile plan
Wait a few seconds until the plan is identified. Press “Download” to add it to your device.
08. Installation confirmation
Your eSIM that is associated with this data plan is now installed. You can turn data roaming on or off by pressing “Settings” and opening your new Holafly mobile plan (we recommend only turning it on when you are at your destination).
09. Label your new data plan
If you want to change the name of your eSIM, click on your new plan and select the edit icon in the top right corner.
We recommend naming it, for example “Holafly Spain.”
Congratulations! Your plan has now been installed and is ready to activate.
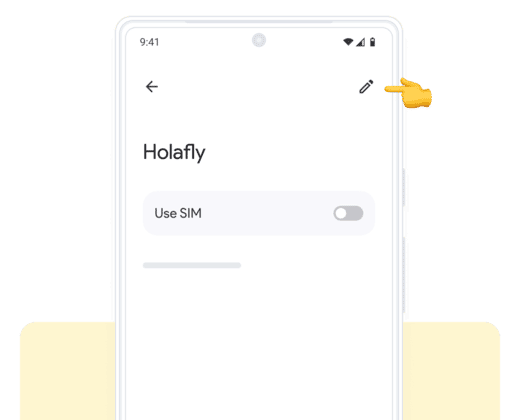
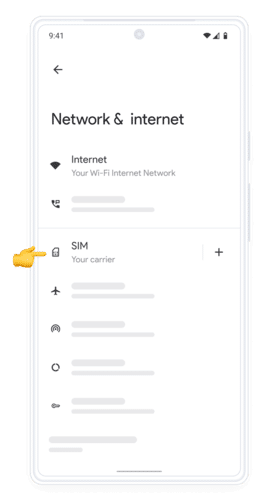
Open “Settings” and then go to “Network & Internet”.
02.
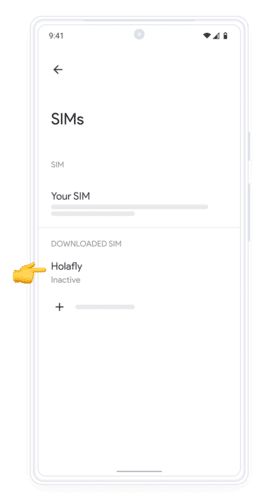
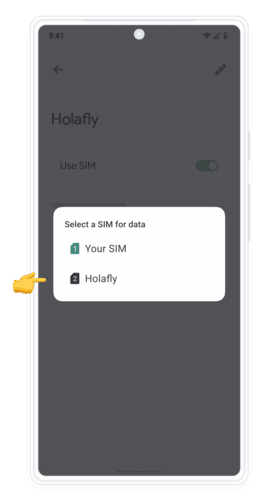
Select your new Holafly plan from the list.
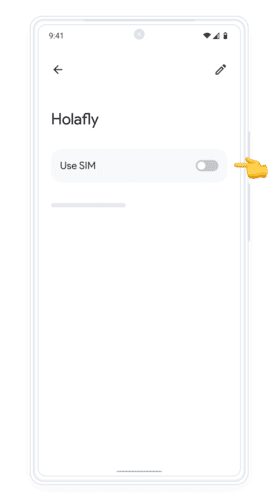
03.
Activate your new plan by clicking on the “Use SIM” option.
04.
Select your Holafly data plan from the options that appear on the screen.
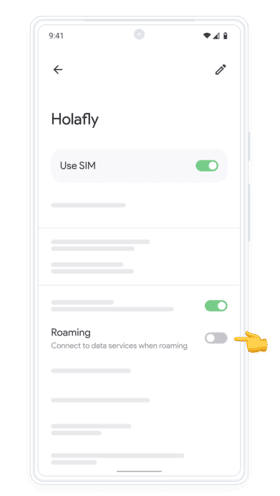
05.
Scroll until you find “Roaming” and activate it. Now, deactivate your main line to avoid surcharges.
¡Done! You already have your plan activated and you can use your data.
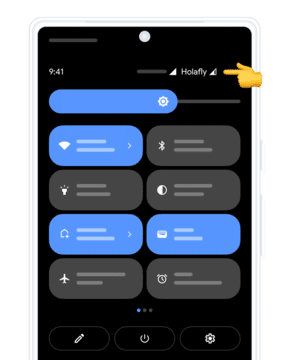
How do you know that your eSIM is active?
How do you know that your eSIM is active?
You can check in two ways:
01.
Make sure there is at least one bar in the signal icon on your phone.
02.
In your device’s settings, go to “Network & Internet”, click on the “SIM” option and select your new Holafly eSIM from the list. Verify that your plan and the “Roaming” option are activated.
Don’t worry! We are here for you.
If you have any questions during this process, remember we’re here to assist you 24/7 through our Online chat.
שינוי בתוכניות? אין שום בעיה!
החזר עבור ביטול השירות
אם חלו שינויים בתוכניות שלך וכבר אין לך צורך ב-eSIM שלHolafly , אנו נספק לך החזר מלא.
החזר עבור מכשיר לא תואם או נעול
אם רכשת את ה-eSIM והתברר שהוא אינו תואם למכשיר שלך, אנו נספק לך החזר מלא.
החזר עבור בעיות בחיבור
אם ה-eSIM שלך לא עובד עקב בעיה עם Holafly או שתשתית הרשת של מדינת היעד בעייתית ולא יציבה, נוכל להציע לך החזר מלא או חלקי.


 שפה
שפה 


 לא נמצאה תוצאה