





 Language
What is SM-DP+ Address? All you need to know
The SM-DP+ Address is the key code that gets your eSIM activated and ready to go. Learn what it is, where to find it, and how to enter it manually when setting up an eSIM.
If you’re trying to activate your eSIM and things aren’t going as planned, an issue with the SM-DP+ Address might be the reason why. This usually happens when you need to install your eSIM manually instead of using a QR code or automatic activation.
The SM-DP+ Address connects your phone to your service provider’s server and finalizes your eSIM setup. Knowing where to find it and how to use it ensures you’re not stuck halfway through the process and can connect smoothly.
In this guide, we cover everything from why the SM-DP+ Address is important and where you can find it to how to use it when things don’t go as planned. We’ll also introduce Holafly, an eSIM provider with a simple activation process that won’t cause any SM-DP+ Address issues.

Peace of mind before you fly
Set up your eSIM before travel and get unlimited data on arrival.
What is SM-DP+ Address?
SM-DP+ Address (Subscription Manager Data Preparation+ Address) is the address of the server your device connects to during certain eSIM installation processes. The SM-DP+ server securely prepares and delivers your eSIM profile to your device.
The eSIM profile contains the information your device needs to authenticate and connect to a mobile network. Depending on the eSIM, it may also include information such as your mobile service details or phone number. Many travel eSIMs, however, are data-only and don’t include a phone number.
You don’t always need to enter the SM-DP+ Address manually. When you scan an eSIM QR code or use an automatic activation method, the necessary information can be provided to your device automatically.
The importance of the SM-DP+ Address in the eSIM activation process
The SM-DP+ Address tells your device which SM-DP+ server to contact during eSIM installation. The server securely prepares and delivers the eSIM profile to your device.
Here’s why it matters:
- Connects your device to the right server. The SM-DP+ Address identifies the server responsible for delivering your eSIM profile.
- Supports secure eSIM provisioning. The SM-DP+ and your device’s eSIM work together using security mechanisms designed to protect the profile during installation. GSMA describes the SM-DP+ as securely preparing and downloading protected profile packages to the device.
- Enables manual installation. When your provider gives you an SM-DP+ Address and activation code, you can enter these details manually instead of scanning a QR code.
SM-DP+ address: How does it work?
Here’s a simplified look at what happens during eSIM installation:
- When you start the eSIM activation process, your device’s eSIM software, known as the Local Profile Assistant (LPA), uses the SM-DP+ Address to identify the server that has your eSIM profile.
- Your device connects securely to the SM-DP+ server.
- The SM-DP+ server checks that the eSIM profile can be downloaded to your device.
- The server securely delivers the profile to your device’s eSIM.
- Your device installs the profile, after which you can use the eSIM to connect to the mobile network.
- The exact process can vary depending on your device, mobile provider, and eSIM activation method.
Where can I find the SM-DP+ Address and activation code?
Before we dive into where to find them, let’s break down what the SM-DP+ Address and Activation Code look like.
An SM-DP+ Address identifies the server used to deliver your eSIM profile. An activation code is additional information used with the SM-DP+ Address during manual eSIM installation.
For example, an eSIM activation string may follow this general format:
LPA:1$smdp.example.com$123ABC456DEF
In this example:
- LPA:1 indicates the activation code format used for the eSIM installation process.
- smdp.example.com represents the SM-DP+ Address.
- 123ABC456DEF represents the activation code provided for the eSIM installation.
Where to find your SM-DP+ Address and activation code?
- Email or installation instructions: Your eSIM provider may send the SM-DP+ Address and activation details in your purchase confirmation or installation instructions.
- QR code. An eSIM QR code can contain the information needed for installation, so you usually don’t need to enter the SM-DP+ Address manually.
- Provider app or account: Some eSIM providers make your installation details available through their app or online account.
- Customer support: If you can’t find the required information, contact your mobile provider or eSIM provider for help.
Your phone may show some eSIM information in its settings, but you generally shouldn’t expect to find the original activation code there after installation.
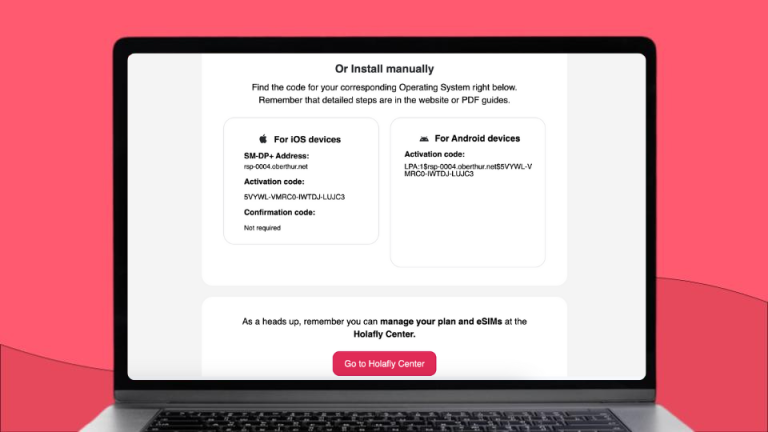
How to set up the SM-DP+ Address
When you scan the initial QR code provided by your carrier, your device will automatically connect to the SM-DP+ server and activate your eSIM. Easy, right?
But what if the QR code doesn’t work, or you need to input the details manually? Here’s how you can set up the SM-DP+ Address yourself.
Setting up the SM-DP+ Address on iPhone
If your QR code doesn’t work and your eSIM provider has given you the information needed for manual installation, you can enter the details manually:
- Find the SM-DP+ Address and activation code in your eSIM provider’s installation instructions. If you can’t find them, contact your provider.
- Open the Settings app on your iPhone.
- Tap Cellular or Mobile Data.
- Tap Add Mobile Plan.
- Tap Enter Details Manually.
- Enter the SM-DP+ Address and activation code provided by your eSIM provider.
- Follow the on-screen instructions to download and install the eSIM.
- Once installed, you can choose how to label and use the new mobile plan, including which line you want to use for mobile data.
The exact options can vary depending on your iPhone model, iOS version and mobile provider. Apple currently lists Settings → Cellular or Mobile Data → Add Mobile Plan → Enter Details Manually for manually entering eSIM information.
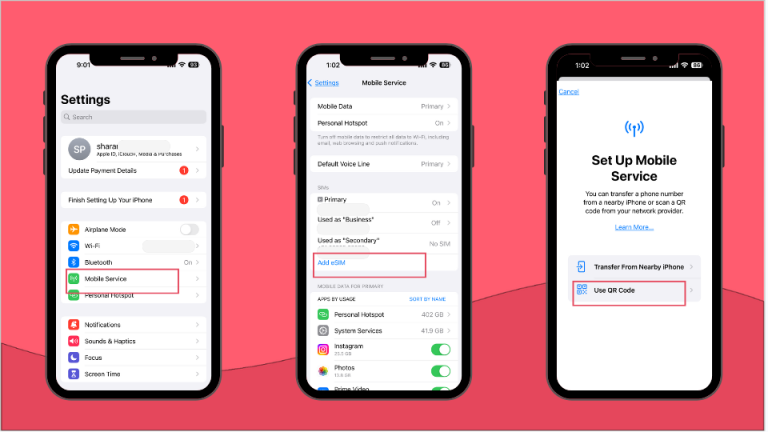
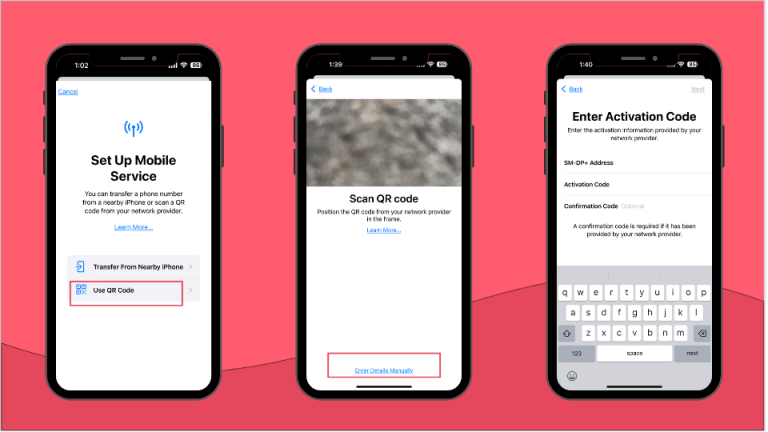
It’s important to note that installing and activating an eSIM on an iPhone may vary depending on the model and software version. But, essentially, the method is the same for all versions.
Setting up the SM-DP+ Address on Android
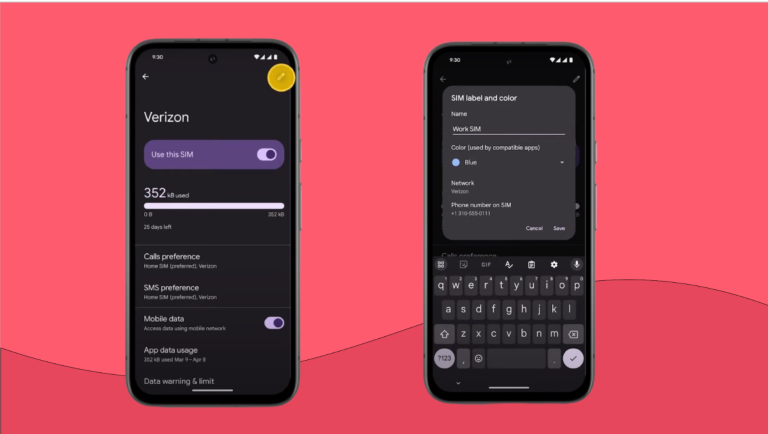
If your Android phone supports manual eSIM installation, you may be able to enter the SM-DP+ Address and activation code provided by your mobile provider or eSIM provider.
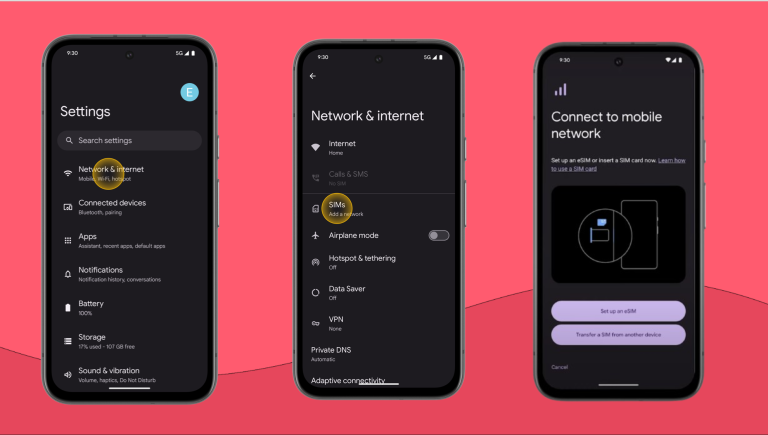
- Open the Settings app on your Android device.
- Tap on Connections, Network & Internet, or Mobile Network, or a similar option. The name varies by manufacturer.
- Look for Add eSIM, Add mobile plan, Set up an eSIM, or a + icon.
- Choose the option to enter eSIM details manually. On some devices, you may first need to select Scan QR code.
- Enter the SM-DP+ address and activation code provided by your carrier or eSIM provider.
- Tap Next or Continue to proceed with the installation.
- Your device will download and install the eSIM profile.
- Follow any additional on-screen instructions to complete the setup, such as naming the plan or setting it as the default line.
The exact installation steps vary between Android manufacturers, models, and software versions. If you’re using a Samsung phone, see our Samsung eSIM installation guide for more specific instructions.
If you run into problems during installation, contact your mobile provider or eSIM provider for help.
Is the SM-DP+ Address the same as the SIM number?
No, the SM-DP+ Address is not the same as the SIM number, even though both are important in setting up and managing mobile connections. Let’s break down the key differences.
| SM-DP+ Address | SIM number, or Integrated Circuit Card Identification (ICCID) | |
|---|---|---|
| What is it? | The address of the server used to securely deliver an eSIM profile. | A unique identifier associated with a SIM or eSIM subscription. |
| What it’s used for | Helps your device connect to the appropriate SM-DP+ server during eSIM installation. | Identifies the SIM/eSIM subscription. |
| Looks like | Usually a domain or server address, sometimes shown as part of an eSIM activation string. (e.g., LPA:1$smdp.example.com$123ABC456DEF). | A long numeric identifier. (e.g., 89148000005123456789). |
| Where to find it | Usually provided by your eSIM or mobile provider when manual installation is required. | Often available in your phone’s SIM/eSIM settings. |
| Can it change | Depends on the eSIM provider and profile. | Each SIM/eSIM profile has its own ICCID. |
| Security role | Ensures secure communication between the device and the back-end servers | Part of the authentication process for network access |
Here’s how you can find your SIM number or ICCID:
- For Android: Settings > About Phone/About Device > Status/SIM Card Status > Scroll down to find ICCID
- For iPhone: Settings > General > About > Scroll down to find ICCID

Wrapping up everything you need to know about SM-DP+ Address
The SM-DP+ Address is simply the server address used during certain eSIM installation processes. You usually won’t need to enter it yourself when you activate an eSIM using a QR code, app or automatic activation method.
However, if your provider asks you to install your eSIM manually, knowing where to find the SM-DP+ Address and activation code can help you complete the setup and troubleshoot installation issues.
If you’re looking for a simple way to stay connected while travelling overseas, Holafly offers travel eSIMs with unlimited data, 5G connectivity where available and 24/7 customer support. Holafly currently offers eSIMs covering 200+ destinations.
Holafly eSIMs also include 1 GB of Always On backup data every 30 days, at no extra cost. It can help you stay connected during situations such as a long layover or after your main plan has ended. Always On is available in 150+ destinations, subject to the applicable coverage and usage conditions.
So, whether you’re heading overseas from Australia for a holiday or need a reliable connection while travelling between countries, you can install your eSIM before your trip and stay connected without relying on expensive international roaming.

Connect to the fastest networks
International eSIMs, local networks. Enjoy the best of both worlds with Holafly.
Plans that may interest you


Formerly a travel journalist turned marketing copywriter, I found my way back to the travel world with Holafly—my dream company that made remote work possible. My motto? “Dream big and make it happen.” I’m passionate about writing, exploring the world, and staying active through walking, running, swimming, and hiking. I also love learning, reflecting, and connecting with inspiring minds.


