

 Language
Telstra eSIM not working? Reasons and how to fix it
Telstra eSIM not working? See the key causes and simple fixes to get it connecting again.
A Telstra eSIM can stop connecting because of an activation issue, device settings, network problems or an issue with international roaming when you’re overseas.
Luckily, most of these failures come from small setup errors, and they’re usually quick to resolve once you know where to look.
That said, if none of the fixes discussed in this guide restore your connection, consider switching to a different provider, such as Holafly. We offer easy installation through a QR code or the app, unlimited data in many destinations, and round-the-clock support.

Connect to the fastest networks
International eSIMs, local networks. Enjoy the best of both worlds with Holafly.
Why is my Telstra eSIM not working?
A Telstra eSIM can fail to connect for many reasons.
Below are the most common ones:
- Your phone doesn’t support eSIM or is still carrier-locked.
- Your eSIM hasn’t finished activating or the eSIM profile needs to be restored.
- Your mobile data or data roaming is turned off.
- Your phone isn’t connecting to an available mobile network.
- Your APN (Access Point Name) settings aren’t configured correctly.
- You’re overseas and international roaming isn’t enabled or available for your service.
- There’s a temporary network outage or coverage issue.
If you’re overseas, remember that international roaming availability depends on your plan, destination, and other factors. Telstra also recommends checking that data roaming is enabled on your device.
How to fix a Telstra eSIM
The following troubleshooting steps can help if your Telstra eSIM won’t activate or connect, whether you’re using a Telstra eSIM in Australia or Telstra tourist eSIM when travelling overseas.
1. Reinstall the My Telstra app
If you can’t see the option to transfer or restore your eSIM, Telstra recommends refreshing the My Telstra app. You can also update it or remove and reinstall it.
- Delete the My Telstra app from your phone.
- Restart your phone.
- Download the latest version from the App Store or Google Play.
- Open the app and go to the Services tab.
- Select your mobile service
- Choose Set up or manage eSIM.
- Select Transfer or restore eSIM and follow the prompts.
Important:
- Only the owner of the Telstra account can access the transfer or restore eSIM option. If you’re a Full Authority contact, you may need to visit a Telstra store with your device and photo ID.
- If you receive an error when transferring or restoring your eSIM, and if this happens more than four times within 24 hours, you should call 13 22 00 or visit a Telstra store.
2. Make sure you have an internet connection
You’ll need an internet connection when setting up or restoring your eSIM. Telstra recommends connecting to Wi-Fi before downloading your eSIM profile or restoring your service.
- iPhone: Go to Settings > WiFi and connect to a reliable network (avoid hotspots and public WiFi networks).
- Android: Go to Settings > Network & Internet > Internet and connect to a Wi-Fi network. Menu names may vary depending on your device.
3. Wait for the eSIM to activate
If you’ve restored an eSIM profile, activation can take up to four hours in some cases.
If you’ve completed the setup correctly but still can’t connect, give the service some time before trying additional troubleshooting steps.
4. Restart your phone after eSIM installation
Restarting your phone can help it reconnect to the Telstra network after an eSIM installation or restoration.
- Turn your phone off (iPhone: Press and hold the side button + volume button; Android: Press and hold the power button).
- Wait at least 10 seconds.
- Turn it back.
- Give the phone a few minutes to reconnect to the mobile network.
5. Turn off Airplane Mode
Make sure Airplane Mode is turned off. When it’s enabled, your phone can’t connect to mobile networks.
You can also turn Aeroplane Mode on for around 15–30 seconds, then turn it off again to refresh the connection. Telstra specifically recommends switching Aeroplane Mode on and off when an eSIM isn’t connecting.
6. Check network settings
Make sure your Telstra eSIM is turned on
Check that the Telstra eSIM is enabled and selected for mobile data.
iPhone:
- Go to Settings > Mobile Data.
- Select your Telstra plan under your SIMs.
- Make sure the line is turned on.
Android:
- Go to Settings > Network & Internet or Connections.
- Open SIMs or SIM manager.
- Select your Telstra eSIM.
- Make sure it’s enabled.
7. Check for software updates
Make sure your phone is running the latest available software. An outdated operating system can sometimes cause connectivity or eSIM-related issues.
- iPhone: Settings > General > Software Update.
- Android: Settings > Software update.
8. Check that your phone supports eSIMs
Your phone must support eSIM technology to use a Telstra eSIM.
Telstra currently lists compatible devices including:
- Apple: iPhone XR, XS and newer supported models, plus iPhone SE (2020 and 2022).
- Samsung: selected Galaxy S and Z series models, with additional supported models depending on the device.
- Google: Pixel 3a and newer supported models.
- Selected models from Nokia, OPPO and Motorola.
Telstra notes that some devices purchased overseas may not be eSIM compatible in Australia. You can also check whether your phone has an EID by dialling *#06#.
For more information, see our eSIM-compatible devices list.
- eSIM-compatible devices list to confirm whether yours is included.
9. Check whether your phone is unlocked
If you’re using a phone purchased from another mobile provider, make sure it isn’t carrier-locked.
iPhone:
- Go to Settings > General > About.
- Find Carrier Lock.
- Check that it says No SIM restrictions.
For Android phones, the process varies by manufacturer. Check your device settings or contact the original carrier if you’re unsure whether the phone is unlocked.
10. Turn on data roaming when you’re overseas
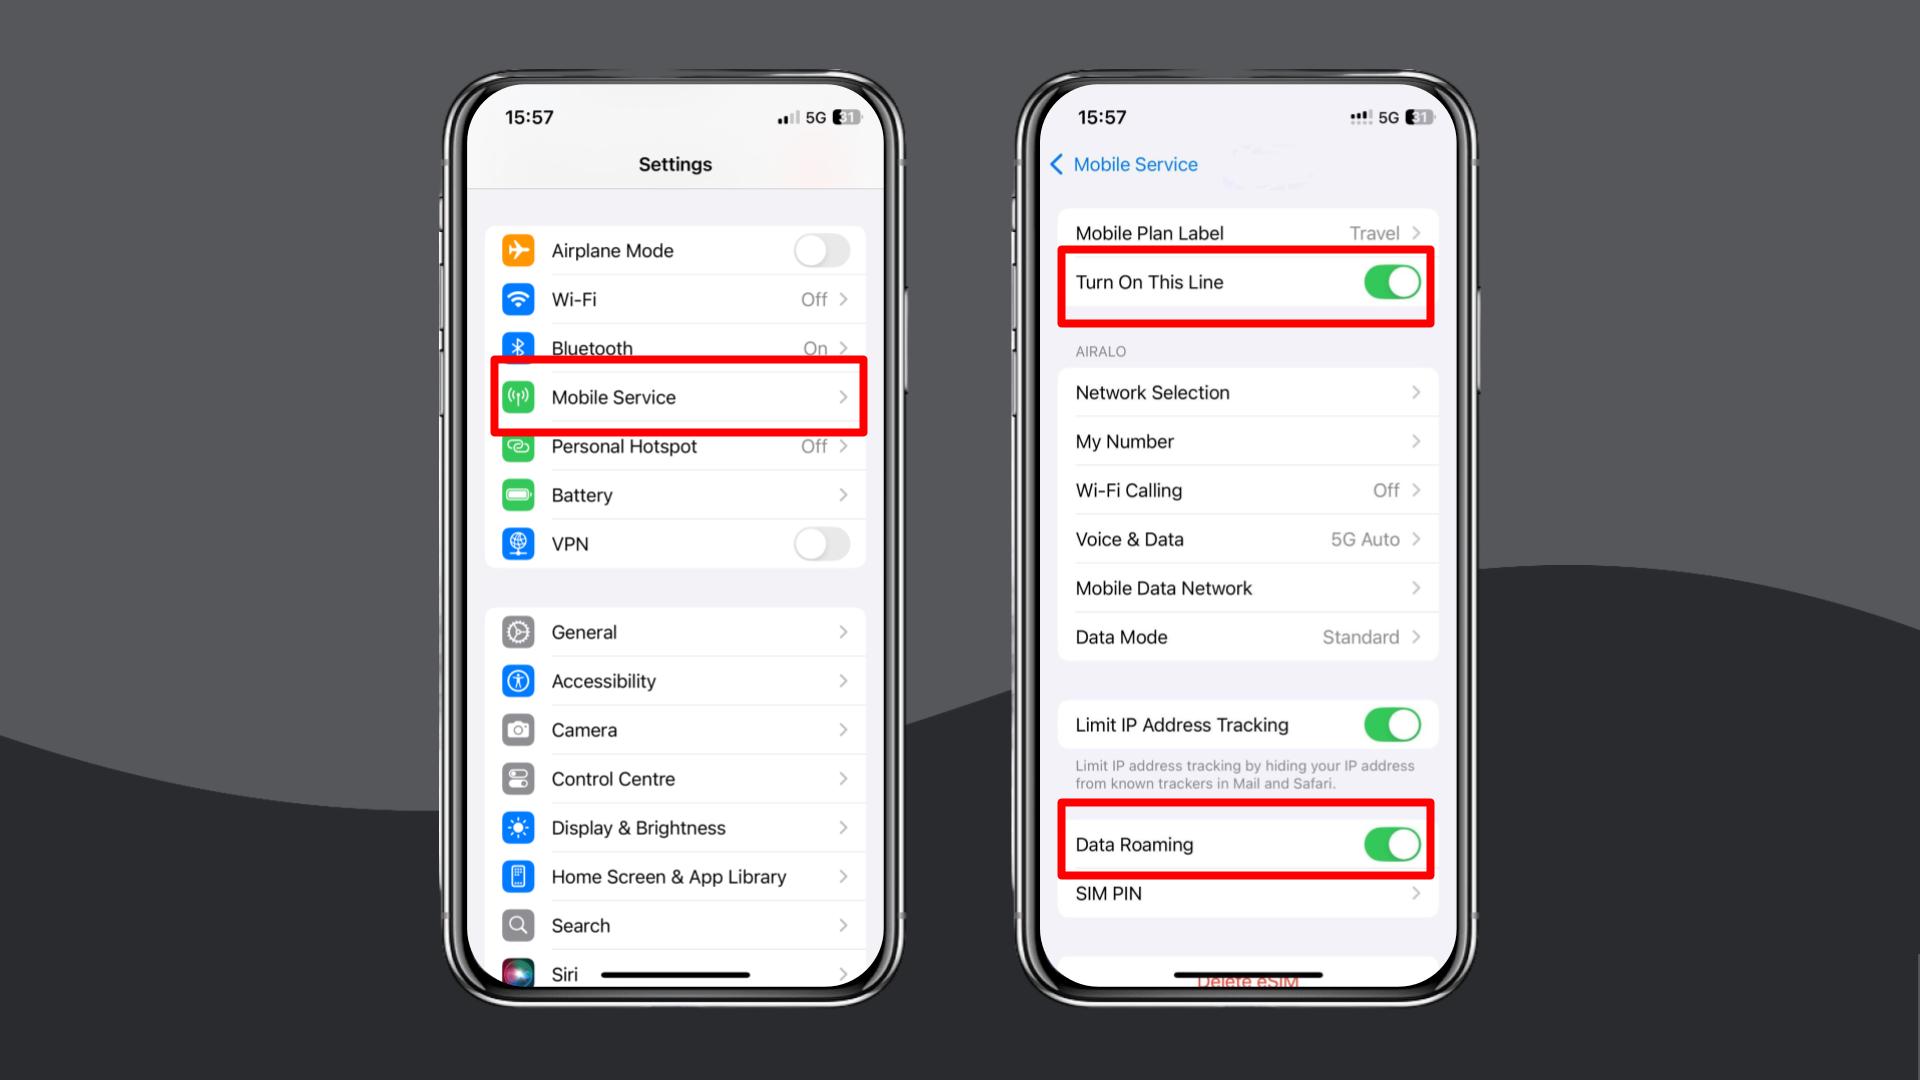
If you’re using your Telstra eSIM outside Australia, make sure data roaming is enabled on your phone.
Telstra also requires international roaming to be available for your service. Depending on your plan, you may need to enable or manage international roaming through My Telstra.
iPhone:
Settings > Mobile Service > your Telstra plan > Data Roaming > On
Android:
Settings > Network & Internet/Connections > Mobile Network > Roaming > On
It can take some time for your phone to connect to an overseas network. If you’re using an International Roaming Day Pass, activation can take up to two hours.
11. Check your APN settings
Your APN (Access Point Name) tells your phone how to connect to mobile data.
Telstra generally configures the APN automatically, so you shouldn’t need to change it unless mobile data isn’t working and you’ve already completed the other troubleshooting steps.
For Telstra Internet on compatible mobile phones, Telstra’s current device guides use:
| Setting | Value |
|---|---|
| Name | Telstra Internet |
| APN | telstra.wap |
| MCC | 505 |
| MNC | 01 |
| Authentication type | None |
| APN type | default |
Telstra also lists telstra.internet for Telstra Broadband services, so don’t use that APN unless it applies to your specific service.
Android:
Go to Settings > Mobile Network > Access Point Names and check the Telstra APN.
iPhone:
APN settings may be automatically configured by the carrier and may not be editable on every device or plan.
If you’re unsure about your APN settings, contact Telstra before making manual changes.
12. Manually select a local network in settings
If your Telstra eSIM doesn’t automatically connect to a network overseas, try selecting an available network manually.
- iPhone: Go to Settings > Mobile Service > Network Selection, turn off Automatic, then select an available network.
- Android: Go to Settings > Connections > Mobile Networks > Network Operators, turn off Select automatically, then choose an available network.
Note: Available networks and menu names vary by device and destination. If manual selection doesn’t work, switch back to Automatic network selection.
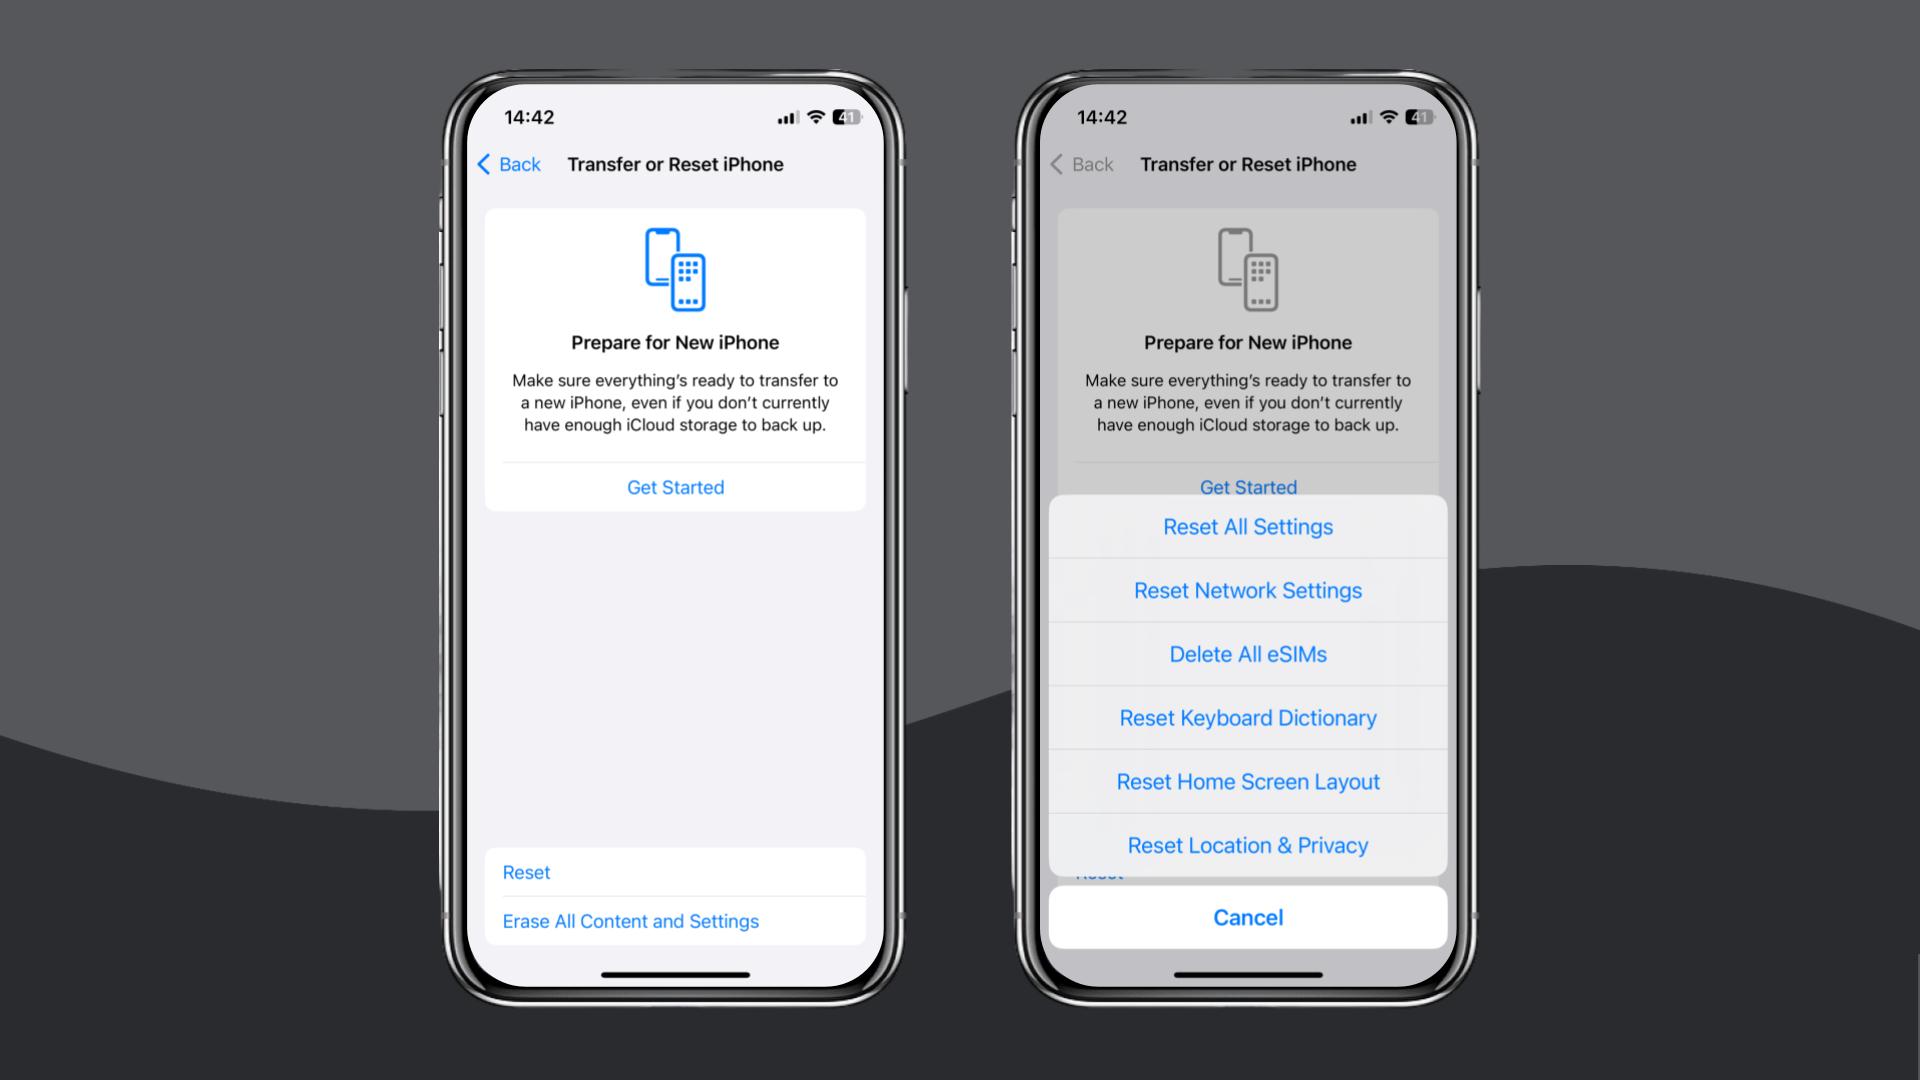
13. Reset your network settings
If the steps above haven’t worked, resetting your network settings can clear connectivity problems caused by incorrect or conflicting network configurations.
iPhone:
Settings > General > Transfer or Reset iPhone > Reset > Reset Network Settings
Android:
The menu varies by manufacturer, but it’s usually under:
Settings > General Management/System > Reset > Reset Network Settings
Keep in mind that resetting network settings can remove saved Wi-Fi networks, passwords and other network configurations. You’ll need to reconnect to your networks afterwards.
If you’ve tried all the steps mentioned and your eSIM still doesn’t work, don’t hesitate to reach out to Telstra support via live chat or email. They’re there to help you out, whether it’s with further assistance or even sorting out a possible refund.
Alternatively, consider switching to a different eSIM provider, such as Holafly (available on iOS and Android).
Choose Holafly for peace of mind
If you’re travelling overseas and want an alternative to using your Australian mobile service for data, a Holafly eSIM can provide a separate mobile data connection.
Holafly eSIMs can be installed through the app or with a QR code, depending on the device and product.
For longer trips, Holafly Plans currently offers two main options:
- Unlimited Plan: Unlimited data with global coverage and unlimited hotspot.
- Light Plan: 25 GB of data with global coverage and hotspot sharing.
Both plans currently include Always On, which provides 1 GB of backup data every 30 days at no extra cost, subject to the applicable coverage and terms.
If your Telstra eSIM still isn’t working after completing all the steps above, switching to a Holafly eSIM (see Holafly eSIM Store) offers a simple way to avoid further troubleshooting, whether you’re abroad or in Australia.
Setup takes only a minute using a QR code, and iPhone users can also install their eSIM directly through the Holafly app.
Our Holafly Plans service is perfect for those looking for a long-term solution, offering several options to match different needs.
Holafly also offers 24/7 customer support through chat and email. Stay connected overseas with a Holafly eSIM on your next trip.

24/7 support, no matter what
When you're traveling, every question can be an urgent one. That's why we work around the clock.
Disclaimer: The data in this article is accurate as of September 21, 2026 and is subject to change.
Plans that may interest you


Formerly a travel journalist turned marketing copywriter, I found my way back to the travel world with Holafly—my dream company that made remote work possible. My motto? “Dream big and make it happen.” I’m passionate about writing, exploring the world, and staying active through walking, running, swimming, and hiking. I also love learning, reflecting, and connecting with inspiring minds.